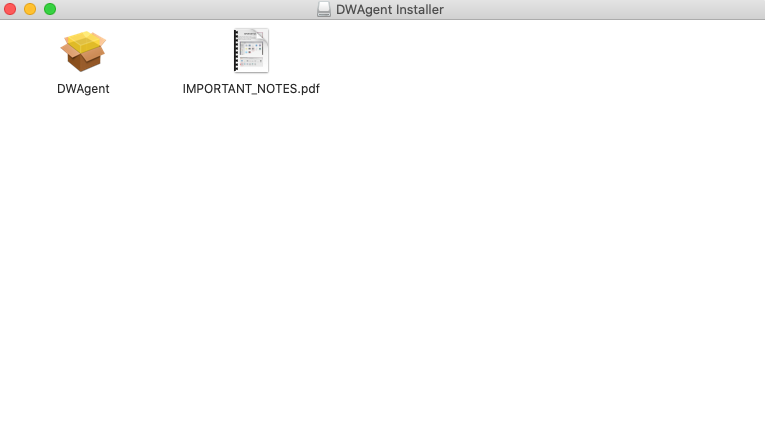
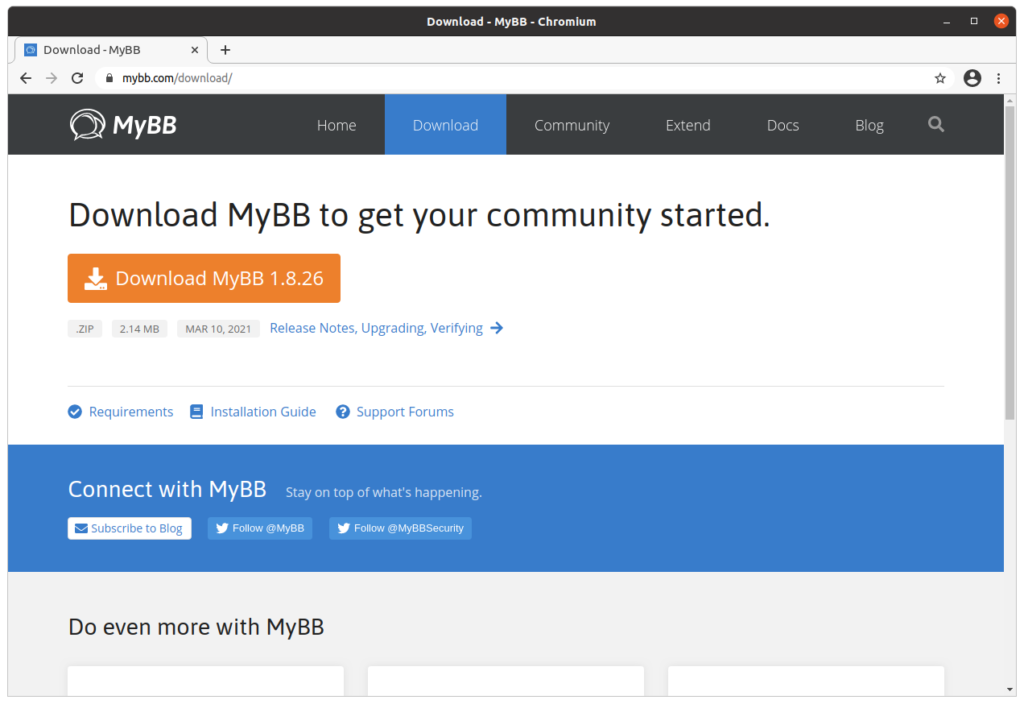
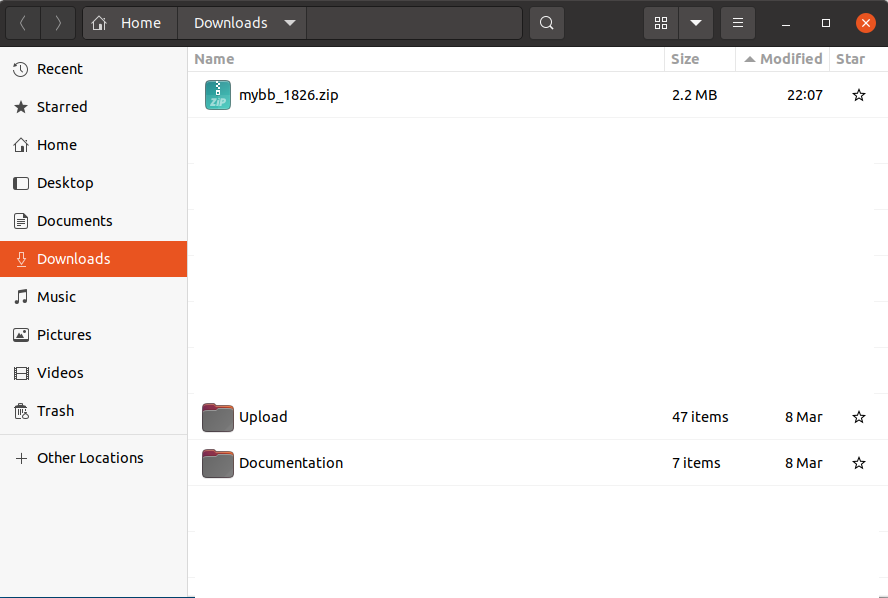
In this post, we use the server automation tools Ansible, Terraform, Docker, and Kubernetes to create and configure virtual machines (VMs) to host an on-premises Kubernetes cluster.
Understanding infrastructure
Infrastructure refers to computing resources used to store, transform, and exchange data. A new approach to software development called DevOps deploys applications across distributed systems consisting of multiple physical and virtual machines.
Understanding DevOps
DevOps is an approach to software development and system administration that views system administration as a task to be automated, so that software developers are not dependent on the services of a system administrator when they deploy software to server infrastructure.
DevOps tools automate the creation and deployment of servers to create a distributed software infrastructure on which software can be deployed and run on multiple computers whether physical or virtual.
Understanding the difference between cloud and on-premises (“onprem”) virtualization servers
The term “cloud” refers to computing services that are offsite, outsourced, and virtualized. These cloud services are provided by companies including Amazon AWS, Google GCP, Microsoft Azure, and Digital Ocean.
The term “On-premises” (“onprem”) refers to computing services that are onsite, in-house, and virtualized. Onprem virtualization servers can provide the same software environment as cloud providers. Onprem server infrastructure can be used to develop and test new software before it is deployed to a public cloud.
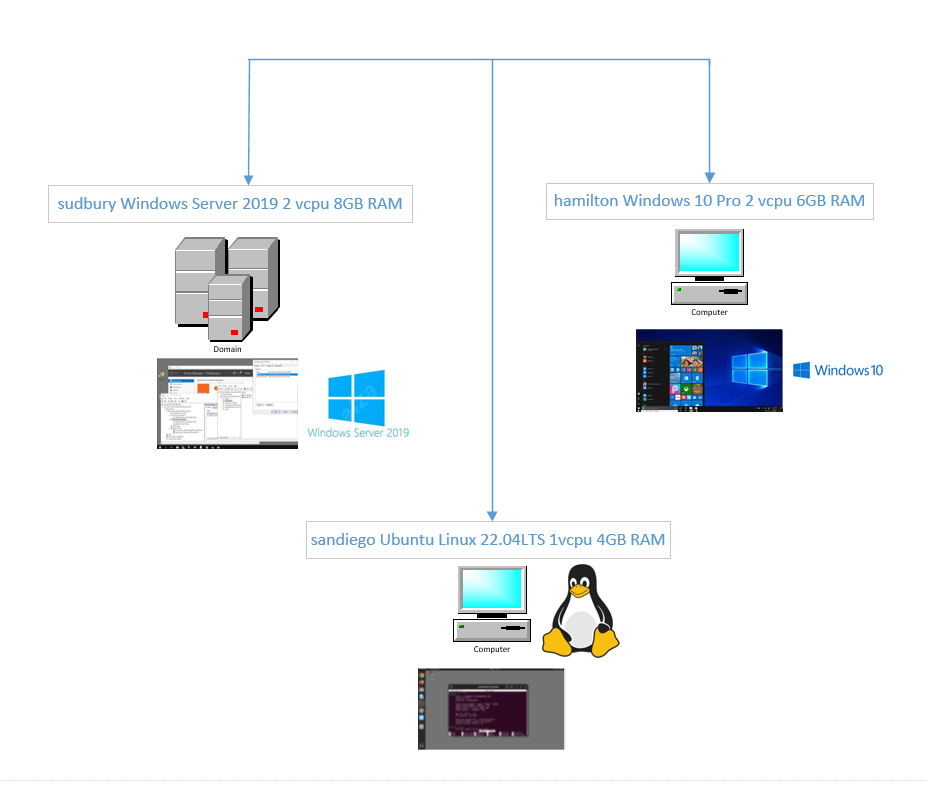
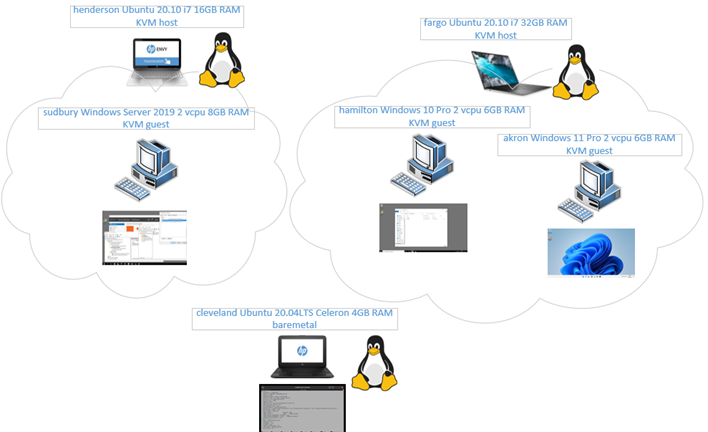
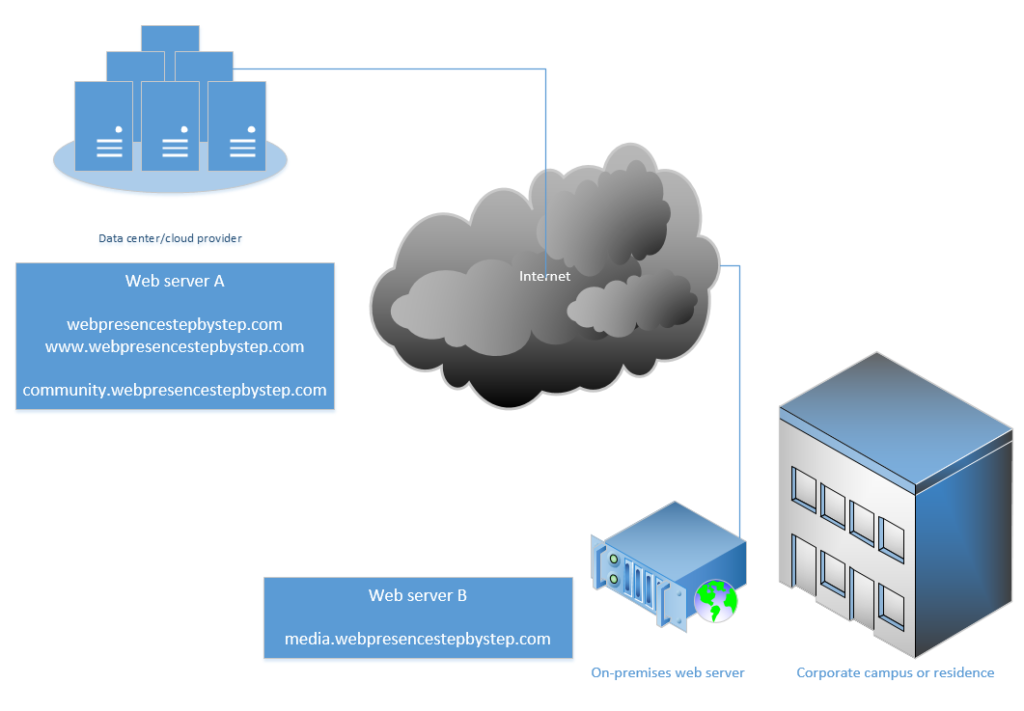
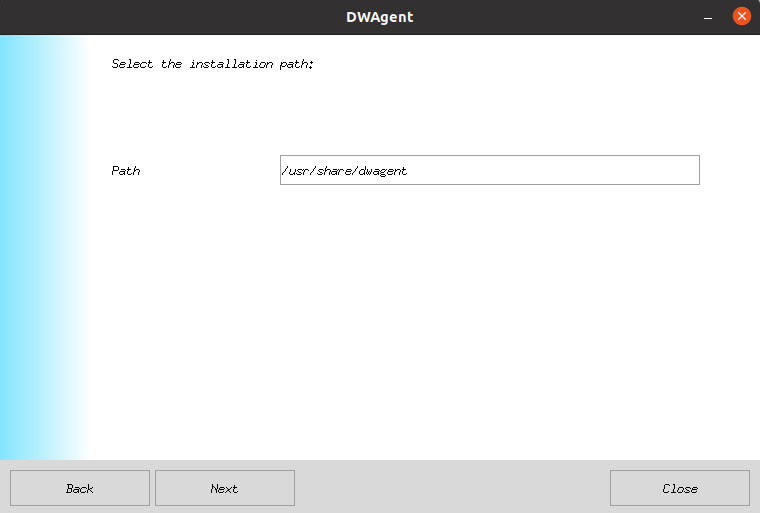
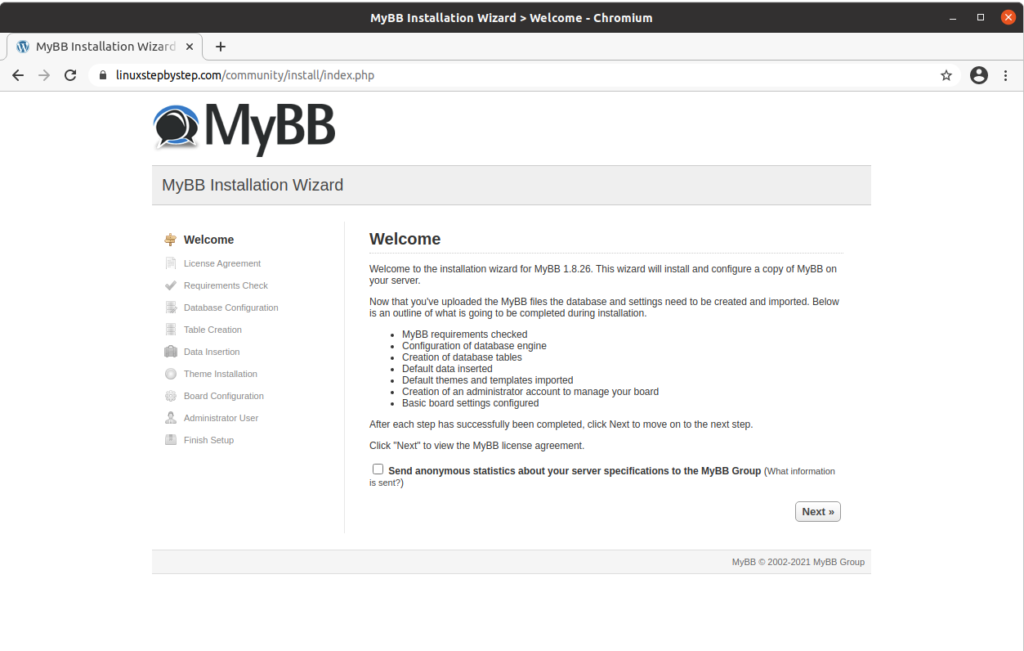
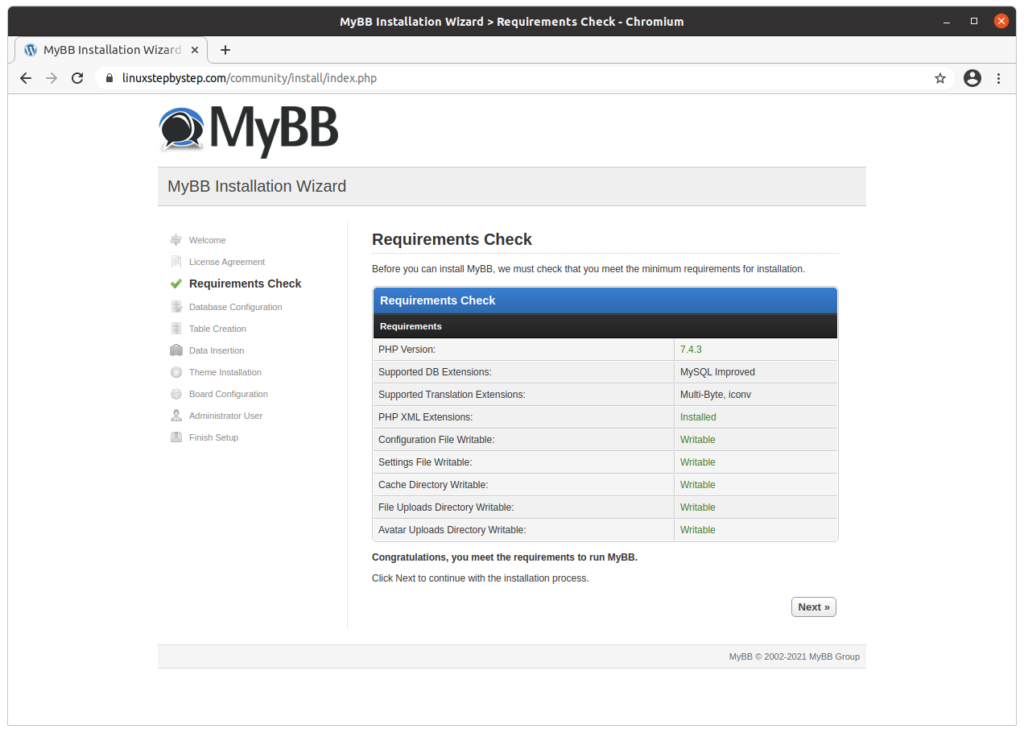
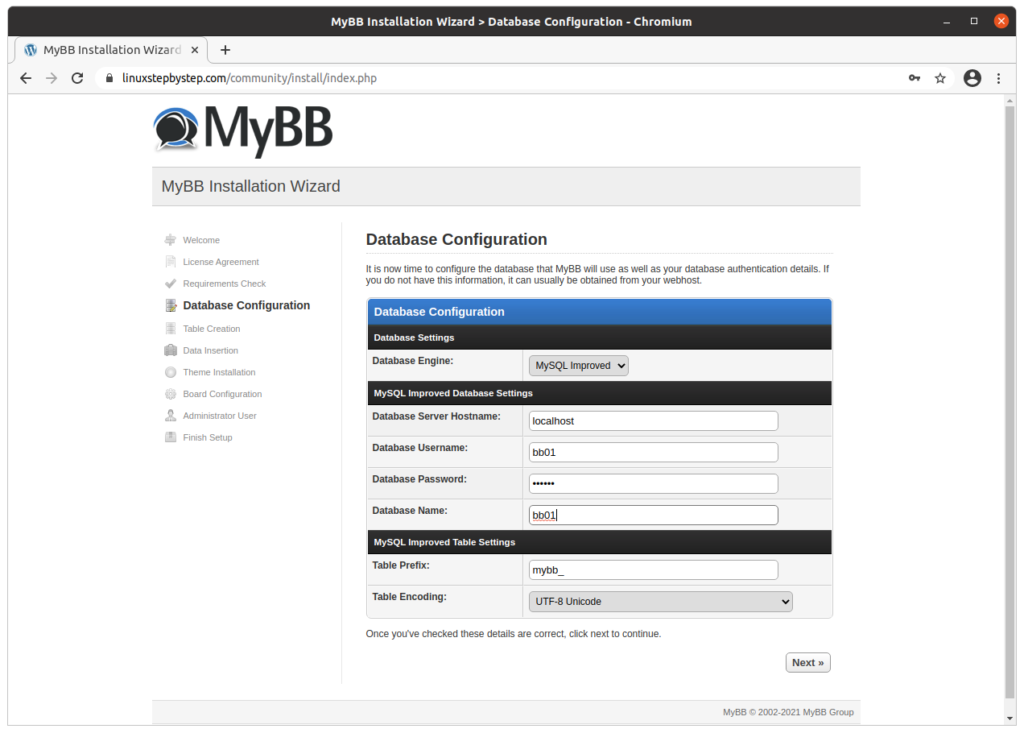
Overview of the system to be constructed
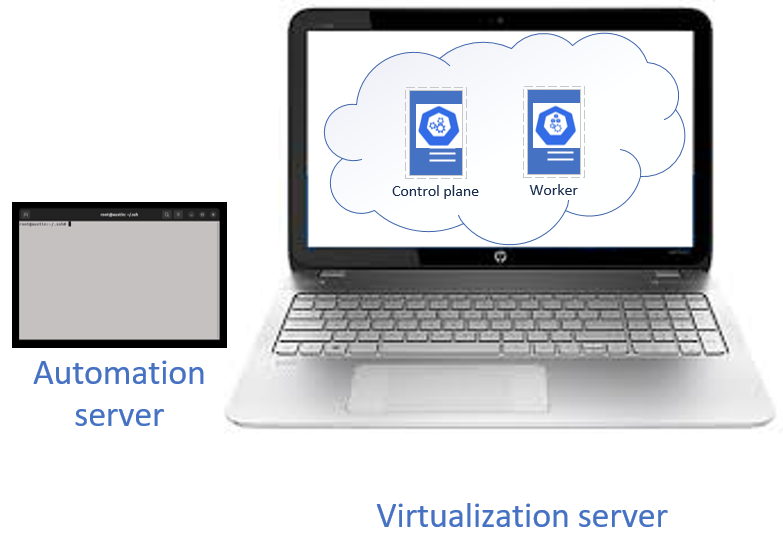
Understanding the virtualization server
Virtual machines require a physical machine containing processors, memory, and storage. For this exercise, we will reformat a circa 2015 laptop (i7-4712HQ, 16GB RAM, 1TB SSD) with Ubuntu Linux 22.04 LTS as an on-premises virtualization host.
Understanding KVM virtualization
KVM creates a hypervisor virtualization host on a Linux server. A KVM hypervisor can host multiple virtual machine (VM) guests.
Understanding Terraform
Terraform can run scripts that automate the creation of virtual machines, on public clouds such as Amazon AWS, Google GCP, and Digital Ocean, as well as on on-premises (“onprem”) virtualization hosts including KVM.
Understanding the libvirt provider software
The libvirt provider software enables Terraform to automate the creation of virtual machines on KVM hypervisor hosts.
Understanding Ansible
Ansible can run scripts that automate server administration tasks. In this exercise, multiple Ansible scripts will be executed to use Terraform to create virtual machine (VM) servers, on which software will be deployed and configured, creating a Kubernetes cluster.
Understanding virtual machine (VM) guests
A virtual machine (VM) guest is a server that emulates hardware as a software image, using a subset of the hypervisor host’s processor cores, memory, and storage to create a distinct computer environment, with its own software libraries, network address, and password or key entry system.
Understanding Docker software containers
Docker containers are software containers created by the docker-compose command. A Docker container has its own software libraries, network address, and password or key entry system, but comparisons between Docker containers and virtual machines (VMs) are discouraged.
Understanding Kubernetes
Kubernetes is software that allows you to create a high-availability cluster consisting of a control plane server and one or more worker servers. Kubernetes allows for software to be deployed as containers stored in pods, running on clusters, running on nodes.
Containers
Software is organized within Docker containers. A Docker container is a self-contained computing environment with its own libraries, IP address, and SSH password or key.
Pods
Pods are a unit of computing that contain one or more containers. Pods execute on clusters, which are intermediate interfaces that distribute computing tasks across control plane and worker nodes, running on virtual machine servers.
Clusters
A cluster is an addressable interface that allows for the execution of Kubernetes Pods across a distributed system of control plane and worker nodes.
Nodes
In Kubernetes, a node is the physical or virtual machine that hosts the control plane role or worker role in a distributed Kubernetes cluster. In this exercise the nodes will be hosted on KVM virtual machines (VMs).
Understanding the automation server
The automation server is a Linux server separate from the virtualization server. The automation server can be a physical or virtual machine.
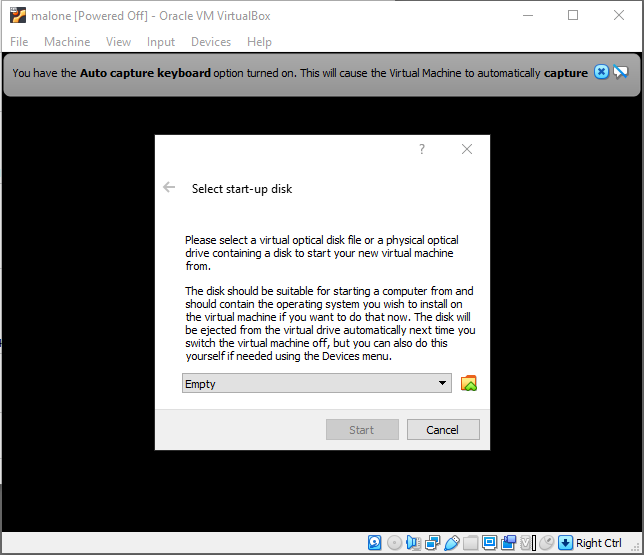
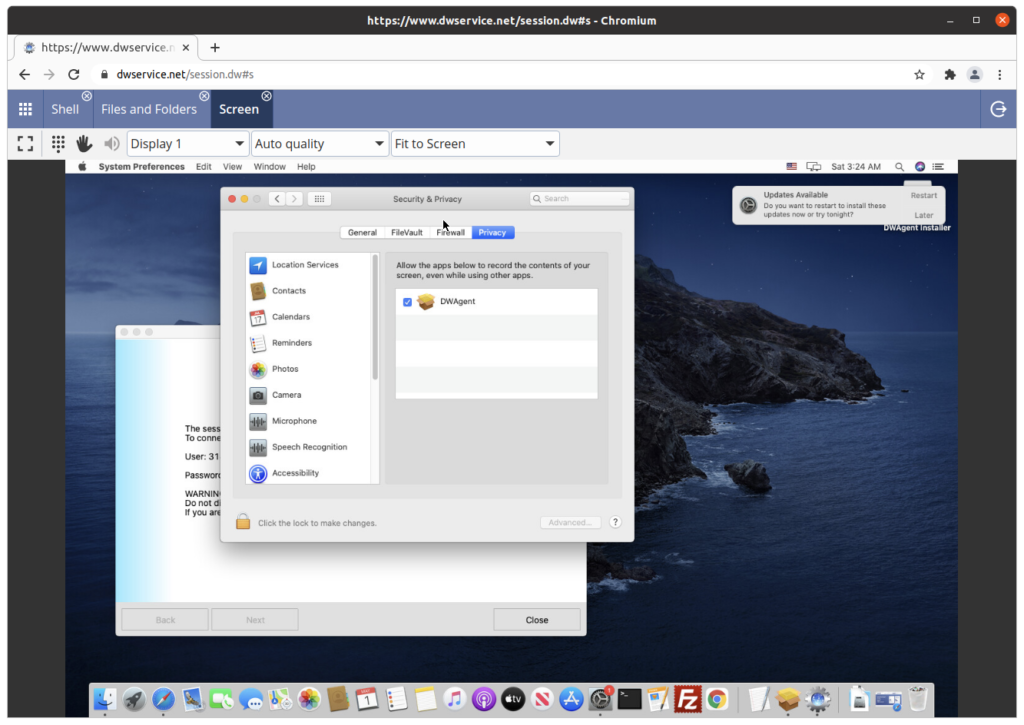
Tip: avoid running operations like this from your baremetal desktop. These operations involve hosts files and SSH keys for server access, and should be isolated if possible. Consider creating a virtual machine for this role using a hypervisor such as KVM on Linux, VirtualBox on Windows, or Parallels on MacOS. Use Ubuntu Linux 22.04 LTS.
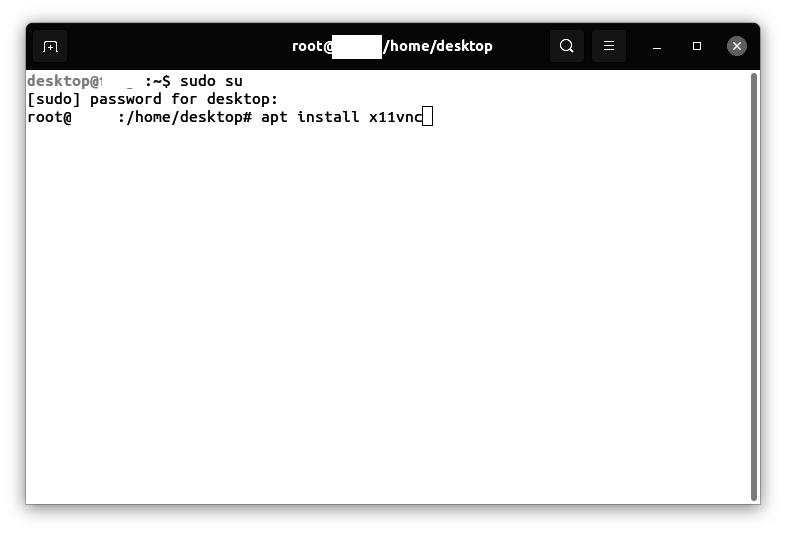
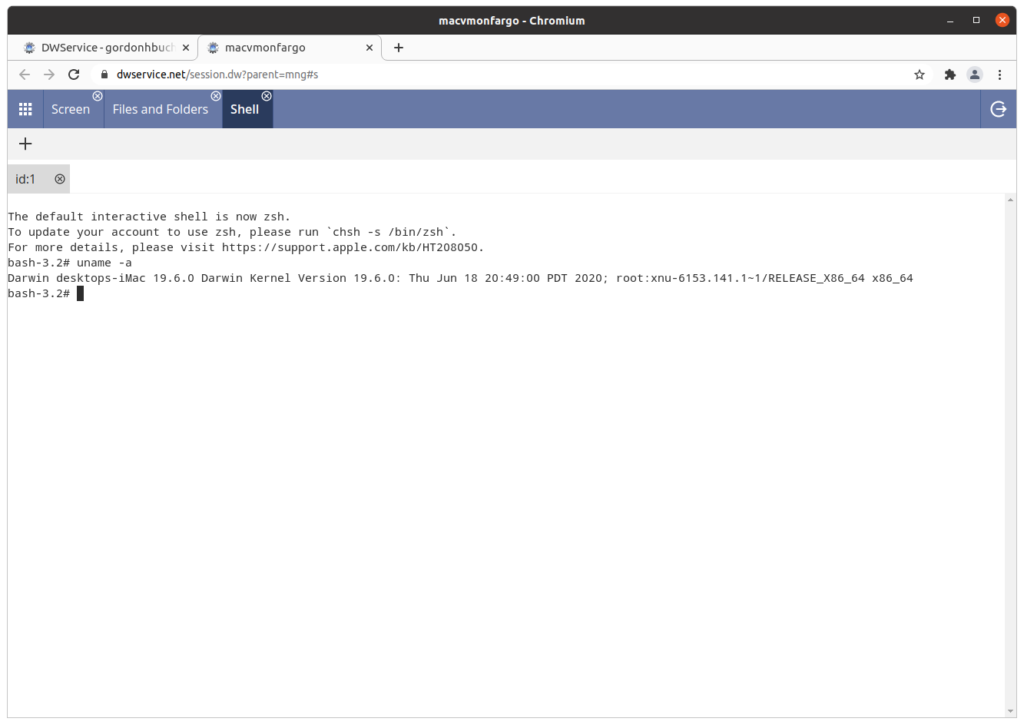
Entering commands as root
This procedure assumes that you are entering commands as root. Escalate to the root user:
sudo su
Preparing the virtualization server 1/3
The virtualization server should be a minimal build: do a fresh format of Ubuntu Linux 22.04 LTS.
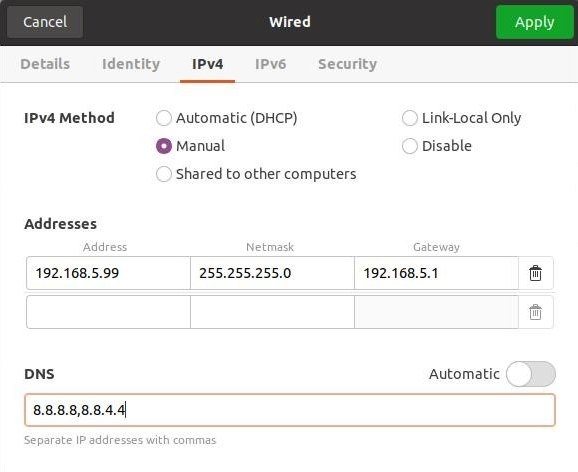
Using a wired network connection
If possible, use a wired Ethernet connection for the network connection on the hypervisor. This simplifies advanced operations like iptables forwarding and makes possible the later use of macvtap adapters for connecting in the hypervisor host networking space.
Setting a static IP address
Set a static IP address for the network connection of the virtualization server. Reboot.
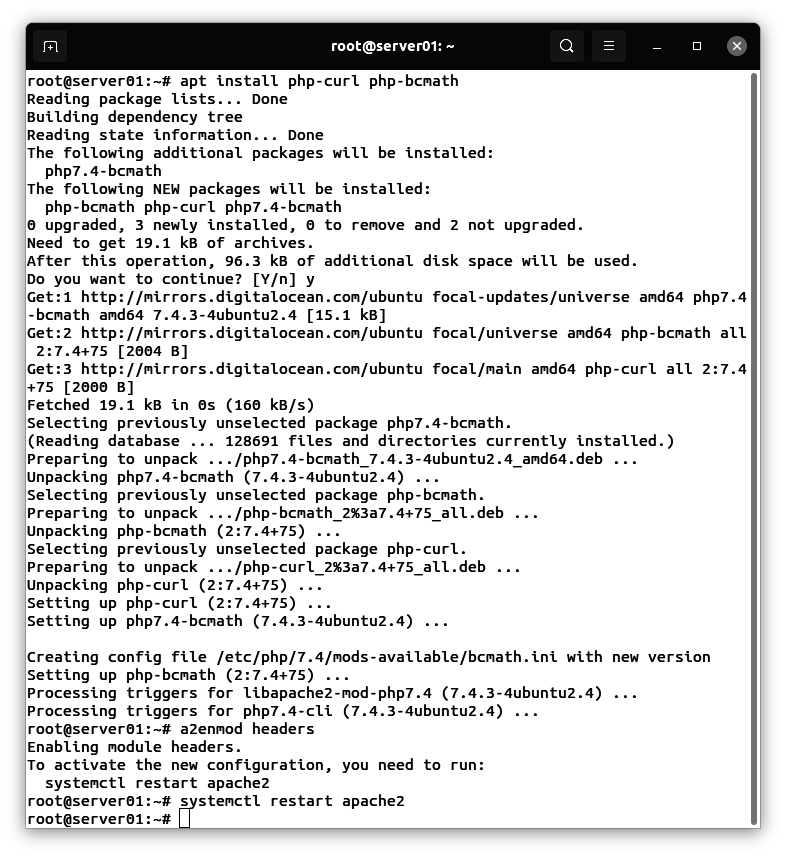
Installing software on the virtualization server
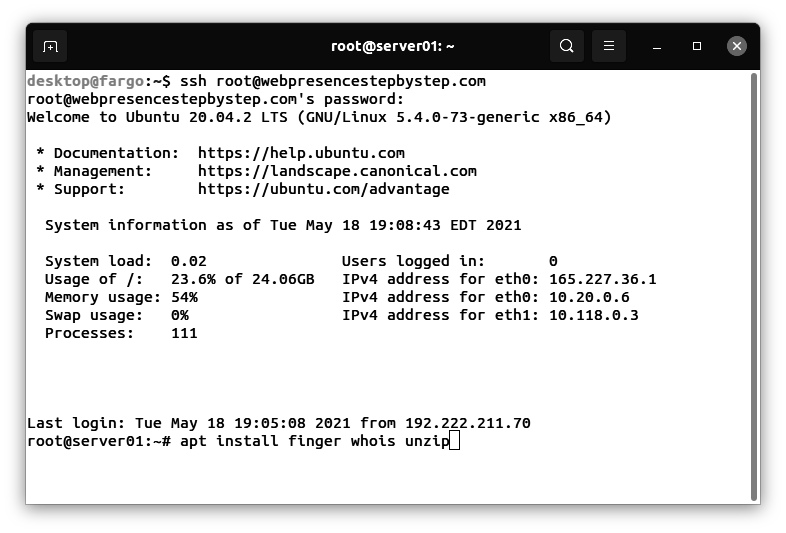
From a root shell on the virtualization server, enter the following command:
apt install ifconfig net-tools iptraf-ng openssh-server
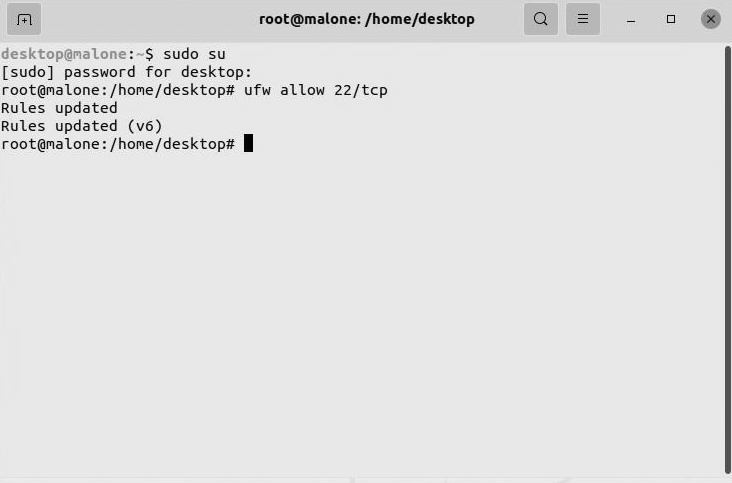
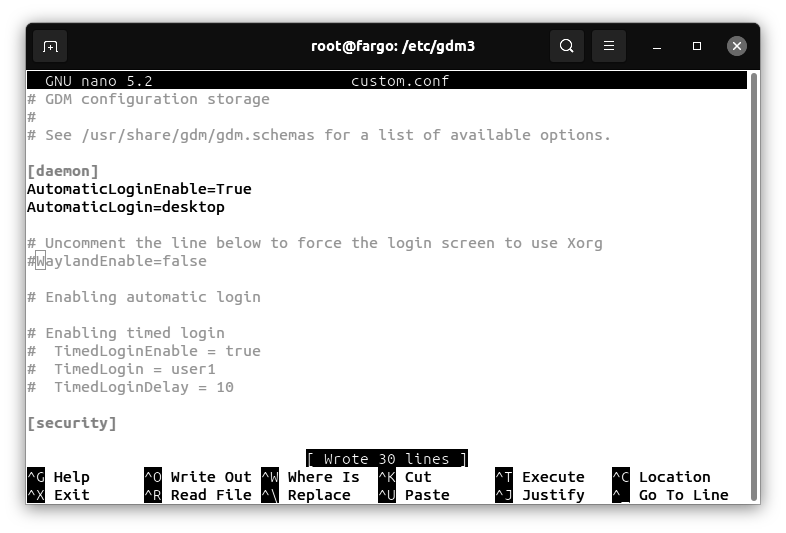
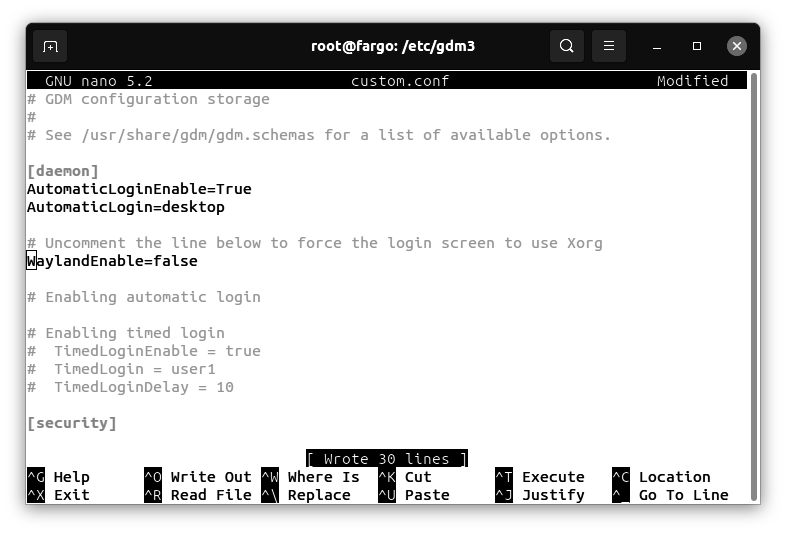
Configuring the SSH server on the virtualization server
From a root shell on the virtualization server, enter the following commands:
cd /etc/ssh
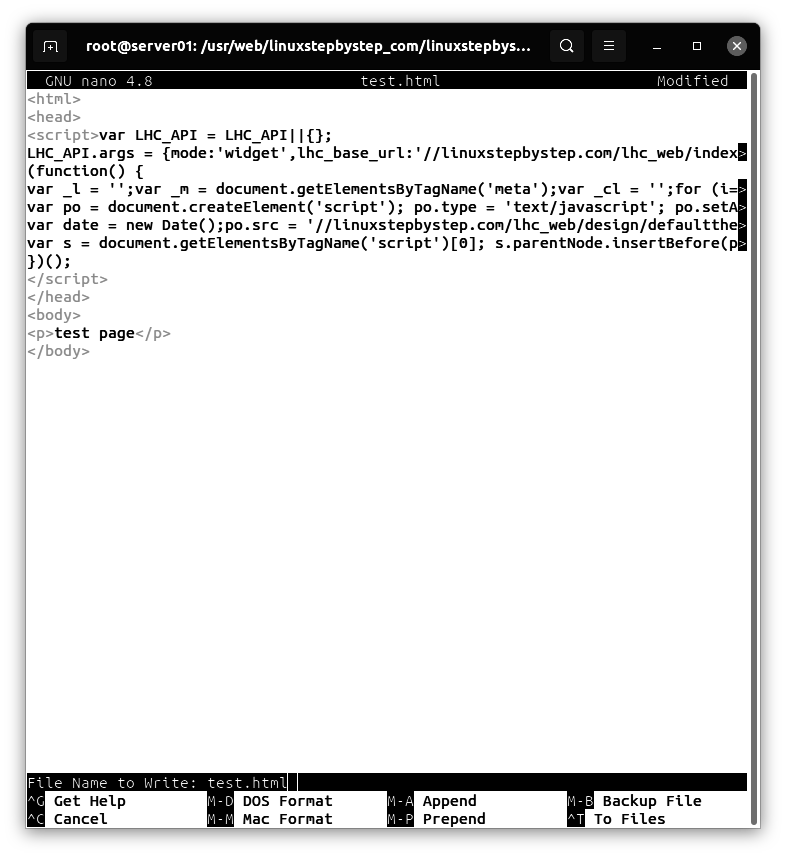
Use the nano editor to create the following text file:
nano sshd_config
uncomment and replace the following line:
PermitRootLogin yes
Creating a root password
sudo su
passwd
Preparing the automation server 1/2
Configure a virtual machine on a different physical machine than the virtualization server. Use Ubuntu Linux 22.04 LTS.
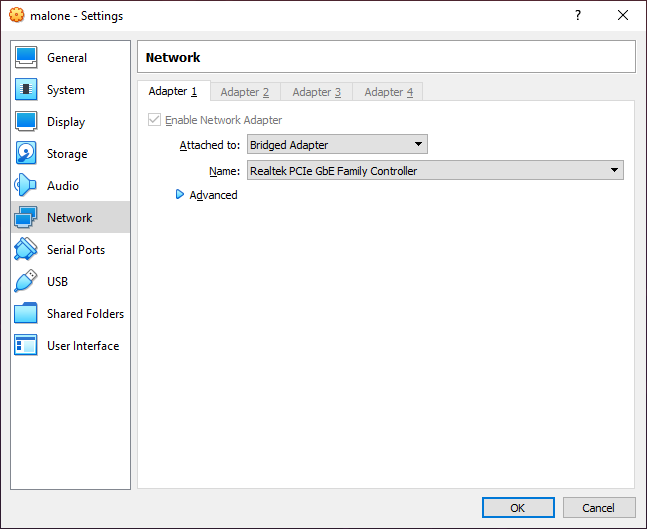
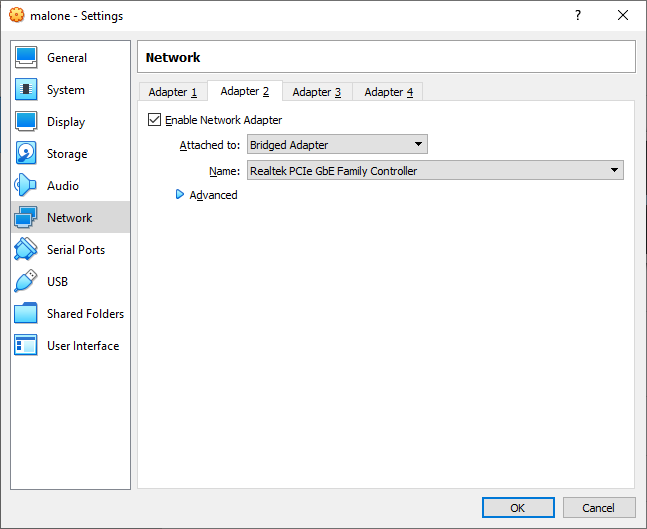
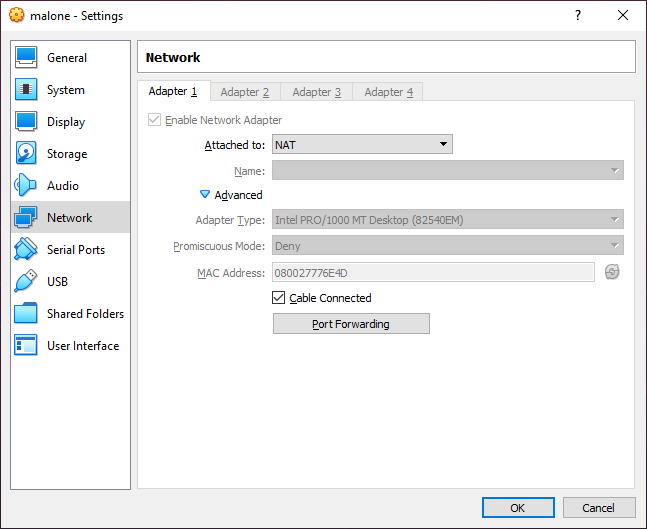
Adding a macvtap or bridge mode network adapter
For KVM, add a macvtap network adapter to the automation server. For VirtualBox or Parallels, add a bridge mode network adapter. This will allow the automation server to access internal subnets on the virtualization server via an ip route command.
Installing software and downloading Ansible scripts on the automation server
From a root shell on the automation server, enter the following commands:
apt install ansible git openssh-server net-tools iptraf-ng
cd /root
mkdir tmpops
cd tmpops
git clone https://github.com/kubealex/libvirt-k8s-provisioner.git
Creating the Ansible hosts file
cd /etc
mkdir ansible
cd ansible
Use the nano editor to create the following text file (use the IP address of the virtualization server in your setup):
nano hosts
contents:
[vm_host]
192.168.56.60
Creating an SSH key pair
From a root shell on the automation server, enter the following command:
ssh-keygen -f /root/.ssh/id_rsa -q -N ""
When prompted for a passphrase, press Enter and provide a blank value.
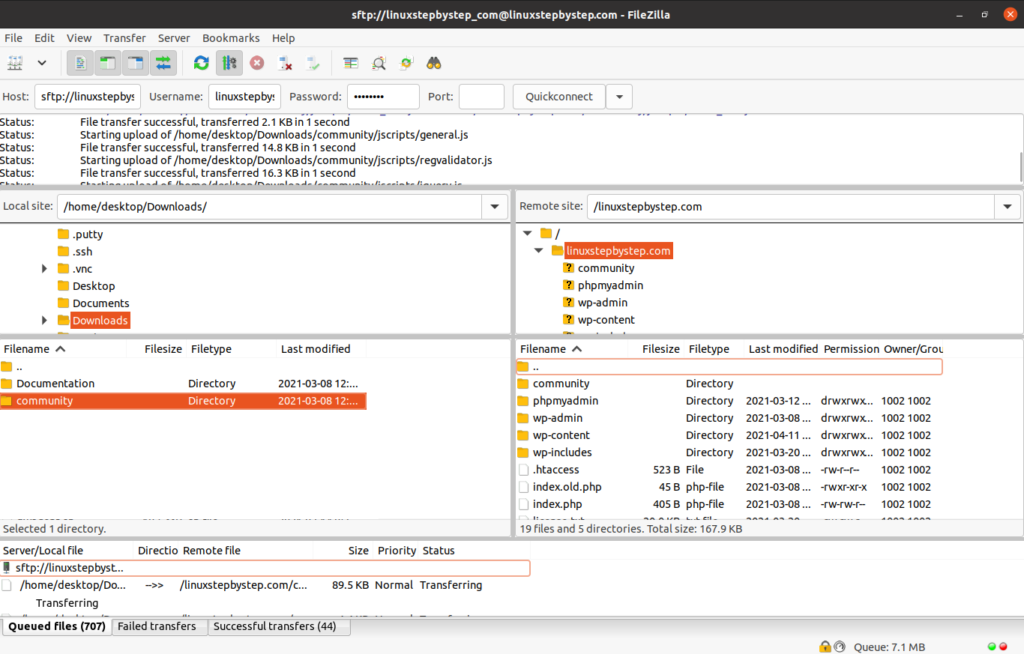
Copying the SSH public key to the virtualization server
From a root shell on the automation server, enter the following commands (substitute the IP address of the virtualization server in your setup):
cd /root/.ssh
rsync -e ssh -raz id_rsa.pub root@192.168.56.60:/root/.ssh/authorized_keys
Preparing the virtualization server 2/3
Verifying the automation server’s public key on the virtualization server
From a root shell on the virtualization server, enter the following commands:
cd /root/.ssh
ls -la
Verify that the file authorized_keys is listed:
root@henderson:/home/desktop# cd /root/.ssh
root@henderson:~/.ssh# ls -la
total 20
drwx------ 2 root root 4096 Jul 29 05:51 .
drwx------ 11 root root 4096 Jul 29 06:25 ..
-rw-r--r-- 1 root root 565 Jul 28 08:18 authorized_keys
-rw------- 1 root root 978 Jul 29 05:50 known_hosts
-rw-r--r-- 1 root root 142 Jul 29 05:50 known_hosts.old
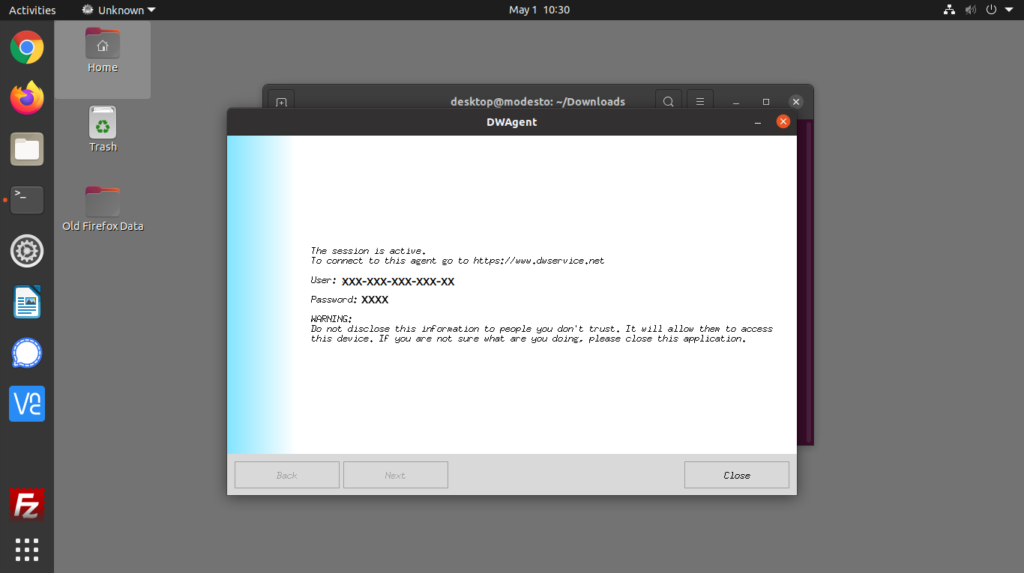
Testing that the automation server can connect to the virtualization server using a public SSH key
From the automation server, enter the folowing command (substitute the IP address of your virtualization server):
ssh root@192.168.56.60
Note: If you are able to login without supplying a password, you have succeeded.
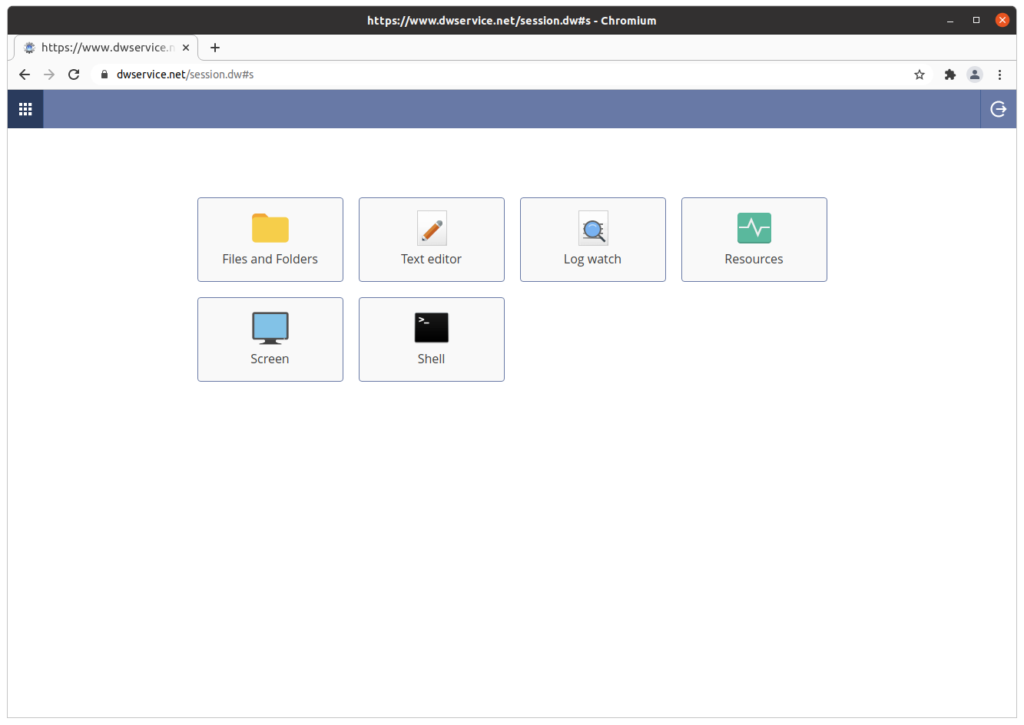
Using Ansible to automate operations
Ansible can run scripts called playbooks to perform automated server administration tasks. Ansible playbook scripts will use Terraform to create and configure virtual machines (VMs) on which a Kubernetes cluster will be installed.
A note about the libvirt-k8s-provisioner project
The libvirt-k8s-provisioner project provides a set of scripts that use Ansible and Terraform to create virtual machines (VMs) and to deploy a Kubernetes cluster.
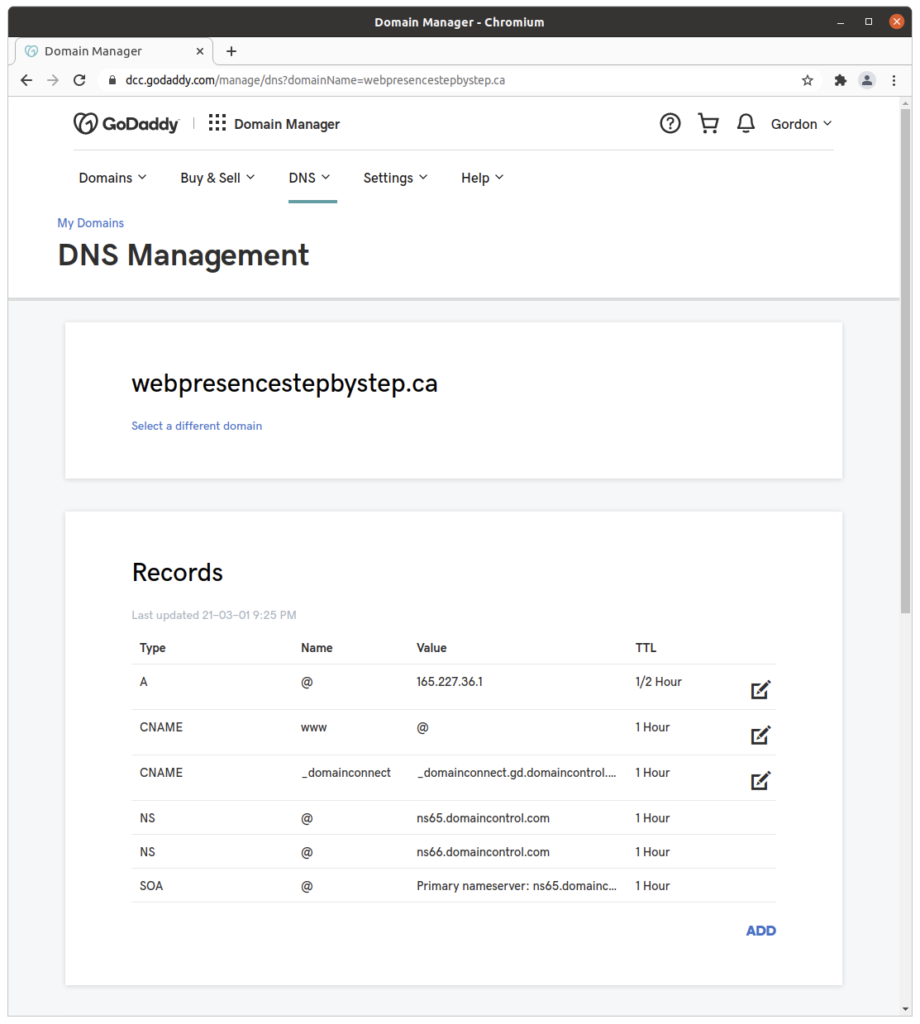
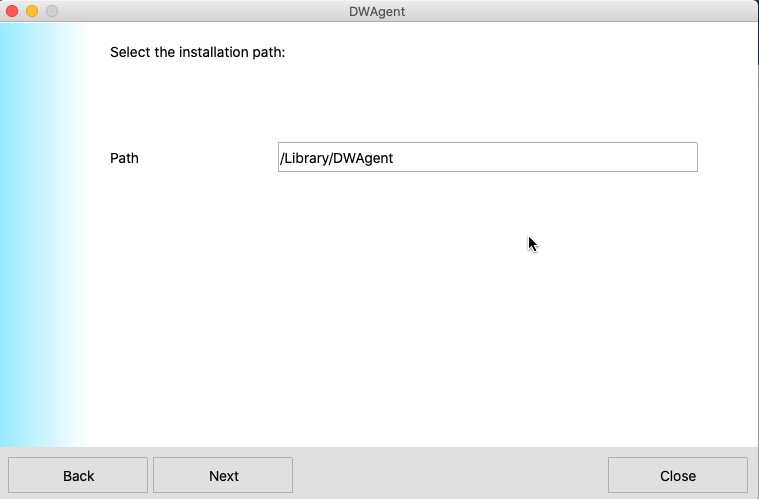
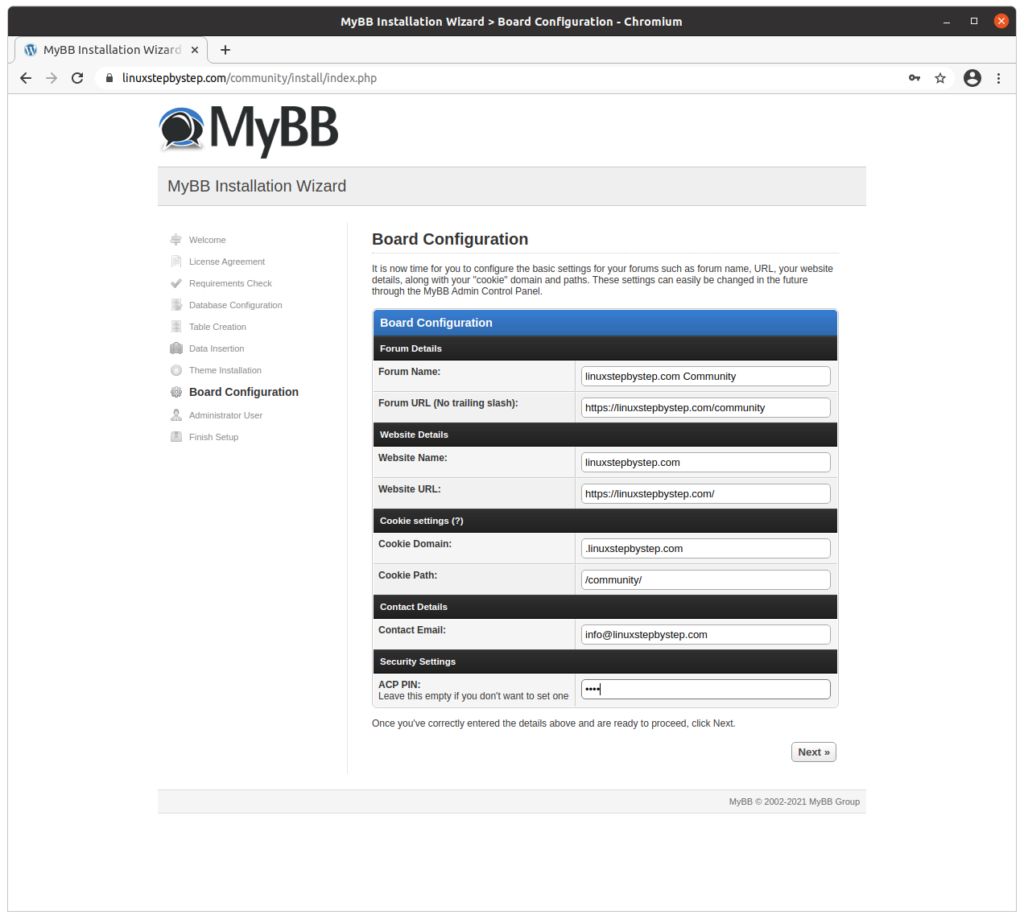
Modifying the libvirt-k8s-provisioner vars file
cd /root/tmpops/libvirt-k8s-provisioner/vars
nano k8s_cluster.yml
k8s:
  cluster_name: k8s-test
  cluster_os: Ubuntu
  cluster_version: 1.24
  container_runtime: crio
  master_schedulable: false

# Nodes configuration

  control_plane:
    vcpu: 2
    mem: 2
    vms: 3
    disk: 30

  worker_nodes:
    vcpu: 2
    mem: 2
    vms: 1
    disk: 30

# Network configuration

  network:
    network_cidr: 192.168.200.0/24
    domain: k8s.test
    additional_san: ""
    pod_cidr: 10.20.0.0/16
    service_cidr: 10.110.0.0/16
    cni_plugin: cilium

rook_ceph:
  install_rook: true
  volume_size: 50
      rook_cluster_size: 1

# Ingress controller configuration [nginx/haproxy]

ingress_controller:
  install_ingress_controller: true
  type: haproxy
      node_port:
        http: 31080
        https: 31443

# Section for metalLB setup

metallb:
  install_metallb: true
  l2:
    iprange: 192.168.200.210-192.168.200.250
Installing the collection requirements for Ansible operations
From a root shell on the virtualization server, enter the following commands:
cd /root/tmpops/libvirt-k8s-provisioner
ansible-galaxy collection install -r requirements.yml
Running the Ansible playbook to create and configure virtual machines on the virtualization host 1/2
From a root shell on the virtualization server, enter the following commands:
ansible-playbook main.yml
The task sequence will end with this error:
fatal: [k8s-test-worker-0.k8s.test]: FAILED! => {"changed": false, "elapsed": 600, "msg": "timed out waiting for ping module test: Failed to connect to the host via ssh: ssh: Could not resolve hostname k8s-test-worker-0.k8s.test: Name or service not known"}
fatal: [k8s-test-master-0.k8s.test]: FAILED! => {"changed": false, "elapsed": 600, "msg": "timed out waiting for ping module test: Failed to connect to the host via ssh: ssh: Could not resolve hostname k8s-test-master-0.k8s.test: Name or service not known"}
Note: we will recover from this error in a later step.
Preparing the virtualization server 3/3
From a root shell on the virtualization server, enter the following command:
virsh net-dhcp-leases k8s-test
Information about the virtual machines in the k8s-test network will be displayed:
root@henderson:/home/desktop# virsh net-dhcp-leases k8s-test
Expiry Time MAC address Protocol IP address Hostname Client ID or DUID
--------------------------------------------------------------------------------------------------------------------------------------------------------
2022-07-29 07:21:42 52:54:00:4a:20:99 ipv4 192.168.200.99/24 k8s-test-master-0 ff:b5:5e:67:ff:00:02:00:00:ab:11:28:1f:a1:fb:24:5c:f5:70
2022-07-29 07:21:42 52:54:00:86:29:8f ipv4 192.168.200.28/24 k8s-test-worker-0 ff:b5:5e:67:ff:00:02:00:00:ab:11:9e:22:e1:40:72:21:cf:9d
Take note of the IP addresses starting with 192.168.200, these values will be needed in a later configuration step.
Understanding the need for IP forwarding on the virtualization server
By default, virtual machines are created with IP addresses in the 192.168.200.x subnet. This subnet is accessible within the virtualization server.
In order to make the 192.168.200.x subnet accessible to the automation server, we need to create a gateway router using iptables directives on the virtualization server.
In a later step, we will add a default route for the 192.168.200.x subnet on the automation server, allowing it to resolve IP addresses in that subnet.
Enabling IP forwarding for the 192.168.200.x subnet
From a root shell on the virtualization server, enter the following commands:
Use the nano editor to create the following text file:
cd /etc
nano sysctl.conf
Add the following line to the end of the sysctl.conf file:
net.ipv4.ip_forward = 1
Enter this command:
sysctl -p
Use the nano editor to create the following text file (substitute the wanadaptername and wanadapterip for those of the virtualization server in your setup):
nano forward.sh
contents:
#!/usr/bin/bash
# values
kvmsubnet="192.168.200.0/24"
wanadaptername="eno1"
wanadapterip="192.168.56.60"
kvmadaptername="k8s-test"
kvmadapterip="192.168.200.1"
# allow virtual adapter to accept packets from outside the host
iptables -I FORWARD -i $wanadaptername -o $kvmadaptername -d $kvmsubnet -j ACCEPT
iptables -I FORWARD -i $kvmadapterip -o $wanadaptername -s $kvmsubnet -j ACCEPT
iptables --table nat --append POSTROUTING --out-interface eth1 -j MASQUERADE
Enter the following commands:
chmod 755 forward.sh
bash forward.sh
Note: add invocation to /etc/rc.local for persistence.
Preparing the automation server 2/2
Adding IP addresses for the VM hosts created in “Preparing the virtualization server 3/3”
From a root shell on the automation server, enter the following commands:
Use the nano editor to create the following text file:
cd /etc
nano sysctl.conf
Add the following line to the end of the sysctl.conf file:
net.ipv4.ip_forward = 1
Enter this command:
sysctl -p
Use the nano editor to modify the /etc/hosts file:
nano hosts
Add the following lines (substitute the IP addresses observed earlier in “Preparing the virtualization server 3/3”):
192.168.200.99 k8s-test-master-0.k8s.test
192.168.200.28 k8s-test-worker-0.k8s.test
Adding a route for for the 192.168.200.x subnet:
From a root shell on the automation server, enter the following command (substitute the wanadaptername (dev) and wanadapterip for those of the virtualization server in your setup):
ip route add 192.168.200.0/24 via 192.168.56.60 dev enp0s3
Note: add invocation to /etc/rc.local for persistence.
Testing the IP routing from the automation server to the 192.168.200.x subnet
Ping one of the IP addresses you observed in the preceding step “Preparing the virtualization server 3/3” (Substitute one of the IP addresses in your setup):
ping 192.168.200.99
Running the Ansible playbook to create and configure virtual machines on the virtualization host 2/2
From a root shell on the automation server, enter the following commands:
cd /root/tmpops/libvirt-k8s-provisioner
ansible-playbook main.yml
Verifying that the Ansible task sequence has completed without errors
Sample output:
PLAY RECAP *******************************************************************************************************************************************************************************************************************************
192.168.56.60 : ok=76 changed=24 unreachable=0 failed=0 skipped=32 rescued=0 ignored=0
k8s-test-master-0.k8s.test : ok=49 changed=28 unreachable=0 failed=0 skipped=28 rescued=0 ignored=0
k8s-test-worker-0.k8s.test : ok=38 changed=24 unreachable=0 failed=0 skipped=28 rescued=0 ignored=0
Making a test connection to a VM
From a root shell on the automation server, enter the following command (substitute the IP address of a VM in your setup):
ssh kube@192.168.200.99
When prompted, enter the password: “kuberocks”
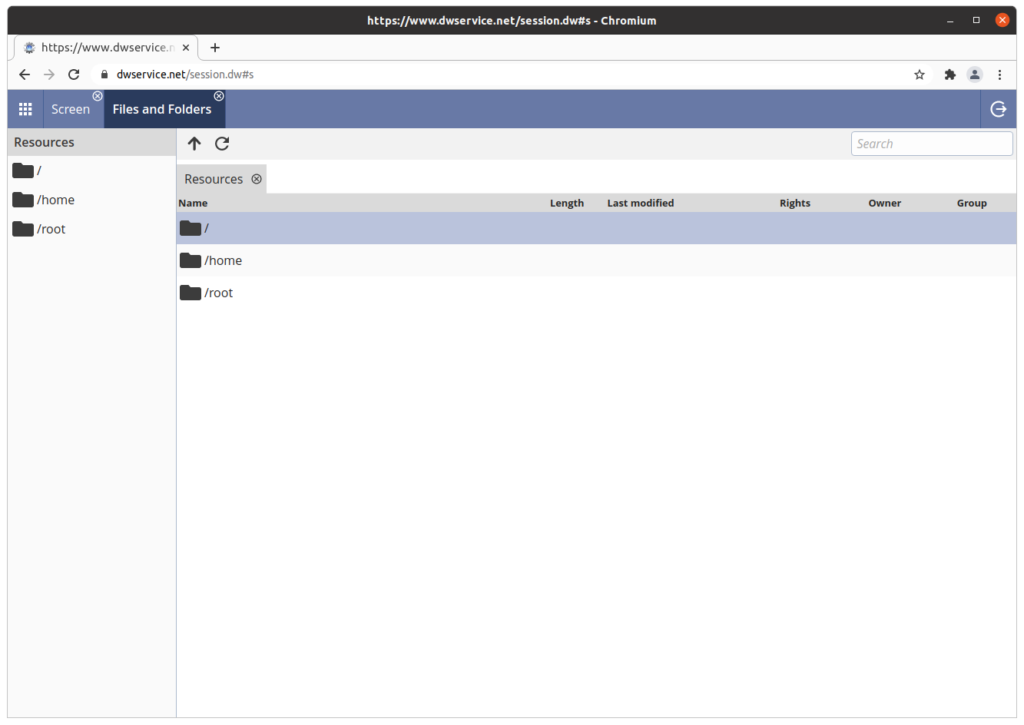
Listing all container images running in the clusters
From a root shell on the control plane (obsolete term “master”) VM server, enter the following command:
kubectl get pods –all-namespaces
Output:
Pending 0 113m
rook-ceph rook-ceph-mds-ceph-filesystem-a-868694c95d-85r54 1/1 Running 0 113m
rook-ceph rook-ceph-mds-ceph-filesystem-b-748dc85c96-qktmb 1/1 Running 0 113m
rook-ceph rook-ceph-mgr-a-7f6784d748-cg9v8 1/1 Running 0 115m
rook-ceph rook-ceph-mon-a-6f9d4bc99b-fgc2g 1/1 Running 0 116m
rook-ceph rook-ceph-operator-f4ccf8fc-f5rcl 1/1 Running 0 119m
rook-ceph rook-ceph-osd-0-7b6fbf8657-lktsx 0/1 CrashLoopBackOff 27 (38s ago) 114m
rook-ceph rook-ceph-osd-prepare-k8s-test-worker-0.k8s.test-j79rg 0/1 Completed 0 114m
rook-ceph rook-ceph-rgw-ceph-objectstore-a-64b5fd4d9b-77krx 0/1 Running 20 (7m43s ago) 110m
Appendix: Full output from the Ansible playbook runs
root@austin:/root/tmpops/libvirt-k8s-provisioner# ansible-playbook main.yml
[WARNING]: Collection community.general does not support Ansible version 2.10.8

PLAY [Pre-flight checklist before installing k8s] ****************************************************************************************************************************************************************************************

TASK [Gathering Facts] *******************************************************************************************************************************************************************************************************************
ok: [192.168.56.60]

TASK [Check if distribution is supported] ************************************************************************************************************************************************************************************************
skipping: [192.168.56.60]

TASK [Check if target distribution is correct] *******************************************************************************************************************************************************************************************
skipping: [192.168.56.60]

TASK [Check if Docker is selected on 1.24] ***********************************************************************************************************************************************************************************************
skipping: [192.168.56.60]

TASK [Check at least one vm for control plane is defined] ********************************************************************************************************************************************************************************
skipping: [192.168.56.60]

TASK [Check if master is schedulable in case of clusters composed by control plane VMs] **************************************************************************************************************************************************
skipping: [192.168.56.60]

TASK [Fail fast if Rook cluster size exceeds worker nodes.] ******************************************************************************************************************************************************************************
skipping: [192.168.56.60]

TASK [Fail fast if no container runtime is defined] **************************************************************************************************************************************************************************************
skipping: [192.168.56.60]

TASK [Fail fast if no ingress controller is selected] ************************************************************************************************************************************************************************************
skipping: [192.168.56.60]

TASK [Fail fast if no container plugin selected] *****************************************************************************************************************************************************************************************
skipping: [192.168.56.60]

PLAY [This play installs needed tools to provision infrastructure VMs] *******************************************************************************************************************************************************************

TASK [Gathering Facts] *******************************************************************************************************************************************************************************************************************
ok: [192.168.56.60]

TASK [Upgrade all packages] **************************************************************************************************************************************************************************************************************
skipping: [192.168.56.60]

TASK [Install required packages] *********************************************************************************************************************************************************************************************************
skipping: [192.168.56.60]

TASK [Install required packages] *********************************************************************************************************************************************************************************************************
skipping: [192.168.56.60]

TASK [Upgrade all packages] **************************************************************************************************************************************************************************************************************
changed: [192.168.56.60]

TASK [Install required packages] *********************************************************************************************************************************************************************************************************
changed: [192.168.56.60]

TASK [Download and provision Terraform] **************************************************************************************************************************************************************************************************
changed: [192.168.56.60]

TASK [Virtualization services are enabled] ***********************************************************************************************************************************************************************************************
ok: [192.168.56.60]

PLAY [This play ensures environment is set up for cluster creation] **********************************************************************************************************************************************************************

TASK [Gathering Facts] *******************************************************************************************************************************************************************************************************************
ok: [192.168.56.60]

TASK [ansible.builtin.set_fact] **********************************************************************************************************************************************************************************************************
ok: [192.168.56.60]

TASK [Ensure needed pip packages are present] ********************************************************************************************************************************************************************************************
ok: [192.168.56.60] => (item=PyYAML)
changed: [192.168.56.60] => (item=kubernetes)
changed: [192.168.56.60] => (item=jsonpatch)
ok: [192.168.56.60] => (item=netaddr)

TASK [Ensure workspace directory exists] *************************************************************************************************************************************************************************************************
changed: [192.168.56.60]

TASK [Ensure cluster folder exists] ******************************************************************************************************************************************************************************************************
changed: [192.168.56.60]

TASK [Ensure pivot tmp folder exists] ****************************************************************************************************************************************************************************************************
changed: [192.168.56.60]

TASK [Populate cluster folder with terraform files] **************************************************************************************************************************************************************************************
changed: [192.168.56.60]

TASK [Snapshot cluster configuration for further use] ************************************************************************************************************************************************************************************
changed: [192.168.56.60]

TASK [Ensure helm is installed] **********************************************************************************************************************************************************************************************************
changed: [192.168.56.60]

TASK [Install helm in PATH] **************************************************************************************************************************************************************************************************************
changed: [192.168.56.60]

TASK [Install Helm Diff] *****************************************************************************************************************************************************************************************************************
changed: [192.168.56.60]

TASK [remove directory] ******************************************************************************************************************************************************************************************************************
changed: [192.168.56.60]

TASK [Retrieve the minor version] ********************************************************************************************************************************************************************************************************
ok: [192.168.56.60]

TASK [Create ssh keypair] ****************************************************************************************************************************************************************************************************************
ok: [192.168.56.60]

TASK [Copy SSH keys in working directory] ************************************************************************************************************************************************************************************************
changed: [192.168.56.60] => (item=id_rsa_k8s-test)
changed: [192.168.56.60] => (item=id_rsa_k8s-test.pub)

TASK [Getting ssh private key] ***********************************************************************************************************************************************************************************************************
ok: [192.168.56.60]

TASK [Getting ssh public key] ************************************************************************************************************************************************************************************************************
ok: [192.168.56.60]

TASK [ansible.builtin.set_fact] **********************************************************************************************************************************************************************************************************
ok: [192.168.56.60]

TASK [Download CentOS image] *************************************************************************************************************************************************************************************************************
skipping: [192.168.56.60]

TASK [Download Ubuntu image] *************************************************************************************************************************************************************************************************************
changed: [192.168.56.60]

PLAY [This play provisions libvirt resources with terraform] *****************************************************************************************************************************************************************************

TASK [Gathering Facts] *******************************************************************************************************************************************************************************************************************
ok: [192.168.56.60]

TASK [Use TF project to ensure pool and network are defined] *****************************************************************************************************************************************************************************
changed: [192.168.56.60]

TASK [Ensure security_driver is disabled] ************************************************************************************************************************************************************************************************
changed: [192.168.56.60]

TASK [Restart libvirtd service] **********************************************************************************************************************************************************************************************************
changed: [192.168.56.60]

TASK [Ensure systemd-resolved config dir is present] *************************************************************************************************************************************************************************************
changed: [192.168.56.60]

TASK [Enable localdns if systemd-resolved is present] ************************************************************************************************************************************************************************************
changed: [192.168.56.60]

TASK [Ensure NM configuration directory exists] ******************************************************************************************************************************************************************************************
ok: [192.168.56.60]

TASK [Ensure NM dnsmasq directory exists] ************************************************************************************************************************************************************************************************
ok: [192.168.56.60]

TASK [Configure NetworkManager for local DNS] ********************************************************************************************************************************************************************************************
changed: [192.168.56.60]

TASK [Configure NetworkManager for libvirt network] **************************************************************************************************************************************************************************************
changed: [192.168.56.60]

RUNNING HANDLER [Restart systemd-resolved] ***********************************************************************************************************************************************************************************************
changed: [192.168.56.60]

RUNNING HANDLER [Restart NetworkManager] *************************************************************************************************************************************************************************************************
changed: [192.168.56.60]

RUNNING HANDLER [Wait for local DNS resolver to be up] ***********************************************************************************************************************************************************************************
skipping: [192.168.56.60]

PLAY [This play provisions k8s VMs based on intial config] *******************************************************************************************************************************************************************************

TASK [Gathering Facts] *******************************************************************************************************************************************************************************************************************
ok: [192.168.56.60]

TASK [Ensure control plane VMs are in place] *********************************************************************************************************************************************************************************************
changed: [192.168.56.60]

TASK [Ensure worker VMs are in place] ****************************************************************************************************************************************************************************************************
ok: [192.168.56.60]

TASK [Ensure Rook dedicated worker VMs are in place] *************************************************************************************************************************************************************************************
changed: [192.168.56.60]

TASK [Add masters to given group] ********************************************************************************************************************************************************************************************************
ok: [192.168.56.60] => (item=0)

TASK [Add workers to given group] ********************************************************************************************************************************************************************************************************
ok: [192.168.56.60] => (item=0)

TASK [Ensure to clean known_hosts] *******************************************************************************************************************************************************************************************************
ok: [192.168.56.60] => (item=k8s-test-master-0.k8s.test)
ok: [192.168.56.60] => (item=k8s-test-worker-0.k8s.test)

PLAY [Check connection and set facts] ****************************************************************************************************************************************************************************************************

TASK [Wait 600 seconds for target connection to become reachable/usable] *****************************************************************************************************************************************************************
fatal: [k8s-test-worker-0.k8s.test]: FAILED! => {"changed": false, "elapsed": 600, "msg": "timed out waiting for ping module test: Failed to connect to the host via ssh: ssh: Could not resolve hostname k8s-test-worker-0.k8s.test: Name or service not known"}
fatal: [k8s-test-master-0.k8s.test]: FAILED! => {"changed": false, "elapsed": 600, "msg": "timed out waiting for ping module test: Failed to connect to the host via ssh: ssh: Could not resolve hostname k8s-test-master-0.k8s.test: Name or service not known"}

PLAY RECAP *******************************************************************************************************************************************************************************************************************************
192.168.56.60              : ok=44   changed=26   unreachable=0    failed=0    skipped=14   rescued=0    ignored=0
k8s-test-master-0.k8s.test : ok=0    changed=0    unreachable=0    failed=1    skipped=0    rescued=0    ignored=0
k8s-test-worker-0.k8s.test : ok=0    changed=0    unreachable=0    failed=1    skipped=0    rescued=0    ignored=0

root@austin:/root/tmpops/libvirt-k8s-provisioner# ansible-playbook main.yml
[WARNING]: Collection community.general does not support Ansible version 2.10.8

PLAY [Pre-flight checklist before installing k8s] ****************************************************************************************************************************************************************************************

TASK [Gathering Facts] *******************************************************************************************************************************************************************************************************************
ok: [192.168.56.60]

TASK [Check if distribution is supported] ************************************************************************************************************************************************************************************************
skipping: [192.168.56.60]

TASK [Check if target distribution is correct] *******************************************************************************************************************************************************************************************
skipping: [192.168.56.60]

TASK [Check if Docker is selected on 1.24] ***********************************************************************************************************************************************************************************************
skipping: [192.168.56.60]

TASK [Check at least one vm for control plane is defined] ********************************************************************************************************************************************************************************
skipping: [192.168.56.60]

TASK [Check if master is schedulable in case of clusters composed by control plane VMs] **************************************************************************************************************************************************
skipping: [192.168.56.60]

TASK [Fail fast if Rook cluster size exceeds worker nodes.] ******************************************************************************************************************************************************************************
skipping: [192.168.56.60]

TASK [Fail fast if no container runtime is defined] **************************************************************************************************************************************************************************************
skipping: [192.168.56.60]

TASK [Fail fast if no ingress controller is selected] ************************************************************************************************************************************************************************************
skipping: [192.168.56.60]

TASK [Fail fast if no container plugin selected] *****************************************************************************************************************************************************************************************
skipping: [192.168.56.60]

PLAY [This play installs needed tools to provision infrastructure VMs] *******************************************************************************************************************************************************************

TASK [Gathering Facts] *******************************************************************************************************************************************************************************************************************
ok: [192.168.56.60]

TASK [Upgrade all packages] **************************************************************************************************************************************************************************************************************
skipping: [192.168.56.60]

TASK [Install required packages] *********************************************************************************************************************************************************************************************************
skipping: [192.168.56.60]

TASK [Install required packages] *********************************************************************************************************************************************************************************************************
skipping: [192.168.56.60]

TASK [Upgrade all packages] **************************************************************************************************************************************************************************************************************
ok: [192.168.56.60]

TASK [Install required packages] *********************************************************************************************************************************************************************************************************
ok: [192.168.56.60]

TASK [Download and provision Terraform] **************************************************************************************************************************************************************************************************
ok: [192.168.56.60]

TASK [Virtualization services are enabled] ***********************************************************************************************************************************************************************************************
ok: [192.168.56.60]

PLAY [This play ensures environment is set up for cluster creation] **********************************************************************************************************************************************************************

TASK [Gathering Facts] *******************************************************************************************************************************************************************************************************************
ok: [192.168.56.60]

TASK [ansible.builtin.set_fact] **********************************************************************************************************************************************************************************************************
ok: [192.168.56.60]

TASK [Ensure needed pip packages are present] ********************************************************************************************************************************************************************************************
ok: [192.168.56.60] => (item=PyYAML)
ok: [192.168.56.60] => (item=kubernetes)
ok: [192.168.56.60] => (item=jsonpatch)
ok: [192.168.56.60] => (item=netaddr)

TASK [Ensure workspace directory exists] *************************************************************************************************************************************************************************************************
ok: [192.168.56.60]

TASK [Ensure cluster folder exists] ******************************************************************************************************************************************************************************************************
ok: [192.168.56.60]

TASK [Ensure pivot tmp folder exists] ****************************************************************************************************************************************************************************************************
ok: [192.168.56.60]

TASK [Populate cluster folder with terraform files] **************************************************************************************************************************************************************************************
ok: [192.168.56.60]

TASK [Snapshot cluster configuration for further use] ************************************************************************************************************************************************************************************
ok: [192.168.56.60]

TASK [Ensure helm is installed] **********************************************************************************************************************************************************************************************************
changed: [192.168.56.60]

TASK [Install helm in PATH] **************************************************************************************************************************************************************************************************************
ok: [192.168.56.60]

TASK [Install Helm Diff] *****************************************************************************************************************************************************************************************************************
ok: [192.168.56.60]

TASK [remove directory] ******************************************************************************************************************************************************************************************************************
changed: [192.168.56.60]

TASK [Retrieve the minor version] ********************************************************************************************************************************************************************************************************
ok: [192.168.56.60]

TASK [Create ssh keypair] ****************************************************************************************************************************************************************************************************************
ok: [192.168.56.60]

TASK [Copy SSH keys in working directory] ************************************************************************************************************************************************************************************************
ok: [192.168.56.60] => (item=id_rsa_k8s-test)
ok: [192.168.56.60] => (item=id_rsa_k8s-test.pub)

TASK [Getting ssh private key] ***********************************************************************************************************************************************************************************************************
ok: [192.168.56.60]

TASK [Getting ssh public key] ************************************************************************************************************************************************************************************************************
ok: [192.168.56.60]

TASK [ansible.builtin.set_fact] **********************************************************************************************************************************************************************************************************
ok: [192.168.56.60]

TASK [Download CentOS image] *************************************************************************************************************************************************************************************************************
skipping: [192.168.56.60]

TASK [Download Ubuntu image] *************************************************************************************************************************************************************************************************************
ok: [192.168.56.60]

PLAY [This play provisions libvirt resources with terraform] *****************************************************************************************************************************************************************************

TASK [Gathering Facts] *******************************************************************************************************************************************************************************************************************
ok: [192.168.56.60]

TASK [Use TF project to ensure pool and network are defined] *****************************************************************************************************************************************************************************
ok: [192.168.56.60]

TASK [Ensure security_driver is disabled] ************************************************************************************************************************************************************************************************
ok: [192.168.56.60]

TASK [Restart libvirtd service] **********************************************************************************************************************************************************************************************************
changed: [192.168.56.60]

TASK [Ensure systemd-resolved config dir is present] *************************************************************************************************************************************************************************************
ok: [192.168.56.60]

TASK [Enable localdns if systemd-resolved is present] ************************************************************************************************************************************************************************************
ok: [192.168.56.60]

TASK [Ensure NM configuration directory exists] ******************************************************************************************************************************************************************************************
ok: [192.168.56.60]

TASK [Ensure NM dnsmasq directory exists] ************************************************************************************************************************************************************************************************
ok: [192.168.56.60]

TASK [Configure NetworkManager for local DNS] ********************************************************************************************************************************************************************************************
ok: [192.168.56.60]

TASK [Configure NetworkManager for libvirt network] **************************************************************************************************************************************************************************************
ok: [192.168.56.60]

PLAY [This play provisions k8s VMs based on intial config] *******************************************************************************************************************************************************************************

TASK [Gathering Facts] *******************************************************************************************************************************************************************************************************************
ok: [192.168.56.60]

TASK [Ensure control plane VMs are in place] *********************************************************************************************************************************************************************************************
ok: [192.168.56.60]

TASK [Ensure worker VMs are in place] ****************************************************************************************************************************************************************************************************
ok: [192.168.56.60]

TASK [Ensure Rook dedicated worker VMs are in place] *************************************************************************************************************************************************************************************
ok: [192.168.56.60]

TASK [Add masters to given group] ********************************************************************************************************************************************************************************************************
ok: [192.168.56.60] => (item=0)

TASK [Add workers to given group] ********************************************************************************************************************************************************************************************************
ok: [192.168.56.60] => (item=0)

TASK [Ensure to clean known_hosts] *******************************************************************************************************************************************************************************************************
ok: [192.168.56.60] => (item=k8s-test-master-0.k8s.test)
ok: [192.168.56.60] => (item=k8s-test-worker-0.k8s.test)

PLAY [Check connection and set facts] ****************************************************************************************************************************************************************************************************

TASK [Wait 600 seconds for target connection to become reachable/usable] *****************************************************************************************************************************************************************
ok: [k8s-test-master-0.k8s.test]
ok: [k8s-test-worker-0.k8s.test]

TASK [ansible.builtin.ping] **************************************************************************************************************************************************************************************************************
ok: [k8s-test-master-0.k8s.test]
ok: [k8s-test-worker-0.k8s.test]

TASK [Add hosts to correct groups] *******************************************************************************************************************************************************************************************************
changed: [k8s-test-master-0.k8s.test]
changed: [k8s-test-worker-0.k8s.test]

TASK [Extract facts from setup] **********************************************************************************************************************************************************************************************************
ok: [k8s-test-worker-0.k8s.test]
ok: [k8s-test-master-0.k8s.test]

TASK [ansible.builtin.set_fact] **********************************************************************************************************************************************************************************************************
ok: [k8s-test-master-0.k8s.test]
ok: [k8s-test-worker-0.k8s.test]

PLAY [This play provisions loadbalancer VM for control plane] ****************************************************************************************************************************************************************************

TASK [Gathering Facts] *******************************************************************************************************************************************************************************************************************
ok: [192.168.56.60]

TASK [Ensure Load Balancer VM is in place] ***********************************************************************************************************************************************************************************************
skipping: [192.168.56.60]

TASK [Add loadbalancer to inventory] *****************************************************************************************************************************************************************************************************
skipping: [192.168.56.60]

TASK [Ensure to clean known_hosts] *******************************************************************************************************************************************************************************************************
skipping: [192.168.56.60]
[WARNING]: Could not match supplied host pattern, ignoring: loadbalancer

PLAY [Check connection to loadbalancer] **************************************************************************************************************************************************************************************************
skipping: no hosts matched

PLAY [Loadbalancer configuration play] ***************************************************************************************************************************************************************************************************
skipping: no hosts matched

PLAY [Install container runtime] *********************************************************************************************************************************************************************************************************

TASK [Gathering Facts] *******************************************************************************************************************************************************************************************************************
ok: [k8s-test-master-0.k8s.test]
ok: [k8s-test-worker-0.k8s.test]

TASK [Retrieve the minor version] ********************************************************************************************************************************************************************************************************
ok: [k8s-test-master-0.k8s.test]
ok: [k8s-test-worker-0.k8s.test]

TASK [Upgrade all packages] **************************************************************************************************************************************************************************************************************
skipping: [k8s-test-master-0.k8s.test]
skipping: [k8s-test-worker-0.k8s.test]

TASK [Upgrade all packages] **************************************************************************************************************************************************************************************************************
changed: [k8s-test-master-0.k8s.test]
changed: [k8s-test-worker-0.k8s.test]

TASK [Add modules to autostart] **********************************************************************************************************************************************************************************************************
changed: [k8s-test-worker-0.k8s.test]
changed: [k8s-test-master-0.k8s.test]

TASK [Enable br_netfilter] ***************************************************************************************************************************************************************************************************************
changed: [k8s-test-worker-0.k8s.test] => (item=br_netfilter)
changed: [k8s-test-master-0.k8s.test] => (item=br_netfilter)
changed: [k8s-test-master-0.k8s.test] => (item=overlay)
changed: [k8s-test-worker-0.k8s.test] => (item=overlay)

TASK [Enable sysctl values] **************************************************************************************************************************************************************************************************************
changed: [k8s-test-worker-0.k8s.test] => (item={'key': 'net.ipv4.ip_forward', 'value': 1})
changed: [k8s-test-master-0.k8s.test] => (item={'key': 'net.ipv4.ip_forward', 'value': 1})
changed: [k8s-test-master-0.k8s.test] => (item={'key': 'net.bridge.bridge-nf-call-ip6tables', 'value': 1})
changed: [k8s-test-worker-0.k8s.test] => (item={'key': 'net.bridge.bridge-nf-call-ip6tables', 'value': 1})
changed: [k8s-test-worker-0.k8s.test] => (item={'key': 'net.bridge.bridge-nf-call-iptables', 'value': 1})
changed: [k8s-test-master-0.k8s.test] => (item={'key': 'net.bridge.bridge-nf-call-iptables', 'value': 1})

TASK [Setup sysctl] **********************************************************************************************************************************************************************************************************************
changed: [k8s-test-master-0.k8s.test]
changed: [k8s-test-worker-0.k8s.test]

TASK [Ensure sysctl is restarted] ********************************************************************************************************************************************************************************************************
changed: [k8s-test-master-0.k8s.test]
changed: [k8s-test-worker-0.k8s.test]

TASK [Ensure required packages are present] **********************************************************************************************************************************************************************************************
skipping: [k8s-test-master-0.k8s.test]
skipping: [k8s-test-worker-0.k8s.test]

TASK [Add docker repo key] ***************************************************************************************************************************************************************************************************************
skipping: [k8s-test-master-0.k8s.test]
skipping: [k8s-test-worker-0.k8s.test]

TASK [Ensure the presence of apt-repo for docker] ****************************************************************************************************************************************************************************************
skipping: [k8s-test-master-0.k8s.test]
skipping: [k8s-test-worker-0.k8s.test]

TASK [Ensure docker packages are installed] **********************************************************************************************************************************************************************************************
skipping: [k8s-test-master-0.k8s.test]
skipping: [k8s-test-worker-0.k8s.test]

TASK [Ensure required packages are present] **********************************************************************************************************************************************************************************************
skipping: [k8s-test-master-0.k8s.test]
skipping: [k8s-test-worker-0.k8s.test]

TASK [Add docker repository] *************************************************************************************************************************************************************************************************************
skipping: [k8s-test-master-0.k8s.test]
skipping: [k8s-test-worker-0.k8s.test]

TASK [Ensure docker is installed] ********************************************************************************************************************************************************************************************************
skipping: [k8s-test-master-0.k8s.test]
skipping: [k8s-test-worker-0.k8s.test]

TASK [Create /etc/docker] ****************************************************************************************************************************************************************************************************************
skipping: [k8s-test-master-0.k8s.test]
skipping: [k8s-test-worker-0.k8s.test]

TASK [Copy docker configuration in /etc/docker] ******************************************************************************************************************************************************************************************
skipping: [k8s-test-master-0.k8s.test]
skipping: [k8s-test-worker-0.k8s.test]

TASK [Create systemd folder for Docker service] ******************************************************************************************************************************************************************************************
skipping: [k8s-test-master-0.k8s.test]
skipping: [k8s-test-worker-0.k8s.test]

TASK [Force systemd to reread configs] ***************************************************************************************************************************************************************************************************
skipping: [k8s-test-master-0.k8s.test]
skipping: [k8s-test-worker-0.k8s.test]

TASK [Ensure docker is enabled and started] **********************************************************************************************************************************************************************************************
skipping: [k8s-test-master-0.k8s.test]
skipping: [k8s-test-worker-0.k8s.test]

TASK [Add crio repo key] *****************************************************************************************************************************************************************************************************************
changed: [k8s-test-master-0.k8s.test] => (item={'key': 'https://download.opensuse.org/repositories/devel:/kubic:/libcontainers:/stable/xUbuntu_22.04/Release.key', 'keyring': '/etc/apt/trusted.gpg.d/libcontainers.gpg'})
changed: [k8s-test-worker-0.k8s.test] => (item={'key': 'https://download.opensuse.org/repositories/devel:/kubic:/libcontainers:/stable/xUbuntu_22.04/Release.key', 'keyring': '/etc/apt/trusted.gpg.d/libcontainers.gpg'})
changed: [k8s-test-master-0.k8s.test] => (item={'key': 'https://download.opensuse.org/repositories/devel:kubic:libcontainers:stable:cri-o:/1.24/xUbuntu_22.04/Release.key', 'keyring': '/etc/apt/trusted.gpg.d/libcontainers-cri-o.gpg'})
changed: [k8s-test-worker-0.k8s.test] => (item={'key': 'https://download.opensuse.org/repositories/devel:kubic:libcontainers:stable:cri-o:/1.24/xUbuntu_22.04/Release.key', 'keyring': '/etc/apt/trusted.gpg.d/libcontainers-cri-o.gpg'})

TASK [Ensure the presence of apt-repo for cri-o] *****************************************************************************************************************************************************************************************
changed: [k8s-test-worker-0.k8s.test] => (item={'repo': 'deb https://download.opensuse.org/repositories/devel:/kubic:/libcontainers:/stable/xUbuntu_22.04/ /', 'file': '/etc/apt/sources.list.d/devel:kubic:libcontainers:stable.list'})
changed: [k8s-test-master-0.k8s.test] => (item={'repo': 'deb https://download.opensuse.org/repositories/devel:/kubic:/libcontainers:/stable/xUbuntu_22.04/ /', 'file': '/etc/apt/sources.list.d/devel:kubic:libcontainers:stable.list'})
changed: [k8s-test-worker-0.k8s.test] => (item={'repo': 'deb http://download.opensuse.org/repositories/devel:/kubic:/libcontainers:/stable:/cri-o:/1.24/xUbuntu_22.04/ /', 'file': '/etc/apt/sources.list.d/devel:kubic:libcontainers:stable:cri-o:1.24.list'})
changed: [k8s-test-master-0.k8s.test] => (item={'repo': 'deb http://download.opensuse.org/repositories/devel:/kubic:/libcontainers:/stable:/cri-o:/1.24/xUbuntu_22.04/ /', 'file': '/etc/apt/sources.list.d/devel:kubic:libcontainers:stable:cri-o:1.24.list'})

TASK [Temporary fix for memory swap slices on 20.04] *************************************************************************************************************************************************************************************
changed: [k8s-test-master-0.k8s.test]
changed: [k8s-test-worker-0.k8s.test]

TASK [Add kubic CentOS repository] *******************************************************************************************************************************************************************************************************
skipping: [k8s-test-master-0.k8s.test] => (item={'file': '/etc/yum.repos.d/devel:kubic:libcontainers:stable.repo', 'url': 'http://download.opensuse.org/repositories/devel:/kubic:/libcontainers:/stable/CentOS_8_Stream/devel:kubic:libcontainers:stable.repo'})
skipping: [k8s-test-master-0.k8s.test] => (item={'file': '/etc/yum.repos.d/devel:kubic:libcontainers:stable:cri-o.repo', 'url': 'http://download.opensuse.org/repositories/devel:/kubic:/libcontainers:/stable:/cri-o:/1.24/CentOS_8_Stream/devel:kubic:libcontainers:stable:cri-o:1.24.repo'})
skipping: [k8s-test-worker-0.k8s.test] => (item={'file': '/etc/yum.repos.d/devel:kubic:libcontainers:stable.repo', 'url': 'http://download.opensuse.org/repositories/devel:/kubic:/libcontainers:/stable/CentOS_8_Stream/devel:kubic:libcontainers:stable.repo'})
skipping: [k8s-test-worker-0.k8s.test] => (item={'file': '/etc/yum.repos.d/devel:kubic:libcontainers:stable:cri-o.repo', 'url': 'http://download.opensuse.org/repositories/devel:/kubic:/libcontainers:/stable:/cri-o:/1.24/CentOS_8_Stream/devel:kubic:libcontainers:stable:cri-o:1.24.repo'})

TASK [Ensure cri-o is installed - CentOS] ************************************************************************************************************************************************************************************************
skipping: [k8s-test-master-0.k8s.test]
skipping: [k8s-test-worker-0.k8s.test]

TASK [Ensure cri-o is installed - Ubuntu] ************************************************************************************************************************************************************************************************
changed: [k8s-test-master-0.k8s.test]
changed: [k8s-test-worker-0.k8s.test]

TASK [Fire crio-conf template] ***********************************************************************************************************************************************************************************************************
changed: [k8s-test-master-0.k8s.test]
changed: [k8s-test-worker-0.k8s.test]

TASK [Remove example CNI configs] ********************************************************************************************************************************************************************************************************
changed: [k8s-test-master-0.k8s.test] => (item=100-crio-bridge.conf)
changed: [k8s-test-worker-0.k8s.test] => (item=100-crio-bridge.conf)
changed: [k8s-test-master-0.k8s.test] => (item=200-loopback.conf)
changed: [k8s-test-worker-0.k8s.test] => (item=200-loopback.conf)

TASK [Force systemd to reread configs] ***************************************************************************************************************************************************************************************************
ok: [k8s-test-worker-0.k8s.test]
ok: [k8s-test-master-0.k8s.test]

TASK [Ensure cri-o is enabled and started] ***********************************************************************************************************************************************************************************************
changed: [k8s-test-master-0.k8s.test]
changed: [k8s-test-worker-0.k8s.test]

TASK [Ensure required packages are present] **********************************************************************************************************************************************************************************************
skipping: [k8s-test-master-0.k8s.test]
skipping: [k8s-test-worker-0.k8s.test]

TASK [Add containerd repository] *********************************************************************************************************************************************************************************************************
skipping: [k8s-test-master-0.k8s.test]
skipping: [k8s-test-worker-0.k8s.test]

TASK [Ensure containerd is installed] ****************************************************************************************************************************************************************************************************
skipping: [k8s-test-master-0.k8s.test]
skipping: [k8s-test-worker-0.k8s.test]

TASK [Ensure containerd is configured and installed on Ubuntu machine] *******************************************************************************************************************************************************************
skipping: [k8s-test-master-0.k8s.test]
skipping: [k8s-test-worker-0.k8s.test]

TASK [Create /etc/containers] ************************************************************************************************************************************************************************************************************
skipping: [k8s-test-master-0.k8s.test]
skipping: [k8s-test-worker-0.k8s.test]

TASK [Initialize config] *****************************************************************************************************************************************************************************************************************
skipping: [k8s-test-master-0.k8s.test]
skipping: [k8s-test-worker-0.k8s.test]

TASK [Force systemd to reread configs] ***************************************************************************************************************************************************************************************************
skipping: [k8s-test-master-0.k8s.test]
skipping: [k8s-test-worker-0.k8s.test]

TASK [Ensure containerd is enabled and started] ******************************************************************************************************************************************************************************************
skipping: [k8s-test-master-0.k8s.test]
skipping: [k8s-test-worker-0.k8s.test]

TASK [Reboot nodes before proceeding] ****************************************************************************************************************************************************************************************************
changed: [k8s-test-worker-0.k8s.test]
changed: [k8s-test-master-0.k8s.test]

PLAY [Ensure kube packages are installed] ************************************************************************************************************************************************************************************************

TASK [Gathering Facts] *******************************************************************************************************************************************************************************************************************
ok: [k8s-test-worker-0.k8s.test]
ok: [k8s-test-master-0.k8s.test]

TASK [Add Kubernetes repository] *********************************************************************************************************************************************************************************************************
skipping: [k8s-test-master-0.k8s.test]
skipping: [k8s-test-worker-0.k8s.test]

TASK [Ensure required packages for kubetools are installed] ******************************************************************************************************************************************************************************
changed: [k8s-test-master-0.k8s.test]
changed: [k8s-test-worker-0.k8s.test]

TASK [Add kube-repo key] *****************************************************************************************************************************************************************************************************************
changed: [k8s-test-master-0.k8s.test]
changed: [k8s-test-worker-0.k8s.test]

TASK [Ensure the presence of apt-repo for kubernetes packages] ***************************************************************************************************************************************************************************
changed: [k8s-test-master-0.k8s.test]
changed: [k8s-test-worker-0.k8s.test]

TASK [Ensure Kubernetes packages are installed] ******************************************************************************************************************************************************************************************
changed: [k8s-test-master-0.k8s.test]
changed: [k8s-test-worker-0.k8s.test]

TASK [Ensure kubelet, kubeadm, kubectl are on hold] **************************************************************************************************************************************************************************************
changed: [k8s-test-worker-0.k8s.test] => (item=kubectl)
changed: [k8s-test-master-0.k8s.test] => (item=kubectl)
changed: [k8s-test-master-0.k8s.test] => (item=kubeadm)
changed: [k8s-test-worker-0.k8s.test] => (item=kubeadm)
changed: [k8s-test-master-0.k8s.test] => (item=kubelet)
changed: [k8s-test-worker-0.k8s.test] => (item=kubelet)

TASK [Disable swap] **********************************************************************************************************************************************************************************************************************
changed: [k8s-test-master-0.k8s.test]
changed: [k8s-test-worker-0.k8s.test]

TASK [Remove swap entry from fstab] ******************************************************************************************************************************************************************************************************
ok: [k8s-test-master-0.k8s.test]
ok: [k8s-test-worker-0.k8s.test]

TASK [Disable SELinux] *******************************************************************************************************************************************************************************************************************
skipping: [k8s-test-master-0.k8s.test]
skipping: [k8s-test-worker-0.k8s.test]

TASK [Install kubepackages] **************************************************************************************************************************************************************************************************************
skipping: [k8s-test-master-0.k8s.test]
skipping: [k8s-test-worker-0.k8s.test]

TASK [Install lvm2 for rook support and git for installing rook] *************************************************************************************************************************************************************************
ok: [k8s-test-master-0.k8s.test]
ok: [k8s-test-worker-0.k8s.test]

TASK [Enable kubelet] ********************************************************************************************************************************************************************************************************************
ok: [k8s-test-master-0.k8s.test]
ok: [k8s-test-worker-0.k8s.test]

PLAY [Prepare kubeadm-config for cluster setup] ******************************************************************************************************************************************************************************************

TASK [Gathering Facts] *******************************************************************************************************************************************************************************************************************
ok: [k8s-test-master-0.k8s.test]

TASK [Generate cluster token] ************************************************************************************************************************************************************************************************************
changed: [k8s-test-master-0.k8s.test]

TASK [Set generated token as fact] *******************************************************************************************************************************************************************************************************
ok: [k8s-test-master-0.k8s.test]

TASK [Generate certificate key] **********************************************************************************************************************************************************************************************************
changed: [k8s-test-master-0.k8s.test]

TASK [Set generated token as fact] *******************************************************************************************************************************************************************************************************
ok: [k8s-test-master-0.k8s.test]

TASK [Add kubelet config for node] *******************************************************************************************************************************************************************************************************
changed: [k8s-test-master-0.k8s.test]

PLAY [Install cluster with kubeadm] ******************************************************************************************************************************************************************************************************

TASK [Gathering Facts] *******************************************************************************************************************************************************************************************************************
ok: [k8s-test-master-0.k8s.test]

TASK [Start kubeadm install] *************************************************************************************************************************************************************************************************************
changed: [k8s-test-master-0.k8s.test]

TASK [Get information on generated certificate] ******************************************************************************************************************************************************************************************
ok: [k8s-test-master-0.k8s.test]

TASK [Set fact for certificate hash] *****************************************************************************************************************************************************************************************************
ok: [k8s-test-master-0.k8s.test]

TASK [Create kube directory] *************************************************************************************************************************************************************************************************************
changed: [k8s-test-master-0.k8s.test]

TASK [Copy kubeconfig] *******************************************************************************************************************************************************************************************************************
changed: [k8s-test-master-0.k8s.test]

TASK [Fetch kubeconfig file] *************************************************************************************************************************************************************************************************************
ok: [k8s-test-master-0.k8s.test]

TASK [Set kubeconfig as fact] ************************************************************************************************************************************************************************************************************
ok: [k8s-test-master-0.k8s.test]

TASK [ansible.builtin.set_fact] **********************************************************************************************************************************************************************************************************
ok: [k8s-test-master-0.k8s.test]

PLAY [Verify cluster has been initialized] ***********************************************************************************************************************************************************************************************

TASK [Gathering Facts] *******************************************************************************************************************************************************************************************************************
ok: [192.168.56.60]

TASK [Save kubeconfig as file] ***********************************************************************************************************************************************************************************************************
changed: [192.168.56.60]

TASK [Wait for control-plane pods to be up and running] **********************************************************************************************************************************************************************************
skipping: [192.168.56.60]

PLAY [Play to join control plane nodes in the cluster] ***********************************************************************************************************************************************************************************
skipping: no hosts matched

PLAY [Play to join nodes in the cluster] *************************************************************************************************************************************************************************************************

TASK [Gathering Facts] *******************************************************************************************************************************************************************************************************************
ok: [k8s-test-worker-0.k8s.test]

TASK [Fire joinConfiguration template for worker nodes] **********************************************************************************************************************************************************************************
changed: [k8s-test-worker-0.k8s.test]

TASK [Join worker nodes in cluster] ******************************************************************************************************************************************************************************************************
changed: [k8s-test-worker-0.k8s.test]

TASK [Mark node as joined] ***************************************************************************************************************************************************************************************************************
ok: [k8s-test-worker-0.k8s.test]

PLAY [Apply network plugin] **************************************************************************************************************************************************************************************************************

TASK [Gathering Facts] *******************************************************************************************************************************************************************************************************************
ok: [192.168.56.60]

TASK [Download Calico manifest.] *********************************************************************************************************************************************************************************************************
skipping: [192.168.56.60] => (item={'name': '/tmp/k8s-test/calico-operator.yaml', 'url': 'https://docs.projectcalico.org/manifests/tigera-operator.yaml'})
skipping: [192.168.56.60] => (item={'name': '/tmp/k8s-test/calico-crd.yaml', 'url': 'https://docs.projectcalico.org/manifests/custom-resources.yaml'})

TASK [Apply custom CIDR to calico installation manifest] *********************************************************************************************************************************************************************************
skipping: [192.168.56.60]

TASK [Temporary fix for non ascii char in Calico CRD (https://github.com/projectcalico/api/pull/46)] *************************************************************************************************************************************
skipping: [192.168.56.60]

TASK [Apply calico manifests to the cluster.] ********************************************************************************************************************************************************************************************
skipping: [192.168.56.60] => (item=/tmp/k8s-test/calico-operator.yaml)
skipping: [192.168.56.60] => (item=/tmp/k8s-test/calico-crd.yaml)

TASK [Add helm chart repository for Cilium] **********************************************************************************************************************************************************************************************
changed: [192.168.56.60] => (item={'name': 'cilium', 'repo_url': 'https://helm.cilium.io/'})

TASK [Ensure Cilium helm chart is installed] *********************************************************************************************************************************************************************************************
changed: [192.168.56.60]

TASK [Download flannel manifest] *********************************************************************************************************************************************************************************************************
skipping: [192.168.56.60]

TASK [Patch kube-flannel to use host-gw instead of vxlan] ********************************************************************************************************************************************************************************
skipping: [192.168.56.60]

TASK [Apply flannel manifests to the cluster.] *******************************************************************************************************************************************************************************************
skipping: [192.168.56.60]

TASK [Wait for core-dns pods to be up and running] ***************************************************************************************************************************************************************************************
changed: [192.168.56.60]

PLAY [Complete cluster setup] ************************************************************************************************************************************************************************************************************

TASK [Gathering Facts] *******************************************************************************************************************************************************************************************************************
ok: [192.168.56.60]

TASK [Prepare playbook for cluster deletion] *********************************************************************************************************************************************************************************************
changed: [192.168.56.60]

TASK [Delete image file] *****************************************************************************************************************************************************************************************************************
changed: [192.168.56.60] => (item=/tmp/OS-GenericCloud.qcow2)

TASK [Label worker nodes] ****************************************************************************************************************************************************************************************************************
changed: [192.168.56.60] => (item=k8s-test-worker-0.k8s.test)

TASK [Remove taint from master nodes] ****************************************************************************************************************************************************************************************************
skipping: [192.168.56.60] => (item=k8s-test-master-0.k8s.test)

PLAY [Save inventory to disk] ************************************************************************************************************************************************************************************************************

TASK [Gathering Facts] *******************************************************************************************************************************************************************************************************************
ok: [192.168.56.60]

TASK [Gather facts from all servers] *****************************************************************************************************************************************************************************************************
ok: [192.168.56.60 -> k8s-test-master-0.k8s.test] => (item=k8s-test-master-0.k8s.test)
ok: [192.168.56.60 -> k8s-test-worker-0.k8s.test] => (item=k8s-test-worker-0.k8s.test)
ok: [192.168.56.60 -> 192.168.56.60] => (item=192.168.56.60)

TASK [Fire up inventory template] ********************************************************************************************************************************************************************************************************
changed: [192.168.56.60]

TASK [ansible.builtin.debug] *************************************************************************************************************************************************************************************************************
ok: [192.168.56.60] => {
    "msg": "Inventory is now saved as k8s-test-inventory-k8s, you can resume next steps by referencing it."
}

PLAY [Prepare cluster to install ingress controller] *************************************************************************************************************************************************************************************

TASK [Gathering Facts] *******************************************************************************************************************************************************************************************************************
ok: [192.168.56.60]

TASK [Ensure the needed Namespaces exist.] ***********************************************************************************************************************************************************************************************
skipping: [192.168.56.60]

TASK [Add helm chart repository for Contour] *********************************************************************************************************************************************************************************************
skipping: [192.168.56.60] => (item={'name': 'bitnami', 'repo_url': 'https://charts.bitnami.com/bitnami'})

TASK [Ensure Contour helm chart is installed] ********************************************************************************************************************************************************************************************
skipping: [192.168.56.60]

TASK [Ensure the needed Namespaces exist.] ***********************************************************************************************************************************************************************************************
changed: [192.168.56.60]

TASK [Add helm chart repository for haproxy] *********************************************************************************************************************************************************************************************
changed: [192.168.56.60] => (item={'name': 'haproxytech', 'repo_url': 'https://haproxytech.github.io/helm-charts'})

TASK [Ensure haproxy helm chart is installed] ********************************************************************************************************************************************************************************************
changed: [192.168.56.60]

TASK [Ensure the needed Namespaces exist.] ***********************************************************************************************************************************************************************************************
skipping: [192.168.56.60]

TASK [Add helm chart repository for Nginx] ***********************************************************************************************************************************************************************************************
skipping: [192.168.56.60] => (item={'name': 'ingress-nginx', 'repo_url': 'https://kubernetes.github.io/ingress-nginx'})

TASK [Ensure Nginx helm chart is installed] **********************************************************************************************************************************************************************************************
skipping: [192.168.56.60]

PLAY [Refresh facts] *********************************************************************************************************************************************************************************************************************

TASK [Gathering Facts] *******************************************************************************************************************************************************************************************************************
ok: [k8s-test-worker-0.k8s.test]
ok: [k8s-test-master-0.k8s.test]
ok: [192.168.56.60]

PLAY [Trigger new haproxy configuration] *************************************************************************************************************************************************************************************************
skipping: no hosts matched

PLAY [Save new haproxy configuration] ****************************************************************************************************************************************************************************************************

TASK [Gathering Facts] *******************************************************************************************************************************************************************************************************************
ok: [192.168.56.60]

TASK [Fire up new haproxy template] ******************************************************************************************************************************************************************************************************
skipping: [192.168.56.60]

PLAY [Prepare cluster to install rook] ***************************************************************************************************************************************************************************************************

TASK [Gathering Facts] *******************************************************************************************************************************************************************************************************************
ok: [192.168.56.60]

TASK [Ensure the needed Namespaces exist.] ***********************************************************************************************************************************************************************************************
changed: [192.168.56.60]

TASK [Add helm chart repository for Rook] ************************************************************************************************************************************************************************************************
changed: [192.168.56.60] => (item={'name': 'rook-release', 'repo_url': 'https://charts.rook.io/release'})
ok: [192.168.56.60] => (item={'name': 'rook-release', 'repo_url': 'https://charts.rook.io/release'})

TASK [Ensure rook-operator helm chart is installed] **************************************************************************************************************************************************************************************
changed: [192.168.56.60]

TASK [Trigger rook template] *************************************************************************************************************************************************************************************************************
changed: [192.168.56.60]

TASK [Ensure rook-ceph-cluster helm chart is installed] **********************************************************************************************************************************************************************************
changed: [192.168.56.60]

PLAY [Prepare cluster to install metalLB] ************************************************************************************************************************************************************************************************

TASK [Gathering Facts] *******************************************************************************************************************************************************************************************************************
ok: [192.168.56.60]

TASK [Render template for L2 configuration] **********************************************************************************************************************************************************************************************
changed: [192.168.56.60]

TASK [Download metal-lb CR for later apply] **********************************************************************************************************************************************************************************************
changed: [192.168.56.60] => (item={'name': '/tmp/k8s-test/metallb-ns.yaml', 'url': 'https://raw.githubusercontent.com/metallb/metallb/v0.12.1/manifests/namespace.yaml'})
changed: [192.168.56.60] => (item={'name': '/tmp/k8s-test/metallb.yaml', 'url': 'https://raw.githubusercontent.com/metallb/metallb/v0.12.1/manifests/metallb.yaml'})

TASK [Ensure metal-lb namespace is present] **********************************************************************************************************************************************************************************************
changed: [192.168.56.60] => (item=/tmp/k8s-test/metallb-ns.yaml)

TASK [Ensure metal-lb is installed in your cluster] **************************************************************************************************************************************************************************************
changed: [192.168.56.60] => (item=/tmp/k8s-test/metallb.yaml)

TASK [Render template for L2 configuration] **********************************************************************************************************************************************************************************************
ok: [192.168.56.60]

TASK [Ensure metal-lb configmap is added in your cluster] ********************************************************************************************************************************************************************************
changed: [192.168.56.60]

PLAY RECAP *******************************************************************************************************************************************************************************************************************************
192.168.56.60              : ok=76   changed=24   unreachable=0    failed=0    skipped=32   rescued=0    ignored=0
k8s-test-master-0.k8s.test : ok=49   changed=28   unreachable=0    failed=0    skipped=28   rescued=0    ignored=0
k8s-test-worker-0.k8s.test : ok=38   changed=24   unreachable=0    failed=0    skipped=28   rescued=0    ignored=0
References
https://www.armosec.io/blog/setting-up-kubernetes-cluster/
https://kubernetes.io/docs/setup/production-environment/tools/kubeadm/create-cluster-kubeadm/
https://linuxconfig.org/how-to-install-kubernetes-on-ubuntu-22-04-jammy-jellyfish-linux
https://subok-tech.com/installing-kubernetes-using-ansible-on-ubuntu-20-04/
https://projectcalico.docs.tigera.io/getting-started/kubernetes/quickstart
https://projectcalico.docs.tigera.io/getting-started/kubernetes/hardway/
https://groups.google.com/g/ansible-project/c/YTl5g317SBg?pli=1
https://www.shellhacks.com/ansible-sudo-a-password-is-required/
https://fabianlee.org/2022/05/25/kvm-kubeadm-cluster-on-kvm-using-ansible/
https://thenewstack.io/install-ansible-on-ubuntu-server-to-automate-linux-server-deployments/