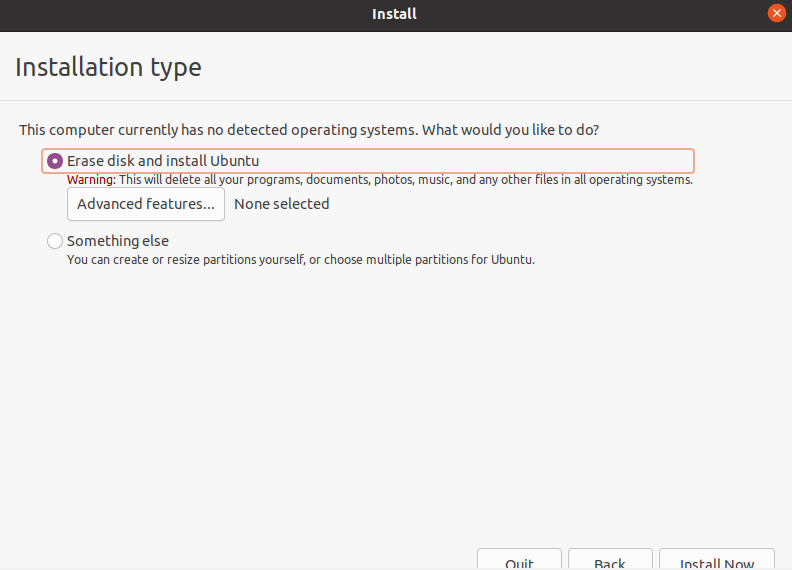
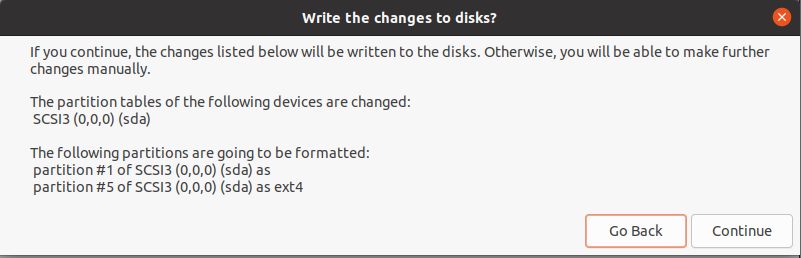
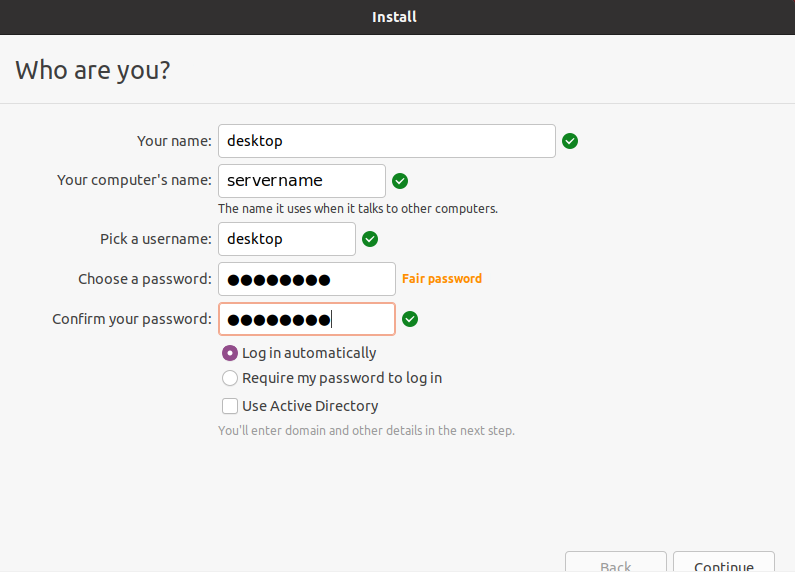
In this procedure, we create a Python script that connects to a large language model (LLM) to facilitate the creation of Ansible playbooks using natural language queries. We begin by creating the Ansible deployment environment on a staging server, with a hosts file and inventory.ini file that correspond to a group of servers. We enable passwordless entry from the staging server to the servers, and ensure that visudo is configured for passwordless escalation to root using sudo.
The system does not run the generated playbook; the human operator must review it and then execute it manually.
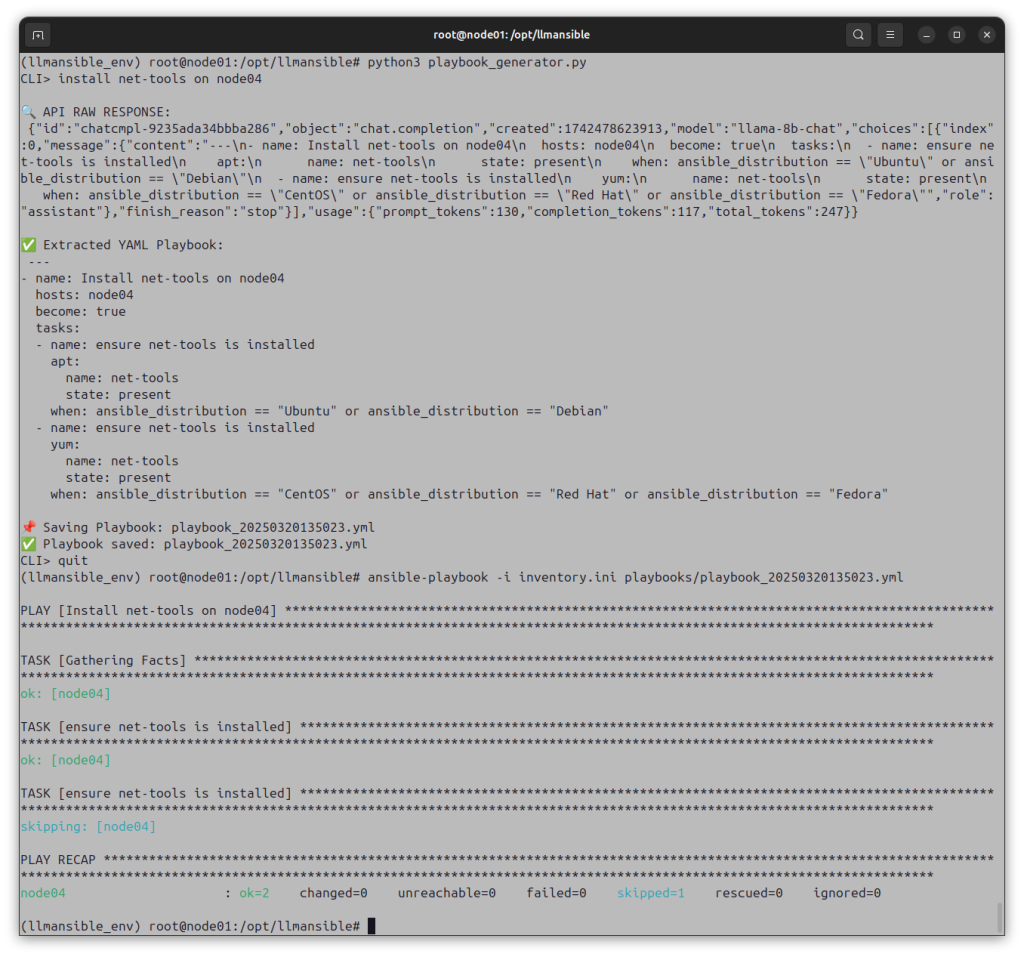
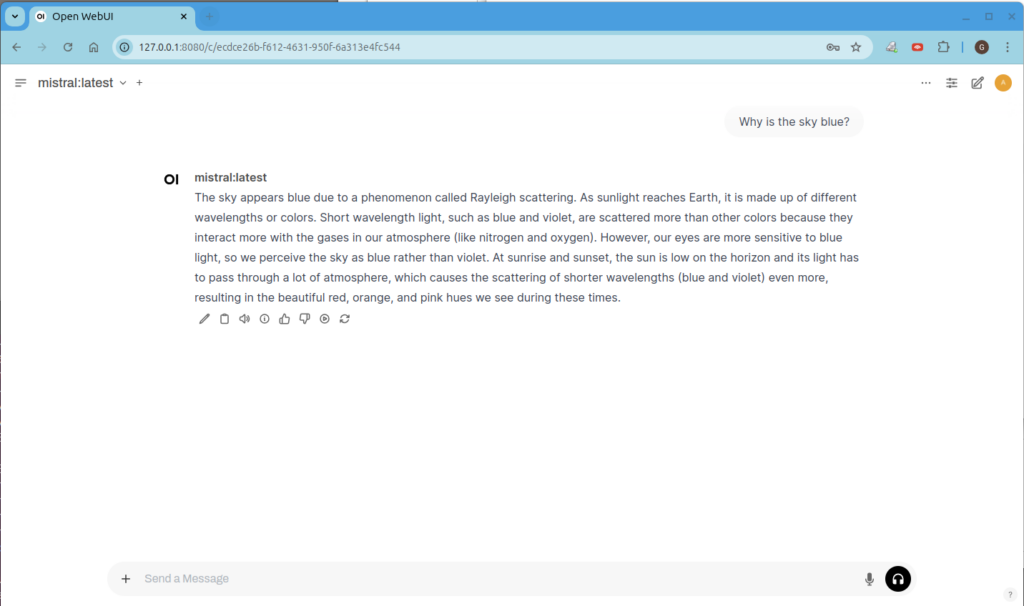
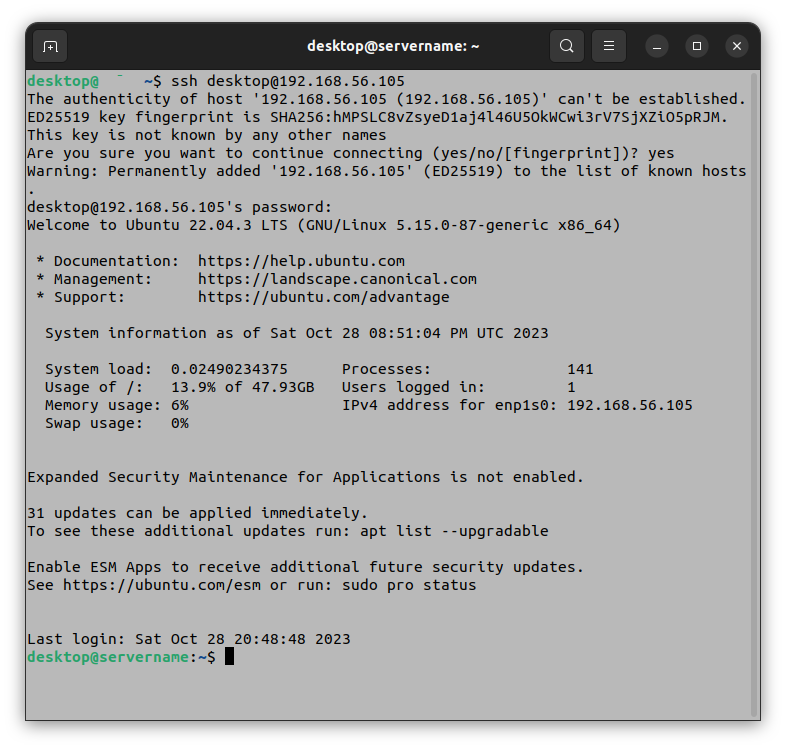
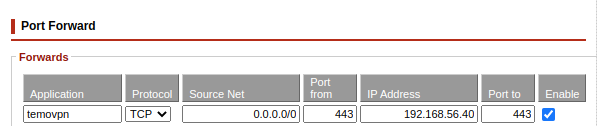
A preview of the system in operation
To use the system, an operator starts the playbook generator at the command line:
python3 playbook_generator.py
The operator enters a natural language query, such as:
Use the nano editor to add the following text to the file (modify values as appropriate to match your installation):
[LLM]
system_prompt = You are an AI that generates structured Ansible playbooks. Ensure: The playbook is idempotent. It installs required packages using apt (for Ubuntu) or yum (for CentOS). It does not execute shell commands directly. It follows proper YAML formatting. assume that OS is ubuntu unless otherwise stated. only respond with the contents of the ansible playbook, nothing more. do not offer multiple playbooks. do not add commentary.
api_url = https://api.lemonfox.ai/v1/chat/completions
api_token = your-api-token
model_name = llama-8b-chat
Save and exit the file.
Creating a Python virtual environment (venv), and adding Python dependencies
Enter the following commands:
cd /opt/llmansible
python3 -m venv llmansible_env
source llmansible_env/bin/activate
Adding Python dependencies using pip
Enter the following command:
pip install PyYAML requests
Creating the playbook_generator.py file
Enter the following command:
nano playbook_generator.py
Use the nano editor to add the following text to the file:
# MIT license Gordon Buchan 2025
# see https://opensource.org/license/mit
# some of the code was generated with the assistance of AI tools.

import requests
import configparser
import os
import re
import yaml
from datetime import datetime

# Load Configuration
config = configparser.ConfigParser()
config.read("config.ini")

LLM_API_URL = config.get("LLM", "api_url")
LLM_API_TOKEN = config.get("LLM", "api_token")
LLM_MODEL = config.get("LLM", "model_name")
SYSTEM_PROMPT = config.get("LLM", "system_prompt")

PLAYBOOK_DIR = "/opt/llmansible/playbooks"

def extract_yaml(text):
    """Extracts valid YAML content and removes explanations or malformed sections."""

    # Remove Markdown-style code block markers (e.g., ```yaml)
    text = re.sub(r"```(yaml|yml)?", "", text, flags=re.IGNORECASE).strip()

    # Capture the first YAML block (ensuring it's well-formed)
    match = re.search(r"(?s)(---\n.+?)(?=\n\S|\Z)", text)

    if match:
        yaml_content = match.group(1).strip()

        # Remove trailing incomplete YAML lines or explanations
        yaml_content = re.sub(r"\n\w+:\s*\"?[^\n]*$", "", yaml_content).strip()

        # Validate extracted YAML before returning
        try:
            yaml.safe_load(yaml_content)  # If this fails, the YAML is invalid
            return yaml_content
        except yaml.YAMLError as e:
            print(f"❌ YAML Validation Error: {e}")
            return ""

    print("❌ Error: No valid YAML found.")
    return ""

def query_llm(prompt):
    """Queries the LLM API and extracts a valid Ansible playbook."""
    payload = {
        "model": LLM_MODEL,
        "messages": [
            {"role": "system", "content": SYSTEM_PROMPT},
            {"role": "user", "content": prompt}
        ],
        "max_tokens": 2048
    }

    headers = {
        "Authorization": f"Bearer {LLM_API_TOKEN}",
        "Content-Type": "application/json"
    }

    response = requests.post(LLM_API_URL, json=payload, headers=headers)

    print("\n🔍 API RAW RESPONSE:\n", response.text)

    try:
        response_json = response.json()
        llm_response = response_json["choices"][0]["message"]["content"]
        yaml_content = extract_yaml(llm_response)

        if not yaml_content:
            print("❌ Error: No valid YAML extracted.")
            return ""

        print("\n✅ Extracted YAML Playbook:\n", yaml_content)
        return yaml_content

    except (KeyError, IndexError):
        print("❌ Error: Unexpected API response format.")
        return ""

def save_playbook(machine, command, playbook_content):
    """Saves the extracted YAML playbook if it's valid."""
    if not playbook_content.strip().startswith("---"):
        print("❌ Error: Extracted content is not a valid Ansible playbook. Skipping save.")
        return None

    timestamp = datetime.now().strftime("%Y%m%d%H%M%S")
    playbook_name = f"playbook_{timestamp}.yml"
    playbook_path = os.path.join(PLAYBOOK_DIR, playbook_name)

    os.makedirs(PLAYBOOK_DIR, exist_ok=True)

    print(f"\n📌 Saving Playbook: {playbook_name}")

    with open(playbook_path, "w") as f:
        f.write(playbook_content)

    return playbook_name

def main():
    """CLI Operator Console."""
    while True:
        user_input = input("CLI> ")
        if user_input.lower() in ["exit", "quit"]:
            break

        llm_response = query_llm(user_input)
        if llm_response:
            playbook_name = save_playbook("all", user_input, llm_response)
            if playbook_name:
                print(f"✅ Playbook saved: {playbook_name}")

if __name__ == "__main__":
    main()
Save and exit the file.
Creating an Ansible playbook using the playbook generator
Ensuring that you are in the Python venv
Ensure that you are already in the Python venv. If not, enter the following commands:
cd /opt/llmansible
source llmansible_env/bin/activate
Enter the following command:
python3 playbook_generator.py
The operator enters a natural language query, such as:
This procedure describes how to create a WordPress chatbot using FAISS for RAG and an external LLM API. We start by scanning the database of WordPress posts, to create a FAISS vector database. We then create an API wrapper that combines hinting information from the local FAISS database with a call to a remote LLM API. This API wrapper is then called by a chatbot, which is then integrated into WordPress as a plugin. The user interface for the chatbot is added to the sidebar of the WordPress blog by adding a shortcode widget that references the chatbot’s PHP, JavaScript, and cascading stylesheet (CSS) elements.
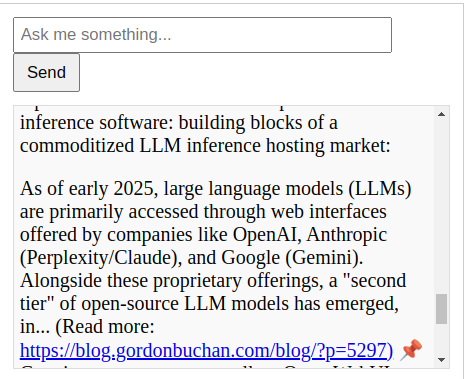
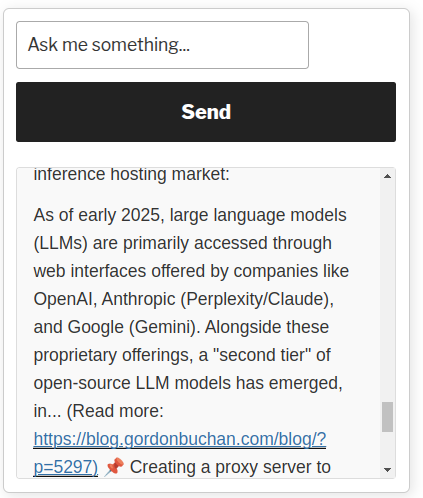
The chatbot accepts natural language queries, submits the queries to the RAG API wrapper, and displays results that contain the remote LLM API’s responses based on the text of blog posts scanned by the RAG system. Links to relevant blog posts are listed in the responses.
Using a recent Linux distribution to support Python 3.12 and some machine learning tools
In order to implement this procedure, we need a recent Linux distribution to support Python 3.12 and some machine learning tools. For this procedure we are using Ubuntu Server 24.04 LTS.
Using a server with relatively modest specifications
Most public-facing websites are hosted in virtual machines (VMs) on cloud servers, with relatively modest specifications. Because we are able to use an external LLM API service, we only need enough processing power to host the WordPress blog itself, as well as some Python and PHP code that implements the FAISS vector database, the RAG API wrapper, and the chatbot itself. For this procedure, we are deploying on a cloud server with 2GB RAM, 2 x vCPU, and 50GB SSD drive space.
import faiss
import numpy as np
import json
import os
import mariadb
from sentence_transformers import SentenceTransformer
from dotenv import load_dotenv

# MIT license Gordon Buchan 2025
# see https://opensource.org/license/mit
# some of the code was generated with the assistance of AI tools.

# Load environment variables from .env file
load_dotenv(dotenv_path="./.env")

DB_USER = os.getenv('DB_USER')
DB_PASSWORD = os.getenv('DB_PASSWORD')
DB_HOST = os.getenv('DB_HOST')
DB_NAME = os.getenv('DB_NAME')


# Load embedding model
model = SentenceTransformer("all-MiniLM-L6-v2")

# FAISS setup
embedding_dim = 384
index_file = "faiss_index.bin"
metadata_file = "faiss_metadata.json"

# Load FAISS index and metadata
if os.path.exists(index_file):
    index = faiss.read_index(index_file)
    with open(metadata_file, "r") as f:
        metadata = json.load(f)
        metadata = {int(k): v for k, v in metadata.items()}  # Ensure integer keys
    print(f"📂 Loaded existing FAISS index with {index.ntotal} embeddings.")
else:
    index = faiss.IndexHNSWFlat(embedding_dim, 32)
    metadata = {}
    print("🆕 Created a new FAISS index.")

def chunk_text(text, chunk_size=500):
    """Split text into smaller chunks"""
    words = text.split()
    return [" ".join(words[i:i + chunk_size]) for i in range(0, len(words), chunk_size)]

def get_blog_posts():
    """Fetch published blog posts from WordPress database."""
    try:
        conn = mariadb.connect(
            user=DB_USER,
            password=DB_PASSWORD,
            host=DB_HOST,
            database=DB_NAME
        )
        cursor = conn.cursor()

        cursor.execute("""
            SELECT ID, post_title, post_content
            FROM wp_posts
            WHERE post_status='publish' AND post_type='post'
        """)

        posts = cursor.fetchall()
        conn.close()
        return posts

    except mariadb.Error as e:
        print(f"❌ Database error: {e}")
        return []

def index_blog_posts():
    """Index only new blog posts in FAISS"""
    blog_posts = get_blog_posts()
    if not blog_posts:
        print("❌ No blog posts found. Check database connection.")
        return

    vectors = []
    new_metadata = {}
    current_index = len(metadata)

    print(f"📝 Found {len(blog_posts)} blog posts to check for indexing.")

    for post_id, title, content in blog_posts:
        if any(str(idx) for idx in metadata if metadata[idx]["post_id"] == post_id):
            print(f"🔄 Skipping already indexed post: {title} (ID: {post_id})")
            continue

        chunks = chunk_text(content)
        for chunk in chunks:
            embedding = model.encode(chunk, normalize_embeddings=True)  # Normalize embeddings
            vectors.append(embedding)
            new_metadata[current_index] = {
                "post_id": post_id,
                "title": title,
                "chunk_text": chunk
            }
            current_index += 1

    if vectors:
        faiss_vectors = np.array(vectors, dtype=np.float32)
        index.add(faiss_vectors)

        metadata.update(new_metadata)

        faiss.write_index(index, index_file)
        with open(metadata_file, "w") as f:
            json.dump(metadata, f, indent=4)

        print(f"✅ Indexed {len(new_metadata)} new chunks.")
    else:
        print("✅ No new posts to index.")

if __name__ == "__main__":
    index_blog_posts()
    print("✅ Indexing completed.")
Save and exit the file.
Creating the FAISS retrieval API
Enter the following command:
nano faiss_search.py
Use the nano editor to add text to the file:
import os
import faiss
import numpy as np
import json
from sentence_transformers import SentenceTransformer  # ✅ Ensure this is imported

# MIT license Gordon Buchan 2025
# see https://opensource.org/license/mit
# some of the code was generated with the assistance of AI tools.

# ✅ Load the same embedding model used in `rag_api_wrapper.py`
model = SentenceTransformer("all-MiniLM-L6-v2")

# ✅ Load FAISS index and metadata
index_file = "faiss_index.bin"
metadata_file = "faiss_metadata.json"

embedding_dim = 384

if os.path.exists(index_file):
    index = faiss.read_index(index_file)
    with open(metadata_file, "r") as f:
        metadata = json.load(f)
else:
    index = faiss.IndexFlatL2(embedding_dim)
    metadata = {}

def search_faiss(query_text, top_k=10):
    """Search FAISS index and retrieve relevant metadata"""
    query_embedding = model.encode(query_text).reshape(1, -1)  # ✅ Ensure `model` is used correctly
    _, indices = index.search(query_embedding, top_k)

    results = []
    for idx in indices[0]:
        if str(idx) in metadata:  # ✅ Convert index to string to match JSON keys
            results.append(metadata[str(idx)])

    return results
Save and exit the file.
Creating the RAG API wrapper
Enter the following command:
nano rag_api_wrapper.py
Use the nano editor to add the following text:
from fastapi import FastAPI, HTTPException
import requests
import os
import json
import faiss
import numpy as np
from dotenv import load_dotenv
from sentence_transformers import SentenceTransformer

# MIT license Gordon Buchan 2025
# see https://opensource.org/license/mit
# some of the code was generated with the assistance of AI tools.

# Load environment variables
load_dotenv(dotenv_path="./.env")

EXTERNAL_LLM_API = os.getenv('EXTERNAL_LLM_API')
EXTERNAL_LLM_API_KEY = os.getenv('EXTERNAL_LLM_API_KEY')
BLOG_URL_BASE = os.getenv('BLOG_URL_BASE')

# Load FAISS index and metadata
embedding_dim = 384
index_file = "faiss_index.bin"
metadata_file = "faiss_metadata.json"

if os.path.exists(index_file):
    index = faiss.read_index(index_file)
    with open(metadata_file, "r") as f:
        metadata = json.load(f)
        metadata = {int(k): v for k, v in metadata.items()}  # Ensure integer keys
    print(f"📂 Loaded FAISS index with {index.ntotal} embeddings.")
else:
    index = faiss.IndexHNSWFlat(embedding_dim, 32)
    metadata = {}
    print("❌ No FAISS index found.")

# Load embedding model
model = SentenceTransformer("all-MiniLM-L6-v2")

app = FastAPI()

def search_faiss(query_text, top_k=3):
    """Retrieve top K relevant chunks from FAISS index"""
    if index.ntotal == 0:
        return []

    query_embedding = model.encode(query_text, normalize_embeddings=True).reshape(1, -1)
    distances, indices = index.search(query_embedding, top_k)

    results = []
    for idx in indices[0]:
        if idx in metadata:
            post_id = metadata[idx]["post_id"]
            title = metadata[idx]["title"]
            chunk_text = metadata[idx]["chunk_text"]
            post_url = f"{BLOG_URL_BASE}/?p={post_id}"

            # Limit chunk text to 300 characters for cleaner display
            short_chunk = chunk_text[:300] + "..." if len(chunk_text) > 300 else chunk_text
            results.append(f"📌 {title}: {short_chunk} (Read more: {post_url})")

    return results[:3]  # Limit to max 3 sources

@app.post("/v1/chat/completions")
def chat_completions(request: dict):
    if "messages" not in request:
        raise HTTPException(status_code=400, detail="No messages provided.")

    user_query = request["messages"][-1]["content"]

    # Retrieve relevant blog context
    context_snippets = search_faiss(user_query)

    context_text = "\n".join(context_snippets) if context_snippets else "No relevant sources found."

    # Send query with context to LLM API
    payload = {
        "model": "llama-8b-chat",
        "messages": [
            {"role": "system", "content": "Use the following blog snippets to provide a detailed response."},
            {"role": "user", "content": f"{user_query}\n\nContext:\n{context_text}"}
        ]
    }
    headers = {"Authorization": f"Bearer {EXTERNAL_LLM_API_KEY}"}
    response = requests.post(EXTERNAL_LLM_API, json=payload, headers=headers)

    if response.status_code != 200:
        raise HTTPException(status_code=500, detail="External LLM API request failed.")

    llm_response = response.json()
    response_text = llm_response["choices"][0]["message"]["content"]

    return {
        "id": llm_response.get("id", "generated_id"),
        "object": "chat.completion",
        "created": llm_response.get("created", 1700000000),
        "model": llm_response.get("model", "llama-8b-chat"),
        "choices": [
            {
                "message": {
                    "role": "assistant",
                    "content": f"{response_text}\n\n📚 Sources:\n{context_text}"
                }
            }
        ],
        "usage": llm_response.get("usage", {"prompt_tokens": 0, "completion_tokens": 0, "total_tokens": 0})
    }
Save and exit the file.
Running the rag_faiss.py file manually to create the FAISS vector database
Enter the following command:
python3 rag_faiss.py
Starting the RAG API wrapper manually to test the system
curl -X POST http://localhost:8000/v1/chat/completions -H "Content-Type: application/json" -d '{"messages": [{"role": "user", "content": "How do I use an external LLM API?"}]}'
Adding the shortcode widget to add the chatbot to the WordPress sidebar
Go to the section “Appearance” | “Widgets.”
Select the sidebar area. Click on the “+” symbol. Search for “shortcode,” click on the short code icon.
In the text box marked “Write shortcode here…” Enter the shortcode:
[rag_chatbot]
Click on Update.
Checking that the chatbot has been added to the sidebar of the blog
Go to the main page of the blog. Look to ensure that the short code element has been added to the blog’s sidebar. Test the chatbot (suggested query: “Tell me about LLMs.”):
Open-WebUI, a web chat server for LLMs, is not compatible with some LLM APIs that support the chat completions API, and use a message array. Although there are other tools available, I wanted to use Open-WebUI. I resolved this by creating a proxy server that acts as a translation layer between the Open-WebUI chat server and an LLM API server that supports the chat completions API and uses a message array.
I wanted to use Open-WebUI as my chat server, but Open-WebUI is not compatible with the API of my remotely hosted LLM API inference service
Open-WebUI was designed to be compatible with Ollama, a tool that hosts an LLM locally and exposes an API. However, instead of using a locally-hosted LLM, I would like to use an LLM inference API service provided by lemonfox.ai, which emulates the OpenAI API including the chat completions API, and uses a message array.
Considering the value of a remote LLM inference API server over a locally-hosted solution
In this blog post, we create a proxy server that enables the Open-WebUI chat server to connect to an OpenAI-compatible API. Although it is an interesting technical exercise to self-host, as a business case it does not make sense for long-term production. Certain kinds of LLM inference workloads can be handled by a CPU-only system, using a tool like Ollama, but the performance is not sufficient for real-time interaction. Dedicating GPU-enabled hardware is a significant expense, whether it be the acquisition of dedicated GPU hardware such as an A30, H100, RTX 4090, or RTX 5090 card. Renting or leasing this hardware is even more expensive. We seem to be heading into an era in which LLM inference itself is software as a service (SaaS), unless there are specific reasons why inference data cannot be shared with a public cloud, such as a legal or medical application.
Using a proxy server as a translation layer between incompatible APIs
There are many chat user interfaces available, but Open-WebUI has been easier to deploy and for the moment is my preference. The need for proxy servers to translate between LLM API servers that have slightly different protocols will likely be with us for some time, until LLM APIs have matured and become more compatible.
Using a remotely-hosted LLM inference API with a toolchain of applications and proxies
At this time in 2025, most LLM inference APIs emulate the OpenAI protocol, with support for the chat completions API and the use of a message array. In this exercise, we will be connecting the Open-WebUI chat server to an OpenAI compatible LLM API. In the future, we may see more abstracted toolchains, for example, a retrieval augmented generation (RAG) server offering an API that encapsulates the local RAG functionality and enhanced by the remote LLM inference API, to which a chat server will connect. In this case, the chat server will be Open-WebUI, but in other applications it could be a web chat user interface embedded in a website.
Escalating to the root user with sudo
Enter the following command:
sudo su
Creating a virtual environment and installing dependencies
Enter the following commands:
cd ~
mkdir proxy_workdir
cd proxy_workdir
python3 -m venv proxy_env
source proxy_env/bin/activate
pip install fastapi uvicorn httpx python-dotenv
Creating the proxy.py file
Enter the following command:
nano proxy.py
Use the nano editor to add the following text:
# MIT license Gordon Buchan 2025
# see https://opensource.org/license/mit
# Some of this code was generated with the assistance of AI tools.

from fastapi import FastAPI, Request
import httpx
import logging
import json
import time

app = FastAPI()

# Enable logging for debugging
logging.basicConfig(level=logging.DEBUG)

# LemonFox API details
LEMONFOX_API_URL = "https://api.lemonfox.ai/v1/chat/completions"
API_KEY = "xxxxxxxxxxxxxxxxxxxxxxxxxxxxxxxx"

@app.get("/api/openai/v1/models")
async def get_models():
    return {
        "object": "list",
        "data": [
            {
                "id": "mixtral-chat",
                "object": "model",
                "owned_by": "lemonfox"
            }
        ]
    }

async def make_request_with_retry(payload):
    """Send request to LemonFox API with one retry in case of failure."""
    headers = {
        "Authorization": f"Bearer {API_KEY}",
        "Content-Type": "application/json",
    }

    for attempt in range(2):  # Try twice before failing
        async with httpx.AsyncClient() as client:
            try:
                response = await client.post(LEMONFOX_API_URL, json=payload, headers=headers)
                response_json = response.json()

                # If response is valid, return it
                if "choices" in response_json and response_json["choices"]:
                    return response_json

                logging.warning(f"❌ Empty response from LemonFox on attempt {attempt + 1}: {response_json}")

            except httpx.HTTPStatusError as e:
                logging.error(f"❌ LemonFox API HTTP error: {e}")
            except json.JSONDecodeError:
                logging.error(f"❌ LemonFox returned an invalid JSON response: {response.text}")

        # Wait 1 second before retrying
        time.sleep(1)

    # If we get here, both attempts failed—return a default response
    logging.error("❌ LemonFox API failed twice. Returning a fallback response.")
    return {
        "id": "fallback-response",
        "object": "chat.completion",
        "created": int(time.time()),
        "model": "unknown",
        "choices": [
            {
                "index": 0,
                "message": {
                    "role": "assistant",
                    "content": "I'm sorry, but I couldn't generate a response. Try again."
                },
                "finish_reason": "stop"
            }
        ],
        "usage": {"prompt_tokens": 0, "completion_tokens": 0, "total_tokens": 0}
    }

@app.post("/api/openai/v1/chat/completions")
async def proxy_chat_completion(request: Request):
    """Ensure Open WebUI's request is converted and always return a valid response."""
    try:
        payload = await request.json()
        logging.debug("🟢 Open WebUI Request: %s", json.dumps(payload, indent=2))

        # Convert `prompt` into OpenAI's `messages[]` format
        if "prompt" in payload:
            payload["messages"] = [{"role": "user", "content": payload["prompt"]}]
            del payload["prompt"]
        elif "messages" not in payload or not isinstance(payload["messages"], list):
            logging.error("❌ Open WebUI sent an invalid request!")
            return {"error": "Invalid request format. Expected `messages[]` or `prompt`."}

        # Force disable streaming
        payload["stream"] = False

        # Set max tokens to a high value to avoid truncation
        payload.setdefault("max_tokens", 4096)

        # Call LemonFox with retry logic
        response_json = await make_request_with_retry(payload)

        # Ensure response follows OpenAI format
        if "choices" not in response_json or not response_json["choices"]:
            logging.error("❌ LemonFox returned an empty `choices[]` array after retry!")
            response_json["choices"] = [
                {
                    "index": 0,
                    "message": {
                        "role": "assistant",
                        "content": "I'm sorry, but I didn't receive a valid response."
                    },
                    "finish_reason": "stop"
                }
            ]

        logging.debug("🟢 Final Response Sent to Open WebUI: %s", json.dumps(response_json, indent=2))
        return response_json

    except Exception as e:
        logging.error("❌ Unexpected Error in Proxy: %s", str(e))
        return {"error": str(e)}
Save and exit the file.
Running the proxy server manually
Enter the following command:
uvicorn proxy:app --host 0.0.0.0 --port 8000
Configuring Open-WebUI
Go to Open-WebUI Settings | Connections
Set API Base URL to:
http://localhost:8000/api/openai/v1
Ensure that model name matches:
mixtral-chat
Testing Open-WebUI with a simple message
Enter some text in the chat window and see if you get a response from the LLM.
Creating the systemd service
Enter the following command:
nano /etc/systemd/system/open-webui-proxy.service
Use the nano editor to add the following text:
[Unit]
Description=open-webui Proxy for Open WebUI and LLM API
After=network.target

[Service]
Type=simple
WorkingDirectory=/root/proxy_workdir  # Change to your script's location
ExecStart=/usr/bin/env bash -c "source /root/proxy_workdir/proxy_env/bin/activate && uvicorn proxy:app --host 0.0.0.0 --port 8000"
Restart=always
RestartSec=5
User=root
Group=root
StandardOutput=journal
StandardError=journal

[Install]
WantedBy=multi-user.target
As of early 2025, large language models (LLMs) are primarily accessed through web interfaces offered by companies like OpenAI, Anthropic (Perplexity/Claude), and Google (Gemini). Alongside these proprietary offerings, a “second tier” of open-source LLM models has emerged, including Meta’s LLaMA 3.1, Mistral, DeepSeek, and others. These open-source models are becoming increasingly viable for self-hosting, offering significant advantages in data sovereignty, confidentiality, and cost savings. For many use cases, they are roughly on par with proprietary models, making them an appealing alternative.
While web interfaces are the most visible way to interact with LLMs, they are largely loss leaders, designed to promote application programming interface (API) services. APIs are the backbone of the LLM ecosystem, enabling developers to integrate LLM capabilities into their own software. Through APIs, businesses can pass data and instructions to an LLM and retrieve outputs tailored to their needs. These APIs are central to the value proposition of LLMs, powering applications like retrieval-augmented generation (RAG) workflows for the scanning of document collections, automated form processing, and natural language interfaces for structured databases.
The growing market for LLM APIs
OpenAI was the first major player to offer an API for its LLMs, and its design has become a de facto standard, with many other LLM providers emulating its structure. This compatibility has paved the way for a competitive LLM inference hosting market. Applications leveraging APIs can often switch between providers with minimal effort, simply by changing the host address and API key. This interoperability is fostering a dynamic market for LLM inferencing, where cost, performance, and data privacy are key differentiators.
Example of an LLM API call
Here’s an example of a basic API call using curl. This same structure is supported by most LLM APIs:
curl https://api.lemonfox.ai/v1/chat/completions \
-H "Authorization: Bearer YOUR_API_KEY" \
-H "Content-Type: application/json" \
-d '{
"model": "mixtral-chat",
"messages": [
      { "role": "system", "content": "You are a helpful assistant." },
      { "role": "user", "content": "Why is the sky blue?" }
]
}'
This straightforward interface makes it easy for developers to integrate LLM capabilities into their applications, whether for natural language understanding, data extraction, or other advanced AI tasks.
Note: you may notice differences between this API call and the API calls we used with Ollama and Open-WebUI in previous blog posts. Ollama and Open-WebUI use a simplified protocol using a prompt field. The example above uses a messages array, compatible with the chat completions API, used by OpenAI and implemented by third parties such as lemonfox.ai
A historical parallel: LLM hosting and the web hosting market of the 2000s
The current trajectory of LLM inference hosting bears striking similarities to the early days of web hosting in the late 1990s and early 2000s. Back then, the advent of open-source technologies like Linux, Apache, MySQL, and PHP enabled hobbyists and businesses to build industrial-grade web servers on consumer hardware. While some opted to host websites themselves, most turned to professional web hosting providers, creating a competitive market that eventually drove down prices and established commoditized hosting as the norm.
Similarly, the LLM inference hosting market is evolving into a spectrum of options:
Self-hosting: Organizations can invest in high-performance hardware like NVIDIA’s H100 GPUs (priced at around US$30,000) or more modest setups using GPUs like the RTX 4090 or RTX 5090 (priced at around US$5,000). This option offers full control but requires significant upfront investment and technical expertise.
Leased GPU services: Cloud providers offer GPU resources on an hourly basis, making it possible to run LLMs without committing to physical hardware. For example, renting an H100 GPU typically costs around US$3 per hour.
Hosted inference services: Many providers offer LLM inference as a service, where customers pay per transaction or token. This model eliminates the need for infrastructure management, appealing to businesses that prioritize simplicity.
The economics of LLM hosting
The emergence of open-source models and interoperable APIs is driving fierce competition in the LLM hosting market. This competition has already led to dramatic price differences between providers. For example:
lemonfox.ai Mistral 7B: US$5 per 10 million tokens (using open-source models)
These disparities highlight the potential cost savings of opting for open-source models hosted by third-party providers or self-hosting solutions.
Renting GPUs vs. buying inference services
For businesses and developers, choosing between renting GPU time, self-hosting, or using inference services depends on several factors:
Scalability: Hosted inference services are ideal for unpredictable or spiky workloads, as they scale effortlessly.
Cost efficiency: For steady, high-volume workloads, self-hosting may be more economical in the long run.
Data control: Organizations with strict confidentiality requirements may prefer self-hosting to ensure data never leaves their infrastructure.
Open source software is free as in freedom, and free as in free beer. Although there are significant hardware costs for GPU capability, in general an enterprise can self-host AI without incurring software licensing fees.
Price competition from vendors using open source solutions no doubt has the effect of constraining the pricing power of closed source vendors.
For example, a small startup building a chatbot might initially use an inference provider like lemonfox.ai to minimize costs and complexity. As their user base grows, they might transition to leased GPU services or invest in dedicated hardware to optimize expenses.
A law firm or medical practice may begin with an air-gapped cloud instance with non-disclosure (NDA) and data protection (DPA) agreements. At some point, the business case may justify taking the service in-house with a self-hosted inference server with GPU hardware.
Conclusion: the road ahead for LLM inference hosting
As LLMs continue to gain traction, the LLM inference hosting market will likely follow the trajectory of web hosting two decades ago—moving toward commoditization and low-margin competition. Businesses and individuals will increasingly weigh the trade-offs between cost, control, and convenience when deciding how to deploy LLM capabilities. The availability of open-source models and interoperable APIs ensures that options will continue to expand, empowering developers to choose the solution that best meets their needs.
In this post, we create a Python script that connects to a Gmail inbox, extracts the text of the subject and body of each message, submits that text with a prompt to a large language model (LLM), then if conditions are met that match the prompt, escalates the message to the attention of an operator, based on a prompt.
Create a new app password. Take note of the password, it will not be visible again.
Note: Google adds spaces to the app password for readability. You should remove the spaces from the app password and use that value.
Escalating to the root user
In this procedure we run as the root user. Enter the following command:
sudo su
Adding utilities to the operating system
Enter the following command:
apt install python3-venv python3-pip sqlite3
Creating a virtual environment and installing required packages with pip
Enter the following commands:
cd ~
mkdir doicareworkdir
cd doicareworkdir
python3 -m venv doicare_env
source doicare_env/bin/activate
pip install requests imaplib2
Creating the configuration file (config.json)
Enter the following command:
nano config.json
Use the nano editor to add the following text:
{
  "gmail_user": "xxxxxxxxxxxx@xxxxx.xxx",
  "gmail_app_password": "xxxxxxxxxxxxxxxx",
  "api_base_url": "http://xxx.xxx.xxx.xxx:8085",
  "openai_api_key": "xxxxxxxxxxxxxxxxxxxxxxxxxxxxxxxxxxxxxxxxxxxxxxxxxxxxxxxxxxxxxxxxxxxxxxxxxxxxxxxxxxxxxxxxxxxxxxxxxxxxxxxxxxxxxxxxxxxxxxxxxxxxxxxxxxxxxxxxxxxxxxx",
  "database": "doicare.db",

  "scanasof": "18-Jan-2025",

  "alert_recipients": [
    "xxxxx@xxxxx.com"
  ],

  "smtp_server": "smtp.gmail.com",
  "smtp_port": 587,
  "smtp_user": "xxxxxx@xxxxx.xxxxx",
  "smtp_password": "xxxxxxxxxxxxxxxx",

  "analysis_prompt": "Analyze the email below. If it needs escalation (urgent, sender upset, or critical issue), return 'Escalation Reason:' followed by one short sentence explaining why. If no escalation is needed, return exactly 'DOESNOTAPPLY'. Always provide either 'DOESNOTAPPLY' or a reason.",
  "model": "mistral"

}
Save and exit the file.
Creating a Python script called doicare that connects to a Gmail inbox, submits messages to an LLM, and escalates messages based on a prompt (Ollama version)
Enter the following command:
nano doicare_gmail.py
import imaplib
import email
import sqlite3
import requests
import smtplib
import json
from datetime import datetime
from email.mime.text import MIMEText
from email.mime.multipart import MIMEMultipart
from email.header import decode_header, make_header

# MIT license 2025 Gordon Buchan
# see https://opensource.org/licenses/MIT
# Some of this code was generated with the assistance of AI tools.

# --------------------------------------------------------------------
# 1. LOAD CONFIG
# --------------------------------------------------------------------
with open("config.json", "r") as cfg:
    config = json.load(cfg)

GMAIL_USER = config["gmail_user"]
GMAIL_APP_PASSWORD = config["gmail_app_password"]
API_BASE_URL = config["api_base_url"]
OPENAI_API_KEY = config["openai_api_key"]
DATABASE = config["database"]
SCAN_ASOF = config["scanasof"]
ALERT_RECIPIENTS = config.get("alert_recipients", [])
SMTP_SERVER = config["smtp_server"]
SMTP_PORT = config["smtp_port"]
SMTP_USER = config["smtp_user"]
SMTP_PASSWORD = config["smtp_password"]
ANALYSIS_PROMPT = config["analysis_prompt"]
MODEL = config["model"]

# --------------------------------------------------------------------
# 2. DATABASE SETUP
# --------------------------------------------------------------------
def setup_database():
    conn = sqlite3.connect(DATABASE)
    cur = conn.cursor()
    cur.execute("""
        CREATE TABLE IF NOT EXISTS escalations (
            id INTEGER PRIMARY KEY AUTOINCREMENT,
            email_date TEXT,
            from_address TEXT,
            to_address TEXT,
            cc_address TEXT,
            subject TEXT,
            body TEXT,
            reason TEXT,
            created_at TEXT
        )
    """)
    cur.execute("""
        CREATE TABLE IF NOT EXISTS scan_info (
            id INTEGER PRIMARY KEY AUTOINCREMENT,
            last_scanned_uid INTEGER
        )
    """)
    conn.commit()
    conn.close()

def get_last_scanned_uid():
    conn = sqlite3.connect(DATABASE)
    cur = conn.cursor()
    cur.execute("SELECT last_scanned_uid FROM scan_info ORDER BY id DESC LIMIT 1")
    row = cur.fetchone()
    conn.close()
    return row[0] if (row and row[0]) else 0

def update_last_scanned_uid(uid_val):
    conn = sqlite3.connect(DATABASE)
    cur = conn.cursor()
    cur.execute("INSERT INTO scan_info (last_scanned_uid) VALUES (?)", (uid_val,))
    conn.commit()
    conn.close()

def is_already_processed(uid_val):
    conn = sqlite3.connect(DATABASE)
    cur = conn.cursor()
    cur.execute("SELECT 1 FROM scan_info WHERE last_scanned_uid = ?", (uid_val,))
    row = cur.fetchone()
    conn.close()
    return bool(row)

# --------------------------------------------------------------------
# 3. ANALYSIS & ALERTING
# --------------------------------------------------------------------
def analyze_with_openai(subject, body):
    prompt = f"{ANALYSIS_PROMPT}\n\nSubject: {subject}\nBody: {body}"
    url = f"{API_BASE_URL}/v1/completions"
    headers = {"Content-Type": "application/json"}
    if OPENAI_API_KEY:
        headers["Authorization"] = f"Bearer {OPENAI_API_KEY}"

    payload = {
        "model": MODEL,
        "prompt": prompt,
        "max_tokens": 300,
        "temperature": 0.7
    }

    try:
        response = requests.post(url, headers=headers, json=payload, timeout=60)
        data = response.json()

        if "error" in data:
            print(f"[DEBUG] API Error: {data['error']['message']}")
            return "DOESNOTAPPLY"

        if "choices" in data and data["choices"]:
            raw_text = data["choices"][0]["text"].strip()
            return raw_text

        return "DOESNOTAPPLY"

    except Exception as e:
        print(f"[DEBUG] Exception during API call: {e}")
        return "DOESNOTAPPLY"

def send_alerts(reason, email_date, from_addr, to_addr, cc_addr, subject, body):
    for recipient in ALERT_RECIPIENTS:
        msg = MIMEMultipart()
        msg["From"] = SMTP_USER
        msg["To"] = recipient
        msg["Subject"] = "Escalation Alert"

        alert_text = f"""
        Escalation Triggered
        Date: {email_date}
        From: {from_addr}
        To: {to_addr}
        CC: {cc_addr}
        Subject: {subject}
        Body: {body}

        Reason: {reason}
        """
        msg.attach(MIMEText(alert_text, "plain"))

        try:
            with smtplib.SMTP(SMTP_SERVER, SMTP_PORT) as server:
                server.starttls()
                server.login(SMTP_USER, SMTP_PASSWORD)
                server.sendmail(SMTP_USER, recipient, msg.as_string())
            print(f"Alert sent to {recipient}")
        except Exception as ex:
            print(f"Failed to send alert to {recipient}: {ex}")

def save_escalation(email_date, from_addr, to_addr, cc_addr, subject, body, reason):
    conn = sqlite3.connect(DATABASE)
    cur = conn.cursor()
    cur.execute("""
        INSERT INTO escalations (
            email_date, from_address, to_address, cc_address,
            subject, body, reason, created_at
        ) VALUES (?, ?, ?, ?, ?, ?, ?, ?)
    """, (
        email_date, from_addr, to_addr, cc_addr,
        subject, body, reason, datetime.now().isoformat()
    ))
    conn.commit()
    conn.close()

# --------------------------------------------------------------------
# 4. MAIN LOGIC
# --------------------------------------------------------------------
def process_message(raw_email, uid_val):
    parsed_msg = email.message_from_bytes(raw_email)

    date_str = parsed_msg.get("Date", "")
    from_addr = parsed_msg.get("From", "")
    to_addr = parsed_msg.get("To", "")
    cc_addr = parsed_msg.get("Cc", "")
    subject_header = parsed_msg.get("Subject", "")
    subject_decoded = str(make_header(decode_header(subject_header)))

    body_text = ""
    if parsed_msg.is_multipart():
        for part in parsed_msg.walk():
            ctype = part.get_content_type()
            disposition = str(part.get("Content-Disposition"))
            if ctype == "text/plain" and "attachment" not in disposition:
                charset = part.get_content_charset() or "utf-8"
                body_text += part.get_payload(decode=True).decode(charset, errors="replace")
    else:
        charset = parsed_msg.get_content_charset() or "utf-8"
        body_text = parsed_msg.get_payload(decode=True).decode(charset, errors="replace")

    reason = analyze_with_openai(subject_decoded, body_text)
    if "DOESNOTAPPLY" in reason:
        print(f"[UID {uid_val}] No escalation: {reason}")
        return

    print(f"[UID {uid_val}] Escalation triggered: {subject_decoded[:50]}")
    save_escalation(date_str, from_addr, to_addr, cc_addr, subject_decoded, body_text, reason)
    send_alerts(reason, date_str, from_addr, to_addr, cc_addr, subject_decoded, body_text)

def main():
    setup_database()
    last_uid = get_last_scanned_uid()
    print(f"[DEBUG] Retrieved last UID: {last_uid}")

    try:
        mail = imaplib.IMAP4_SSL("imap.gmail.com")
        mail.login(GMAIL_USER, GMAIL_APP_PASSWORD)
        print("IMAP login successful.")
    except Exception as e:
        print(f"Error logging into Gmail: {e}")
        return

    mail.select("INBOX")

    if last_uid == 0:
        print(f"[DEBUG] First run: scanning since date {SCAN_ASOF}")
        r1, d1 = mail.search(None, f'(SINCE {SCAN_ASOF})')
    else:
        print(f"[DEBUG] Subsequent run: scanning for UIDs > {last_uid}")
        r1, d1 = mail.uid('SEARCH', None, f'UID {last_uid + 1}:*')

    if r1 != "OK":
        print("[DEBUG] Search failed.")
        mail.logout()
        return

    seq_nums = d1[0].split()
    print(f"[DEBUG] Found {len(seq_nums)} messages to process: {seq_nums}")

    if not seq_nums:
        print("[DEBUG] No messages to process.")
        mail.logout()
        return

    highest_uid_seen = last_uid

    for seq_num in seq_nums:
        if is_already_processed(seq_num.decode()):
            print(f"[DEBUG] UID {seq_num.decode()} already processed, skipping.")
            continue

        print(f"[DEBUG] Processing sequence number: {seq_num}")
        r2, d2 = mail.uid('FETCH', seq_num.decode(), '(RFC822)')
        if r2 != "OK" or not d2 or len(d2) < 1 or not d2[0]:
            print(f"[DEBUG] Failed to fetch message for UID {seq_num.decode()}")
            continue

        print(f"[DEBUG] Successfully fetched message for UID {seq_num.decode()}")
        raw_email = d2[0][1]

        try:
            process_message(raw_email, int(seq_num.decode()))
            mail.uid('STORE', seq_num.decode(), '+FLAGS', '\\Seen')
            if int(seq_num.decode()) > highest_uid_seen:
                highest_uid_seen = int(seq_num.decode())
        except Exception as e:
            print(f"[DEBUG] Error processing message UID {seq_num.decode()}: {e}")

    if highest_uid_seen > last_uid:
        print(f"[DEBUG] Updating last scanned UID to {highest_uid_seen}")
        update_last_scanned_uid(highest_uid_seen)

    mail.logout()

if __name__ == "__main__":
    main()
Save and exit the file.
Creating a Python script called doicare that connects to a Gmail inbox, submits messages to an LLM, and escalates messages based on a prompt (OpenAI-compatible version)
Enter the following command:
nano doicare_gmail.py
import imaplib
import email
import sqlite3
import requests
import smtplib
import json
from datetime import datetime
from email.mime.text import MIMEText
from email.mime.multipart import MIMEMultipart
from email.header import decode_header, make_header

# MIT license 2025 Gordon Buchan
# see https://opensource.org/licenses/MIT
# Some of this code was generated with the assistance of AI tools.

# --------------------------------------------------------------------
# 1. LOAD CONFIG
# --------------------------------------------------------------------
with open("config.json", "r") as cfg:
    config = json.load(cfg)

GMAIL_USER = config["gmail_user"]
GMAIL_APP_PASSWORD = config["gmail_app_password"]
API_BASE_URL = config["api_base_url"]
OPENAI_API_KEY = config["openai_api_key"]
DATABASE = config["database"]
SCAN_ASOF = config["scanasof"]
ALERT_RECIPIENTS = config.get("alert_recipients", [])
SMTP_SERVER = config["smtp_server"]
SMTP_PORT = config["smtp_port"]
SMTP_USER = config["smtp_user"]
SMTP_PASSWORD = config["smtp_password"]
ANALYSIS_PROMPT = config["analysis_prompt"]
MODEL = config["model"]

# --------------------------------------------------------------------
# 2. DATABASE SETUP
# --------------------------------------------------------------------
def setup_database():
    """ Ensure the database and necessary tables exist. """
    conn = sqlite3.connect(DATABASE)
    cur = conn.cursor()

    print("[DEBUG] Ensuring database tables exist...")

    cur.execute("""
        CREATE TABLE IF NOT EXISTS escalations (
            id INTEGER PRIMARY KEY AUTOINCREMENT,
            email_date TEXT,
            from_address TEXT,
            to_address TEXT,
            cc_address TEXT,
            subject TEXT,
            body TEXT,
            reason TEXT,
            created_at TEXT
        )
    """)

    cur.execute("""
        CREATE TABLE IF NOT EXISTS scan_info (
            id INTEGER PRIMARY KEY AUTOINCREMENT,
            last_scanned_uid INTEGER UNIQUE
        )
    """)

    # Ensure at least one row exists in scan_info
    cur.execute("SELECT COUNT(*) FROM scan_info")
    if cur.fetchone()[0] == 0:
        cur.execute("INSERT INTO scan_info (last_scanned_uid) VALUES (0)")

    conn.commit()
    conn.close()
    print("[DEBUG] Database setup complete.")

def get_last_scanned_uid():
    """ Retrieve the last scanned UID from the database """
    conn = sqlite3.connect(DATABASE)
    cur = conn.cursor()
    cur.execute("SELECT last_scanned_uid FROM scan_info ORDER BY id DESC LIMIT 1")
    row = cur.fetchone()
    conn.close()
    return int(row[0]) if (row and row[0]) else 0

def update_last_scanned_uid(uid_val):
    """ Update the last scanned UID in the database """
    conn = sqlite3.connect(DATABASE)
    cur = conn.cursor()
    cur.execute("""
        INSERT INTO scan_info (id, last_scanned_uid)
        VALUES (1, ?)
        ON CONFLICT(id) DO UPDATE SET last_scanned_uid = excluded.last_scanned_uid
    """, (uid_val,))
    conn.commit()
    conn.close()

# --------------------------------------------------------------------
# 3. ANALYSIS & ALERTING
# --------------------------------------------------------------------
def analyze_with_openai(subject, body):
    """ Send email content to OpenAI API for analysis """
    prompt = f"{ANALYSIS_PROMPT}\n\nSubject: {subject}\nBody: {body}"
    url = f"{API_BASE_URL}/v1/chat/completions"
    headers = {
        "Content-Type": "application/json",
        "Authorization": f"Bearer {OPENAI_API_KEY}" if OPENAI_API_KEY else "",
    }

    payload = {
        "model": MODEL,
        "messages": [
            {"role": "system", "content": "You are a helpful assistant"},
            {"role": "user", "content": prompt}
        ],
        "max_tokens": 300,
        "temperature": 0.7
    }

    try:
        response = requests.post(url, headers=headers, json=payload, timeout=60)
        data = response.json()

        if "error" in data:
            print(f"[DEBUG] API Error: {data['error']['message']}")
            return "DOESNOTAPPLY"

        if "choices" in data and data["choices"]:
            return data["choices"][0]["message"]["content"].strip()

        return "DOESNOTAPPLY"

    except Exception as e:
        print(f"[DEBUG] Exception during API call: {e}")
        return "DOESNOTAPPLY"

# --------------------------------------------------------------------
# 4. MAIN LOGIC
# --------------------------------------------------------------------
def process_message(raw_email, uid_val):
    """ Process a single email message """
    parsed_msg = email.message_from_bytes(raw_email)

    date_str = parsed_msg.get("Date", "")
    from_addr = parsed_msg.get("From", "")
    to_addr = parsed_msg.get("To", "")
    cc_addr = parsed_msg.get("Cc", "")
    subject_header = parsed_msg.get("Subject", "")
    subject_decoded = str(make_header(decode_header(subject_header)))

    body_text = ""
    if parsed_msg.is_multipart():
        for part in parsed_msg.walk():
            ctype = part.get_content_type()
            disposition = str(part.get("Content-Disposition"))
            if ctype == "text/plain" and "attachment" not in disposition:
                charset = part.get_content_charset() or "utf-8"
                body_text += part.get_payload(decode=True).decode(charset, errors="replace")
    else:
        charset = parsed_msg.get_content_charset() or "utf-8"
        body_text = parsed_msg.get_payload(decode=True).decode(charset, errors="replace")

    reason = analyze_with_openai(subject_decoded, body_text)
    if "DOESNOTAPPLY" in reason:
        print(f"[UID {uid_val}] No escalation: {reason}")
        return

    print(f"[UID {uid_val}] Escalation triggered: {subject_decoded[:50]}")

    update_last_scanned_uid(uid_val)

def main():
    """ Main function to fetch and process emails """
    setup_database()
    last_uid = get_last_scanned_uid()
    print(f"[DEBUG] Retrieved last UID: {last_uid}")

    try:
        mail = imaplib.IMAP4_SSL("imap.gmail.com")
        mail.login(GMAIL_USER, GMAIL_APP_PASSWORD)
        print("IMAP login successful.")
    except Exception as e:
        print(f"Error logging into Gmail: {e}")
        return

    mail.select("INBOX")

    search_query = f'UID {last_uid + 1}:*' if last_uid > 0 else f'SINCE {SCAN_ASOF}'
    print(f"[DEBUG] Running IMAP search: {search_query}")

    r1, d1 = mail.uid('SEARCH', None, search_query)

    if r1 != "OK":
        print("[DEBUG] Search failed.")
        mail.logout()
        return

    seq_nums = d1[0].split()
    seq_nums = [seq.decode() for seq in seq_nums]

    print(f"[DEBUG] Found {len(seq_nums)} new messages: {seq_nums}")

    if not seq_nums:
        print("[DEBUG] No new messages found, exiting.")
        mail.logout()
        return

    highest_uid_seen = last_uid

    for seq_num in seq_nums:
        numeric_uid = int(seq_num)
        if numeric_uid <= last_uid:
            print(f"[DEBUG] UID {numeric_uid} already processed, skipping.")
            continue

        print(f"[DEBUG] Processing UID: {numeric_uid}")
        r2, d2 = mail.uid('FETCH', seq_num, '(RFC822)')
        if r2 != "OK" or not d2 or len(d2) < 1 or not d2[0]:
            print(f"[DEBUG] Failed to fetch message for UID {numeric_uid}")
            continue

        raw_email = d2[0][1]
        process_message(raw_email, numeric_uid)

        highest_uid_seen = max(highest_uid_seen, numeric_uid)

    if highest_uid_seen > last_uid:
        print(f"[DEBUG] Updating last scanned UID to {highest_uid_seen}")
        update_last_scanned_uid(highest_uid_seen)

    mail.logout()

if __name__ == "__main__":
    main()
Save and exit the file.
Running the doicare_gmail.py script
Enter the following command:
python3 doicare_gmail.py
Sample output
(doicare_env) root@xxxxx:/home/desktop/doicareworkingdir# python3 doicare_gmail.py
[DEBUG] Retrieved last UID: 0
IMAP login successful.
[DEBUG] First run: scanning since date 18-Jan-2025
[DEBUG] Found 23 messages to process: [b'49146', b'49147', b'49148', b'49149', b'49150', b'49151', b'49152', b'49153', b'49154', b'49155', b'49156', b'49157', b'49158', b'49159', b'49160', b'49161', b'49162', b'49163', b'49164', b'49165', b'49166', b'49167', b'49168']
[DEBUG] Processing sequence number: b'49146'
[DEBUG] FETCH response: b'49146 (UID 50196)'
[DEBUG] FETCH line to parse: 49146 (UID 50196)
[DEBUG] Parsed UID: 50196
[DEBUG] Valid UID Found: 50196
[DEBUG] Successfully fetched message for UID 50196
[UID 50196] No escalation: DOESNOTAPPLY. The email does not contain any urgent matter, sender is not upset, and there does not seem to be a critical issue mentioned.
[DEBUG] Processing sequence number: b'49147'
[DEBUG] FETCH response: b'49147 (UID 50197)'
[DEBUG] FETCH line to parse: 49147 (UID 50197)
[DEBUG] Parsed UID: 50197
[DEBUG] Valid UID Found: 50197
[DEBUG] Successfully fetched message for UID 50197
[UID 50197] No escalation: DOESNOTAPPLY
[DEBUG] Processing sequence number: b'49148'
[DEBUG] FETCH response: b'49148 (UID 50198)'
[DEBUG] FETCH line to parse: 49148 (UID 50198)
[DEBUG] Parsed UID: 50198
[DEBUG] Valid UID Found: 50198
[DEBUG] Successfully fetched message for UID 50198
[UID 50198] No escalation: DOESNOTAPPLY. The email does not contain any urgent matter, sender is not upset, and there doesn't seem to be a critical issue presented in the content.
[DEBUG] Processing sequence number: b'49149'
[DEBUG] FETCH response: b'49149 (UID 50199)'
[DEBUG] FETCH line to parse: 49149 (UID 50199)
[DEBUG] Parsed UID: 50199
[DEBUG] Valid UID Found: 50199
[DEBUG] Successfully fetched message for UID 50199
[UID 50199] No escalation: DOESNOTAPPLY. The email does not contain any urgent matter, the sender is not upset, and there is no critical issue mentioned in the message.
[DEBUG] Processing sequence number: b'49150'
[DEBUG] FETCH response: b'49150 (UID 50200)'
[DEBUG] FETCH line to parse: 49150 (UID 50200)
[DEBUG] Parsed UID: 50200
[DEBUG] Valid UID Found: 50200
[DEBUG] Successfully fetched message for UID 50200
[UID 50200] No escalation: DOESNOTAPPLY. The email lacks sufficient content for an escalation.
[DEBUG] Processing sequence number: b'49151'
[DEBUG] FETCH response: b'49151 (UID 50201)'
[DEBUG] FETCH line to parse: 49151 (UID 50201)
[DEBUG] Parsed UID: 50201
[DEBUG] Valid UID Found: 50201
[DEBUG] Successfully fetched message for UID 50201
[UID 50201] Escalation triggered: Security alert
Alert sent to xxxx@hotmail.com
[DEBUG] Processing sequence number: b'49152'
[DEBUG] FETCH response: b'49152 (UID 50202)'
[DEBUG] FETCH line to parse: 49152 (UID 50202)
[DEBUG] Parsed UID: 50202
[DEBUG] Valid UID Found: 50202
[DEBUG] Successfully fetched message for UID 50202
[UID 50202] Escalation triggered: Delivery Status Notification (Failure)
Alert sent to xxxx@hotmail.com
[DEBUG] Processing sequence number: b'49153'
[DEBUG] FETCH response: b'49153 (UID 50203)'
[DEBUG] FETCH line to parse: 49153 (UID 50203)
[DEBUG] Parsed UID: 50203
[DEBUG] Valid UID Found: 50203
[DEBUG] Successfully fetched message for UID 50203
[UID 50203] No escalation: DOESNOTAPPLY
[DEBUG] Processing sequence number: b'49154'
[DEBUG] FETCH response: b'49154 (UID 50204)'
[DEBUG] FETCH line to parse: 49154 (UID 50204)
[DEBUG] Parsed UID: 50204
[DEBUG] Valid UID Found: 50204
[DEBUG] Successfully fetched message for UID 50204
[UID 50204] Escalation triggered: my server lollipop is down
Alert sent to xxxx@hotmail.com
[DEBUG] Processing sequence number: b'49155'
[DEBUG] FETCH response: b'49155 (UID 50205)'
[DEBUG] FETCH line to parse: 49155 (UID 50205)
[DEBUG] Parsed UID: 50205
[DEBUG] Valid UID Found: 50205
[DEBUG] Successfully fetched message for UID 50205
[UID 50205] No escalation: DOESNOTAPPLY
[DEBUG] Processing sequence number: b'49156'
[DEBUG] FETCH response: b'49156 (UID 50206)'
[DEBUG] FETCH line to parse: 49156 (UID 50206)
[DEBUG] Parsed UID: 50206
[DEBUG] Valid UID Found: 50206
[DEBUG] Successfully fetched message for UID 50206
[UID 50206] Escalation triggered: now doomfire is down too!
Alert sent to xxxx@hotmail.com
[DEBUG] Processing sequence number: b'49157'
[DEBUG] FETCH response: b'49157 (UID 50207)'
[DEBUG] FETCH line to parse: 49157 (UID 50207)
[DEBUG] Parsed UID: 50207
[DEBUG] Valid UID Found: 50207
[DEBUG] Successfully fetched message for UID 50207
[UID 50207] No escalation: DOESNOTAPPLY
[DEBUG] Processing sequence number: b'49158'
[DEBUG] FETCH response: b'49158 (UID 50208)'
[DEBUG] FETCH line to parse: 49158 (UID 50208)
[DEBUG] Parsed UID: 50208
[DEBUG] Valid UID Found: 50208
[DEBUG] Successfully fetched message for UID 50208
[UID 50208] Escalation triggered: pants is down now
Alert sent to xxxx@hotmail.com
[DEBUG] Processing sequence number: b'49159'
[DEBUG] FETCH response: b'49159 (UID 50209)'
[DEBUG] FETCH line to parse: 49159 (UID 50209)
[DEBUG] Parsed UID: 50209
[DEBUG] Valid UID Found: 50209
[DEBUG] Successfully fetched message for UID 50209
[UID 50209] Escalation triggered: server05 down
Alert sent to xxxx@hotmail.com
[DEBUG] Processing sequence number: b'49160'
[DEBUG] FETCH response: b'49160 (UID 50210)'
[DEBUG] FETCH line to parse: 49160 (UID 50210)
[DEBUG] Parsed UID: 50210
[DEBUG] Valid UID Found: 50210
[DEBUG] Successfully fetched message for UID 50210
[UID 50210] No escalation: DOESNOTAPPLY (The sender has asked for a phone call instead of specifying the issue in detail, so it doesn't appear to be urgent or critical at first glance.)
[DEBUG] Processing sequence number: b'49161'
[DEBUG] FETCH response: b'49161 (UID 50211)'
[DEBUG] FETCH line to parse: 49161 (UID 50211)
[DEBUG] Parsed UID: 50211
[DEBUG] Valid UID Found: 50211
[DEBUG] Successfully fetched message for UID 50211
[UID 50211] Escalation triggered: my server is down
Alert sent to xxxx@hotmail.com
[DEBUG] Processing sequence number: b'49162'
[DEBUG] FETCH response: b'49162 (UID 50212)'
[DEBUG] FETCH line to parse: 49162 (UID 50212)
[DEBUG] Parsed UID: 50212
[DEBUG] Valid UID Found: 50212
[DEBUG] Successfully fetched message for UID 50212
[UID 50212] No escalation: DOESNOTAPPLY
[DEBUG] Processing sequence number: b'49163'
[DEBUG] FETCH response: b'49163 (UID 50213)'
[DEBUG] FETCH line to parse: 49163 (UID 50213)
[DEBUG] Parsed UID: 50213
[DEBUG] Valid UID Found: 50213
[DEBUG] Successfully fetched message for UID 50213
[UID 50213] Escalation triggered: this is getting bad
Alert sent to xxxx@hotmail.com
[DEBUG] Processing sequence number: b'49164'
[DEBUG] FETCH response: b'49164 (UID 50214)'
[DEBUG] FETCH line to parse: 49164 (UID 50214)
[DEBUG] Parsed UID: 50214
[DEBUG] Valid UID Found: 50214
[DEBUG] Successfully fetched message for UID 50214
[UID 50214] No escalation: DOESNOTAPPLY
[DEBUG] Processing sequence number: b'49165'
[DEBUG] FETCH response: b'49165 (UID 50215)'
[DEBUG] FETCH line to parse: 49165 (UID 50215)
[DEBUG] Parsed UID: 50215
[DEBUG] Valid UID Found: 50215
[DEBUG] Successfully fetched message for UID 50215
[UID 50215] Escalation triggered: server zebra 05 is down
Alert sent to xxxx@hotmail.com
[DEBUG] Processing sequence number: b'49166'
[DEBUG] FETCH response: b'49166 (UID 50216)'
[DEBUG] FETCH line to parse: 49166 (UID 50216)
[DEBUG] Parsed UID: 50216
[DEBUG] Valid UID Found: 50216
[DEBUG] Successfully fetched message for UID 50216
[UID 50216] No escalation: DOESNOTAPPLY
[DEBUG] Processing sequence number: b'49167'
[DEBUG] FETCH response: b'49167 (UID 50217)'
[DEBUG] FETCH line to parse: 49167 (UID 50217)
[DEBUG] Parsed UID: 50217
[DEBUG] Valid UID Found: 50217
[DEBUG] Successfully fetched message for UID 50217
[UID 50217] Escalation triggered: help
Alert sent to xxxx@hotmail.com
[DEBUG] Processing sequence number: b'49168'
[DEBUG] FETCH response: b'49168 (UID 50218)'
[DEBUG] FETCH line to parse: 49168 (UID 50218)
[DEBUG] Parsed UID: 50218
[DEBUG] Valid UID Found: 50218
[DEBUG] Successfully fetched message for UID 50218
[UID 50218] Escalation triggered: server is down
Alert sent to xxxx@hotmail.com
[DEBUG] Updating last scanned UID to 50218
[DEBUG] Attempting to update last scanned UID to 50218
[DEBUG] Last scanned UID successfully updated to 50218
Example of an alert message
Escalation Triggered
Date: Sat, 18 Jan 2025 21:00:16 +0000
From: Gordon Buchan <gordonhbuchan@hotmail.com>
To: "gordonhbuchan@gmail.com" <gordonhbuchan@gmail.com>
CC:
Subject: server is down
Body: server down help please


Reason: Escalation Reason: This email indicates that there is a critical issue (server downtime).
Creating a systemd service to run the doicare script automatically
Enter the following command:
nano /etc/systemd/system/doicare.service
Use the nano editor to add the following text (change values to match your path):
In this post, we install the Ollama LLM hosting software, and load a large language model (LLM), a 5GB file produced by a company called Mistral. We then test local inference, interacting with the model at the command line. We send test queries to the application protocol interface (API) server. We install an application called Open-WebUI that enables a web chat interface to the LLM.
Note: this procedure references the mistral model. however, you can specify other models, such as dolphin-mistral. Consult the following page for available models. Try to limit your choices to 7B complexity, unless you have a GPU.
Until 2023, graphical processing units (GPUs) were only of interest to video gamers, animators, and mechanical designers. There is now an imperative for GPU resources on most new servers going forward, for local inference and retrieval augmented generation (RAG). However we will need to devise an interim approach to use the CPU-centric servers we have, even for some AI inference tasks, until the capex cycles have refreshed in 3-4 years from now. On a CPU-only system, the system response time for a query can range from 2-5 seconds to 30-40 seconds. This level of performance may be acceptable for some use cases, including scripted tasks for which a 40 second delay is not material. Deploying this solution on a system with even a modest Nvidia GPU will result in dramatic increases in performance.
Why host an LLM locally
To learn how LLMs are built
To achieve data sovereignty by operating on a private system
To save expense by avoiding the need for external LLM vendors
Preparing a computer for deployment
This procedure was tested on Ubuntu Server 24.04. Baremetal is better than a virtual machine for this use case, allowing the software to access all of the resources of the host system. In terms of resources, you will need a relatively powerful CPU, like an i7, and 16-32GB of RAM.
Note: the version of Python required by Open-WebUI is Python 3.12, which is supported by default in Ubuntu Server 24.04 LTS. If you are on an older version of the operating, you can install a newer version of Python using a PPA.
Do you need a GPU?
No, but a GPU will make your inference noticeably faster. If you have an Nvidia GPU, ensure that you have Nvidia CUDA drivers enabled. If you have an AMD GPU, ensure that you have AMD ROCM drivers. There is some talk of support for Intel GPUs but none of it is yet practical.
Note: if you have an Nvidia GPU, you may want to consider vLLM.
Ollama is able to work on a CPU-only system
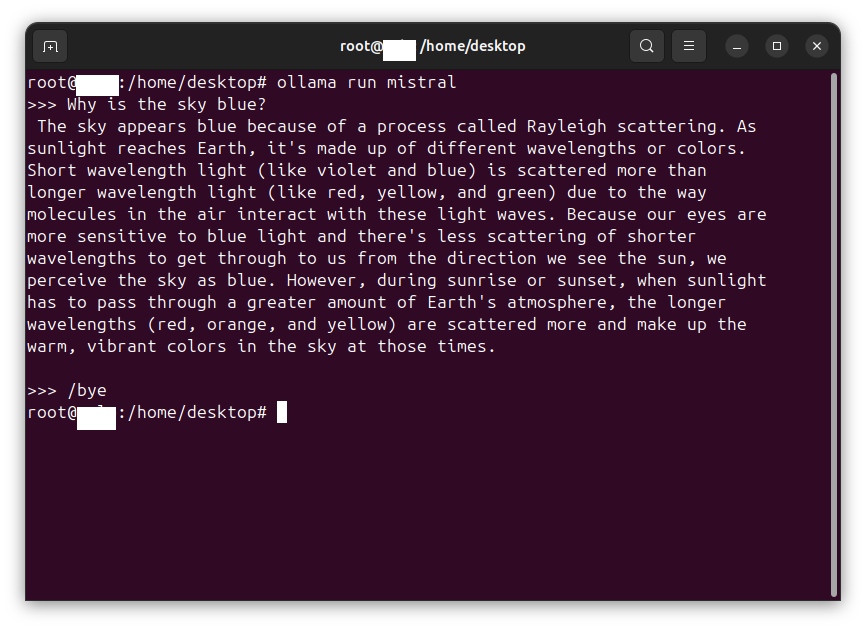
Ollama is able to work on a CPU-only system, and that is what we will implement in this post. Ollama is able to achieve performance that may be acceptable for certain kinds of operations. For example, large batch operations that run overnight, that can accept a 30-60 second delay versus 2-10 seconds for a GPU-driven solution. For some questions, like “why is the sky blue?’ an answer will start immediately. For more complex questions, there may be a 5-10 second delay before answering, and the text will arrive slowly enough to remind you of 300 baud modems (for those of you who get that reference). The wonder of a dancing bear is not in how well it dances, but that it dances at all. This level of performance may be acceptable for some use cases, in particular batched operations and programmatic access via a custom function invoking commands sent to the API server.
Escalating to root using sudo
From a shell, enter the following command:
sudo su
(enter the password when requested)
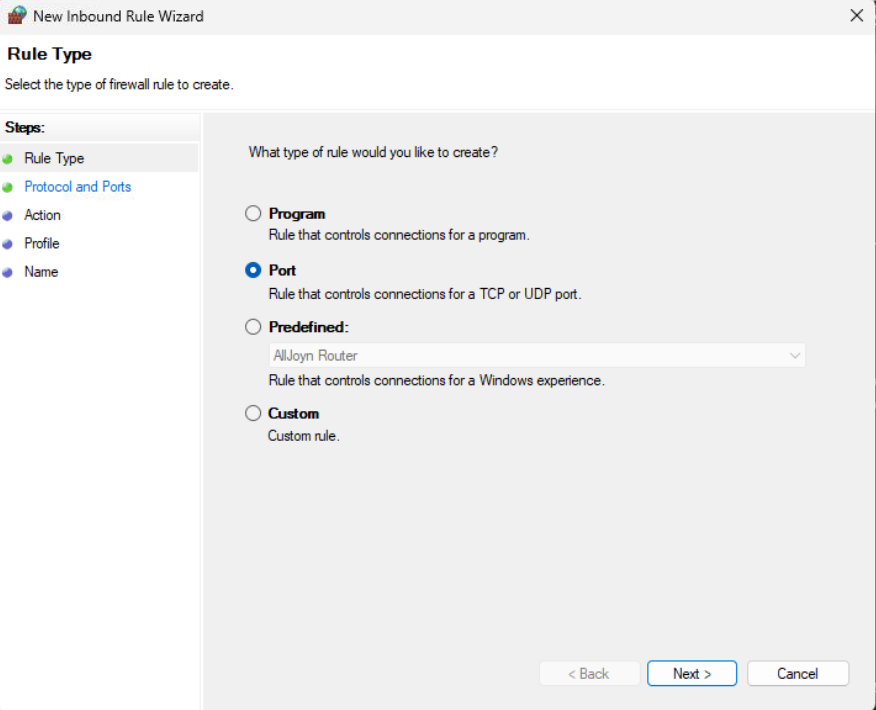
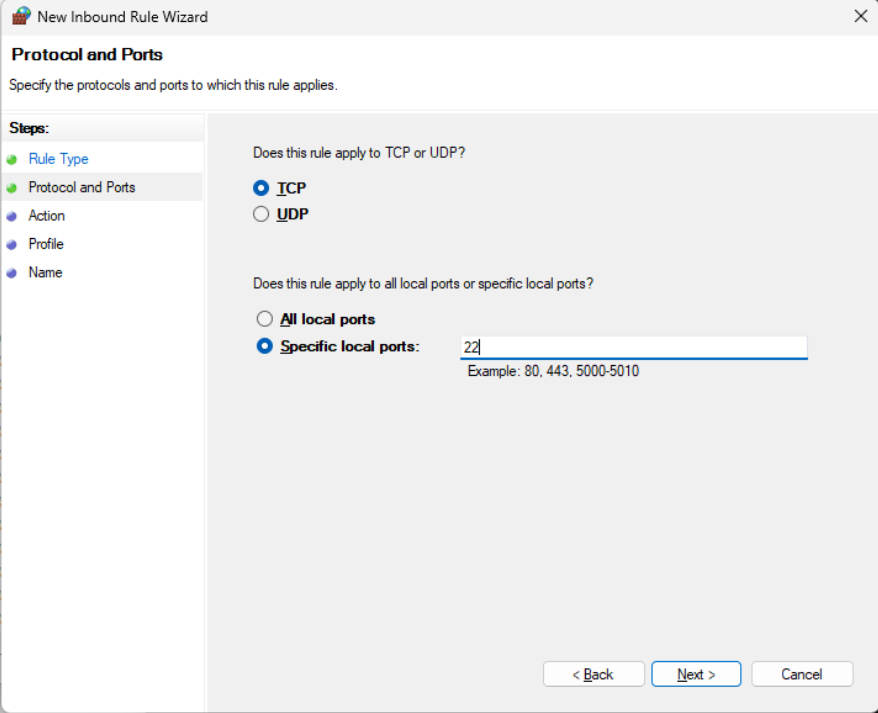
Opening ports in the UFW firewall
You may need to open ports on the UFW firewall to enable the chat client.
A note re RHEL and variants like Fedora and AlmaLinux
Although this procedure has not been tested on RHEL and variants like Fedora and AlmaLinux, I looked at the installation script and those platforms are supported. In theory, you could configure an RHEL-type system by using equivalent firewall-cmd and dnf commands.
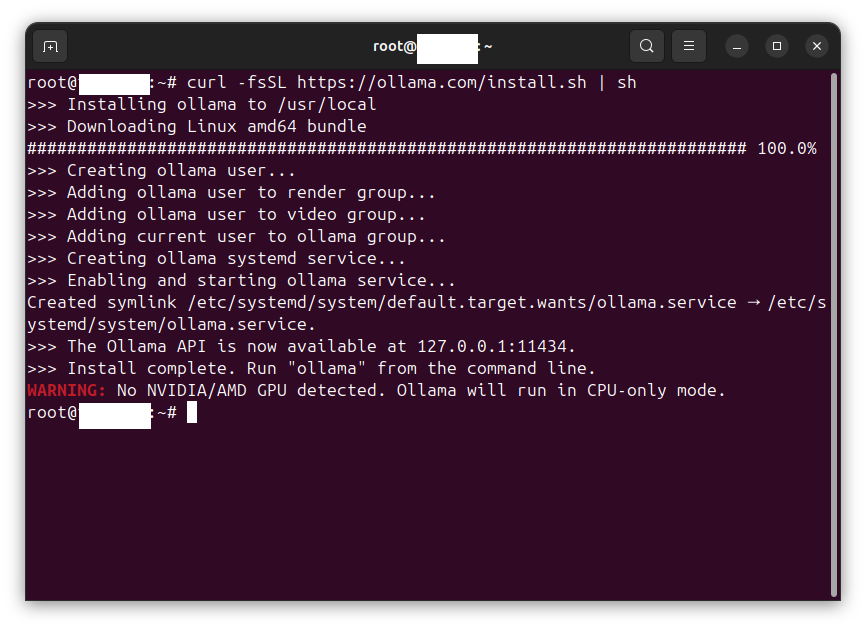
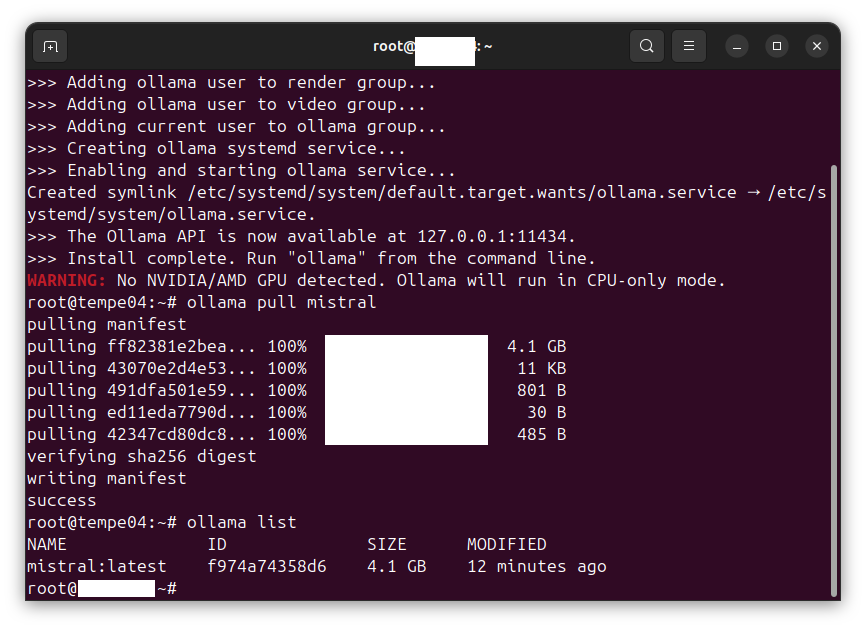
Installing Ollama using the installation script
Ollama provides an installation script that automates the installation. From a shell as root, enter the following command:
curl -fsSL https://ollama.com/install.sh | sh
Pulling the mistral image
Enter the following command:
ollama pull mistral
Listing the images available
Enter the following command:
ollama list
Testing Ollama and the LLM using the command line
Enter the following command. Test the chat interface on the command line in the shell:
ollama run mistral
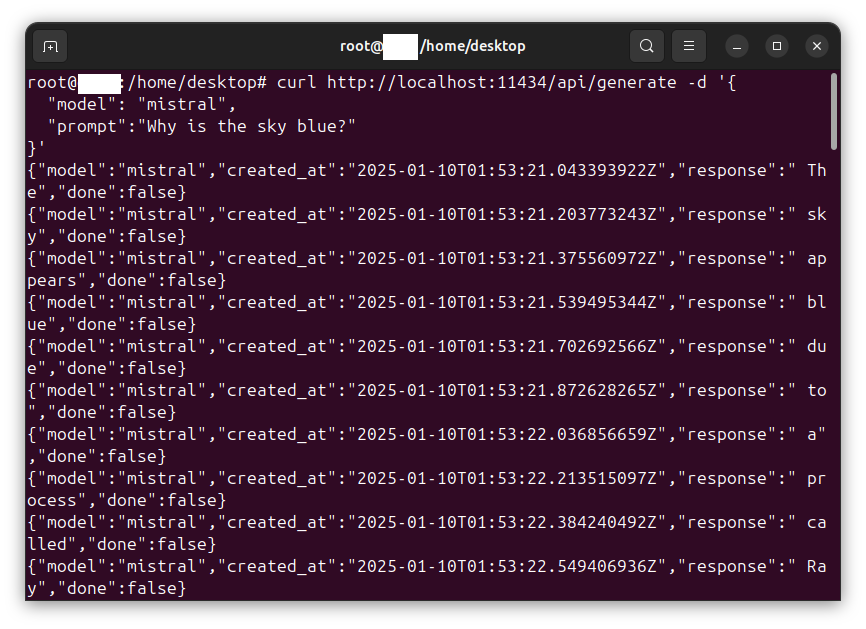
Testing the API server using curl
Enter the following commands:
systemctl restart ollama
systemctl status ollama
systemctl enable ollama
curl http://localhost:11434/api/generate -d '{
"model": "mistral",
"prompt":"Why is the sky blue?"
}'
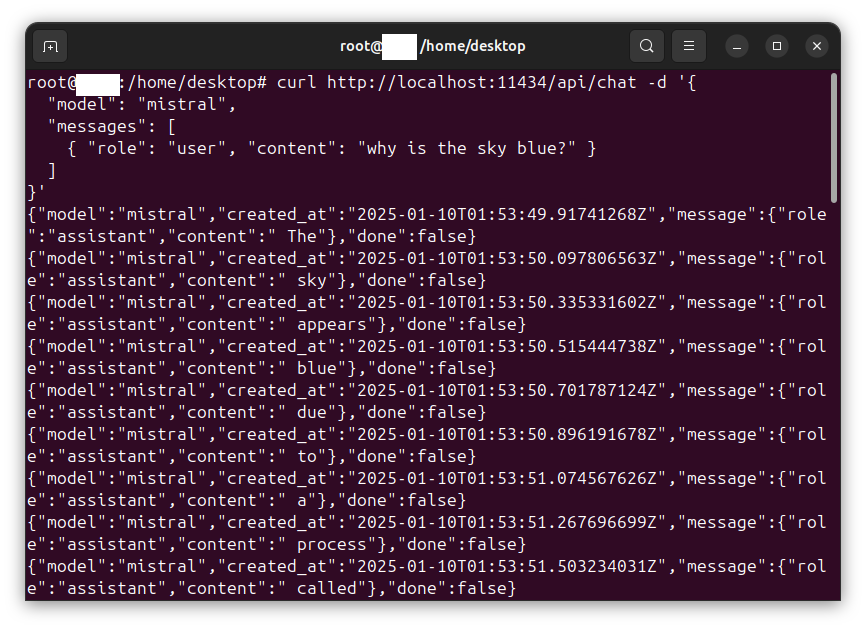
Enter the following command:
curl http://localhost:11434/api/chat -d '{
"model": "mistral",
"messages": [
{ "role": "user", "content": "why is the sky blue?" }
]
}'
Preparing the system for Open-WebUI
To prepare the system for Open-WebUI, we must create a working directory, and create a venv (virtual python environment).
Enter the following commands:
cd ~
pwd
mkdir ollamatmp
cd ollamatmp
python3 -m venv ollama_env
source ollama_env/bin/activate
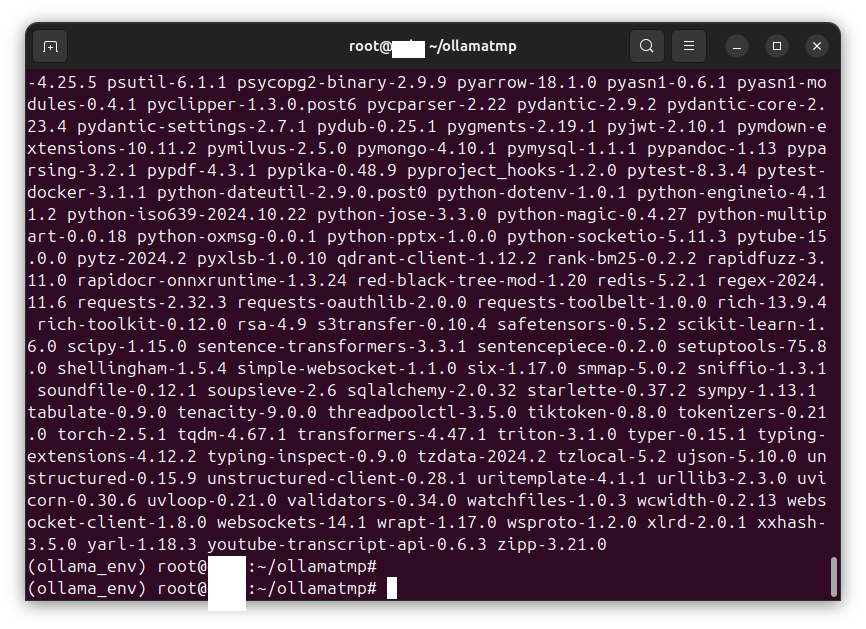
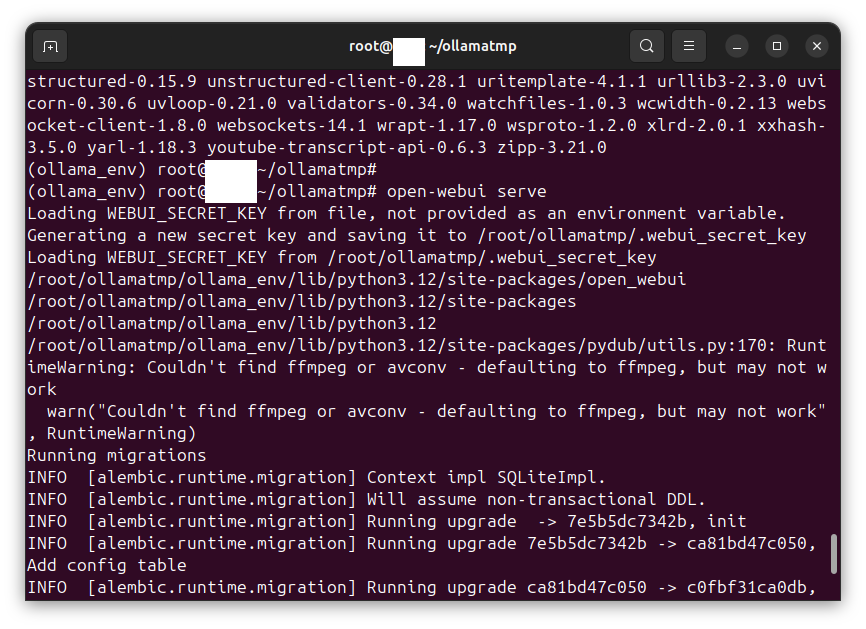
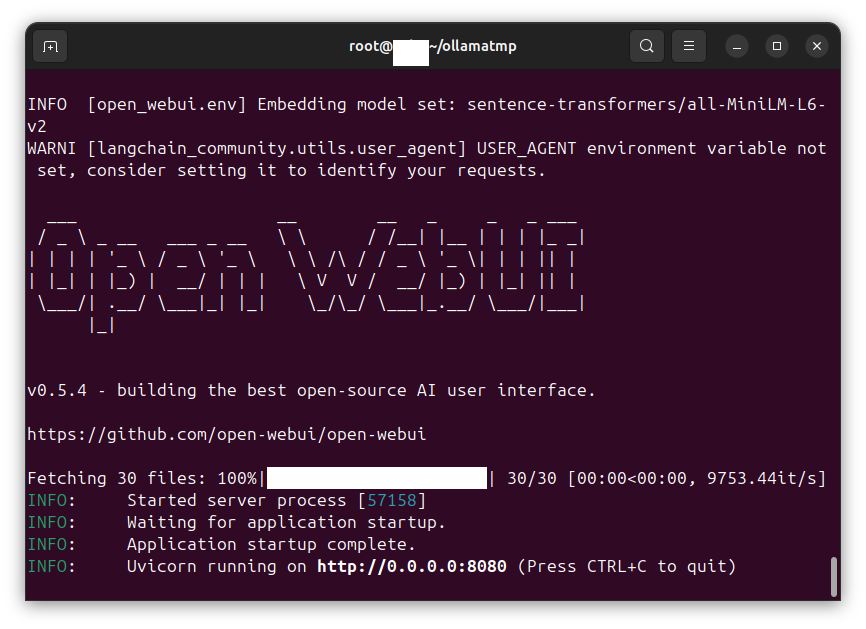
pip install open-webui
This window took 30 seconds to begin showing its answer, then another 20 seconds to complete generating the answer:
Using nginx as a proxy to expose the API port to the local network
By default, the Ollama API server answers on port 11434 but only on the local address 127.0.0.1. You can use nginx as a proxy to expose the API to the local network. Enter the following commands:
ufw allow 8085/tcp
apt install nginx
cd /etc/nginx/sites-enabled
nano default
Use the nano editor to add the following text:
server {
    listen 8085;

    location / {
        proxy_pass http://127.0.0.1:11434;  # Replace with your Ollama API port
        proxy_http_version 1.1;
        proxy_set_header Upgrade $http_upgrade;
        proxy_set_header Connection 'upgrade';
        proxy_set_header Host $host;
        proxy_cache_bypass $http_upgrade;

        # Optional: Add timeout settings for long-running API calls
        proxy_connect_timeout 60s;
        proxy_read_timeout 60s;
        proxy_send_timeout 60s;
    }
}
Save and exit the file.
Enter this command:
systemctl restart nginx
Testing the exposed API port from another computer
From another computer, enter the command (where xxx.xxx.xxx.xxx is the IP address of the computer hosting the Ollama API server):
curl http://xxx.xxx.xxx.xxx:8085/api/chat -d '{
"model": "mistral",
"messages": [
{ "role": "user", "content": "why is the sky blue?" }
]
}'
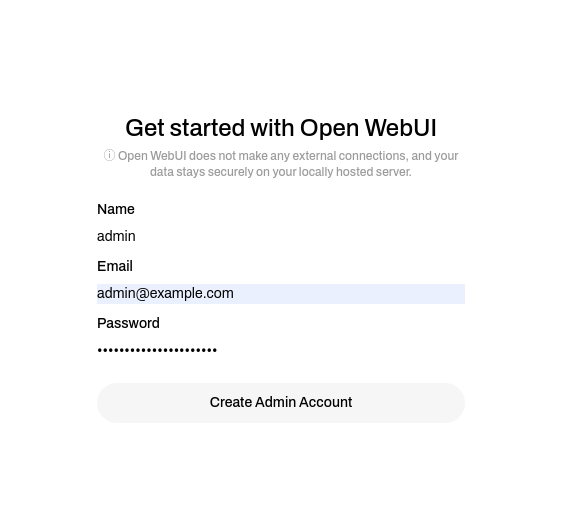
Creating a systemd service to start the Open-WebUI chat interface automatically
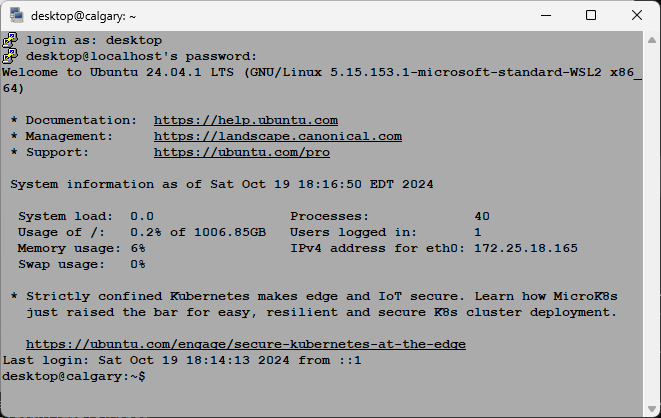
In this post we install and configure an instance of Ubuntu Server under WSL2 for Linux. Many developers are going to choose to use WSL2, so we guide them to install the Ubuntu Server version of WSL2. This provides a more standard environment referenced by many howto procedures on the Internet.
WSL2 enables a computer running Windows 11 Pro to host a guest instance of Ubuntu Server:
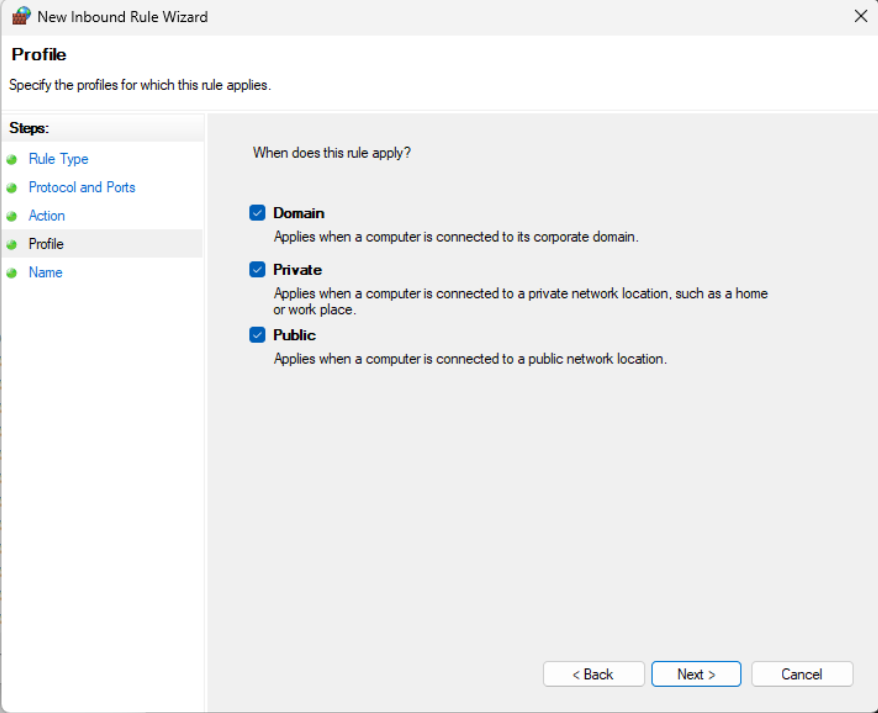
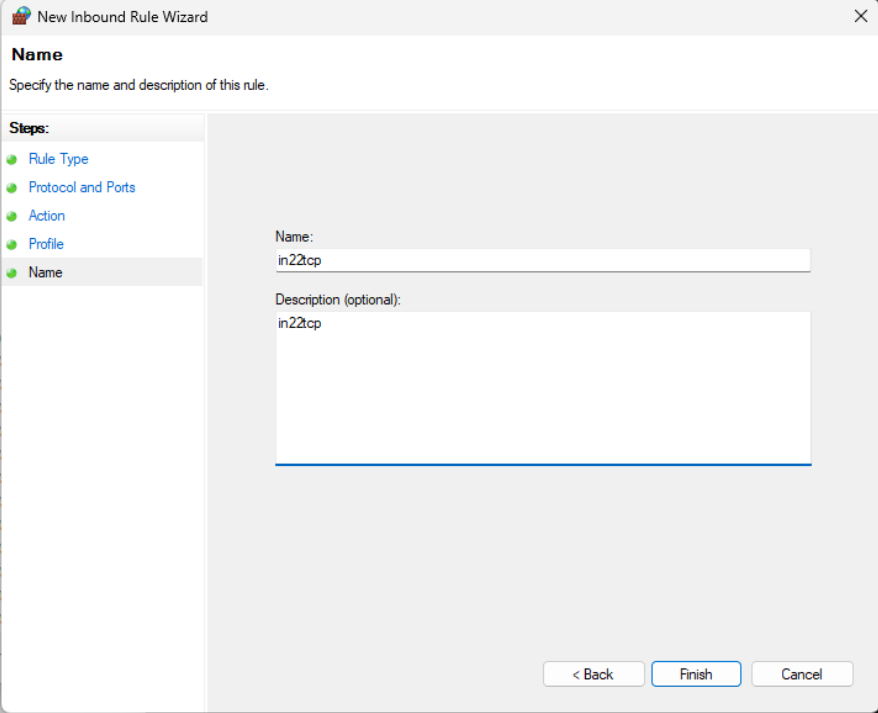
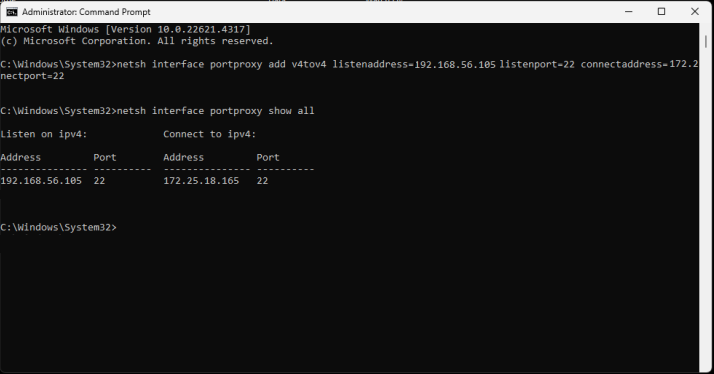
WSL2 offers some advantages for a developer experience
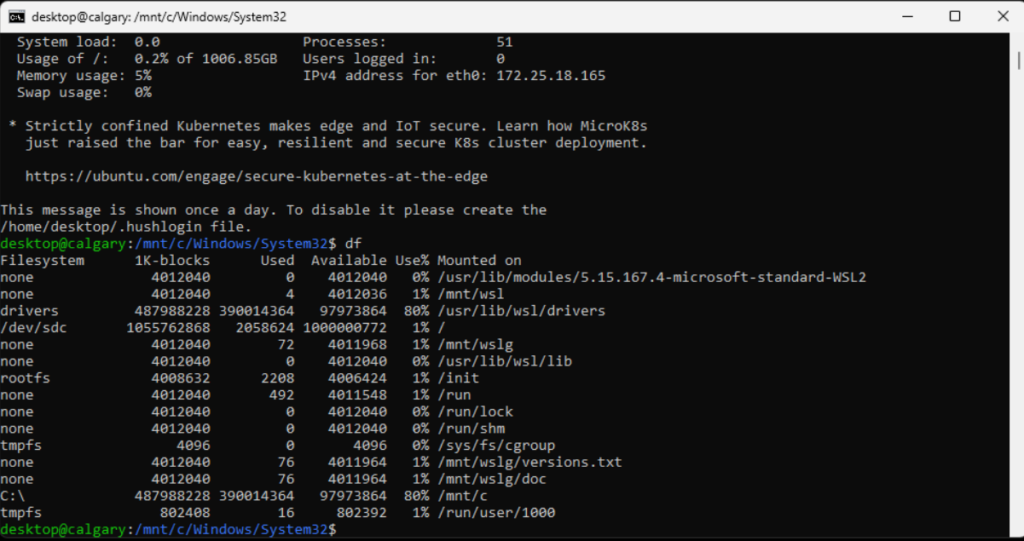
WSL2 offers some advantages for a local developer in terms of networking: if they install a service that opens a port, like port 22/tcp for SSH, that same port is opened on localhost of the Windows machine hosting the WSL2 Ubuntu Server instance. A developer can SSH to port 22 on localhost, without configuring a static IP address or port forwarding. This eliminates the need to configure virtual switches, static IP addresses, and port forwarding. In addition, WSL2 provides a file mounts of the Windows file system within Linux, and a file mount of the Linux filesystem within Windows.
Other ways to install Ubuntu Server on a Windows 11 Pro computer
There are other ways to install Ubuntu Server on a Windows 11 Pro computer, including Windows Hyper-V. If you need to host multiple instances of Ubuntu Server with static IP addresses and subnet routing, consider using Hyper-V instead.
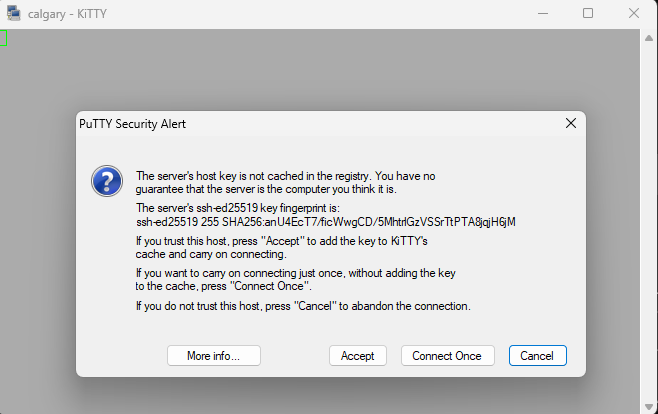
Installing WSL2
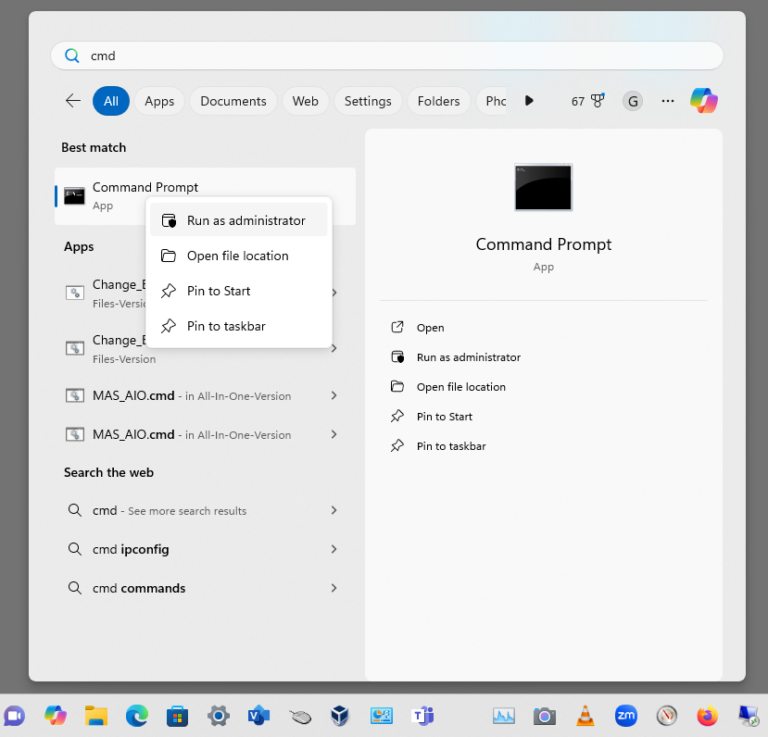
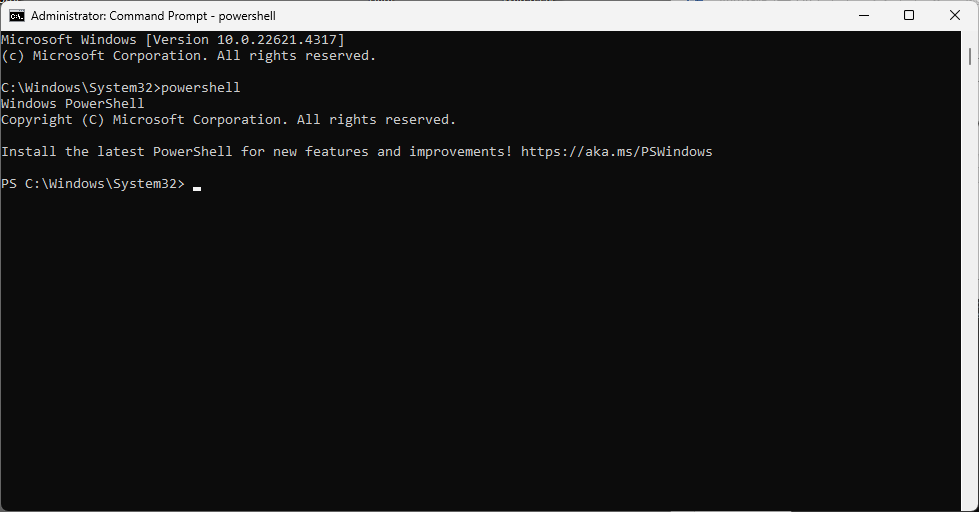
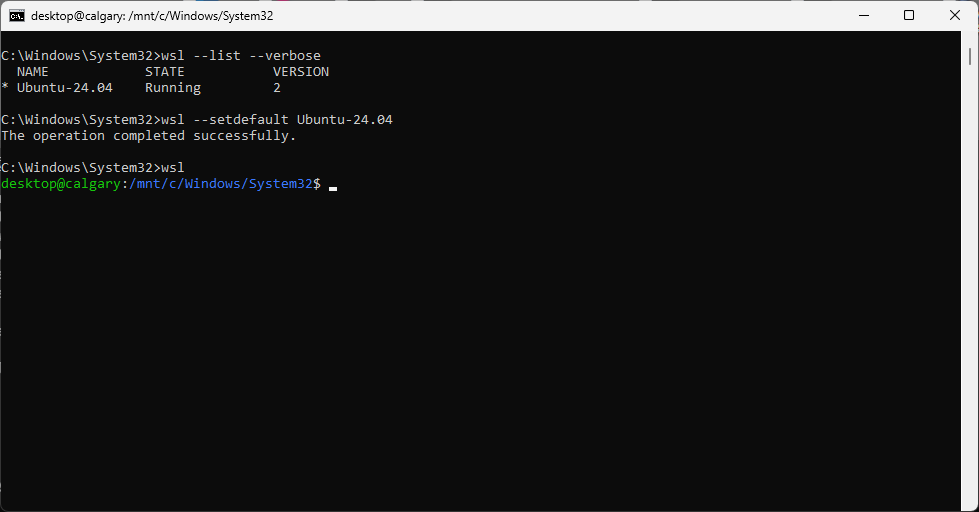
Start a CMD window as Administrator. At the Start menu, type the letters “cmd” then right-click on the app icon to run the command prompt as root:
Enter the following command:
powershell
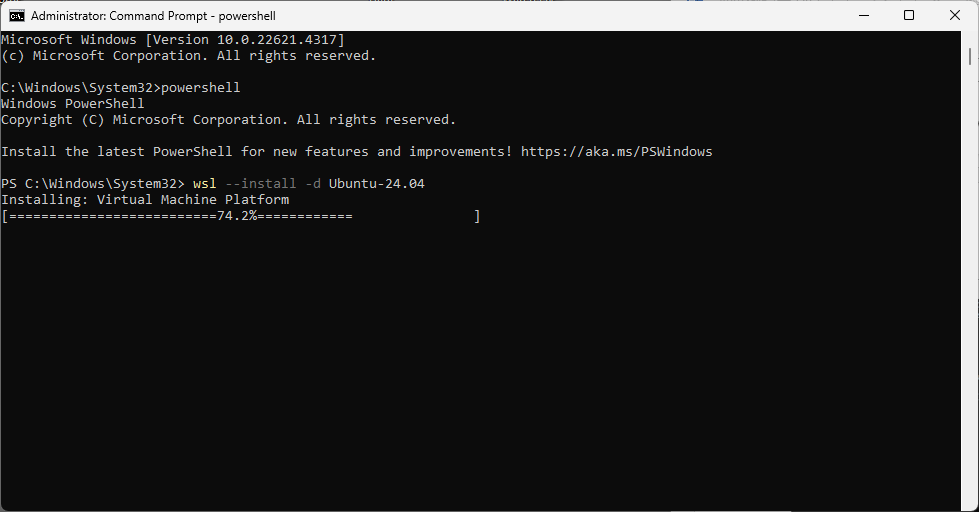
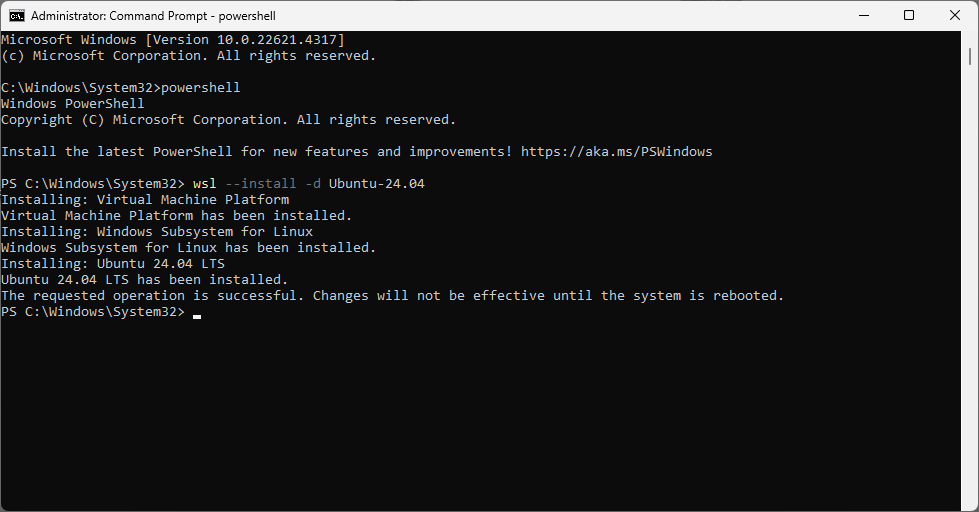
Enter the following command:
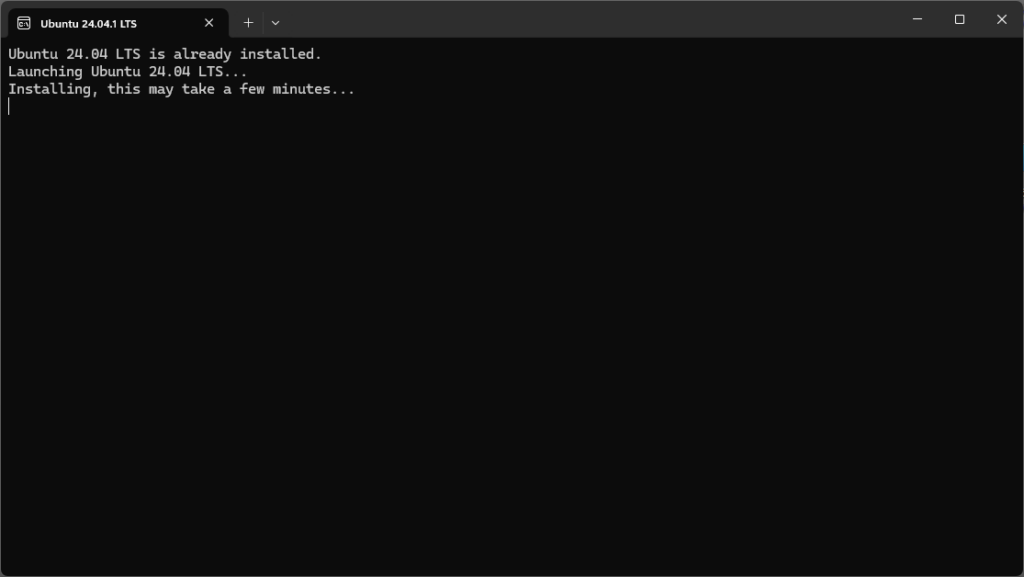
wsl --install -d Ubuntu-24.04
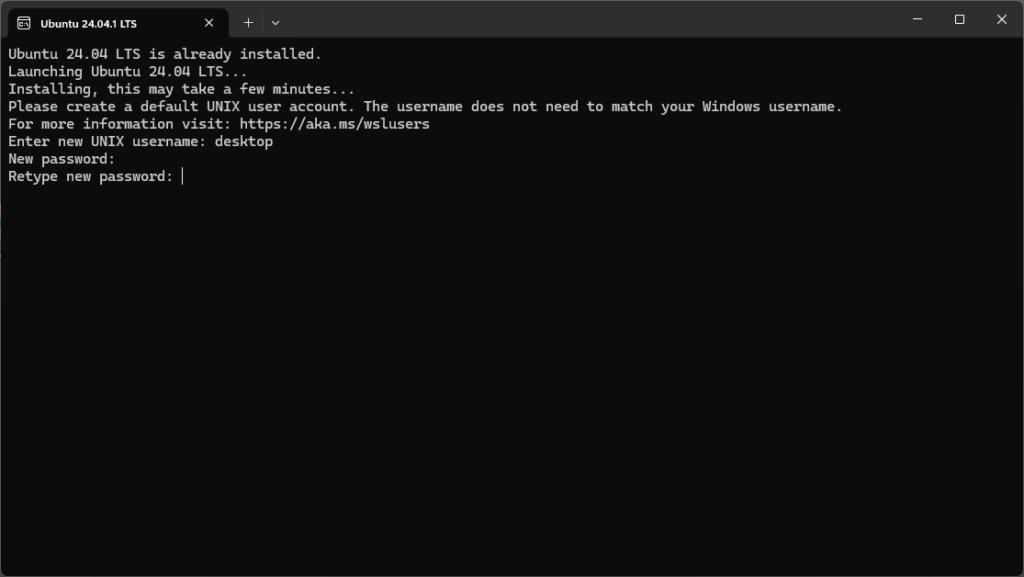
Reboot your computer.
Enter values for username and password:
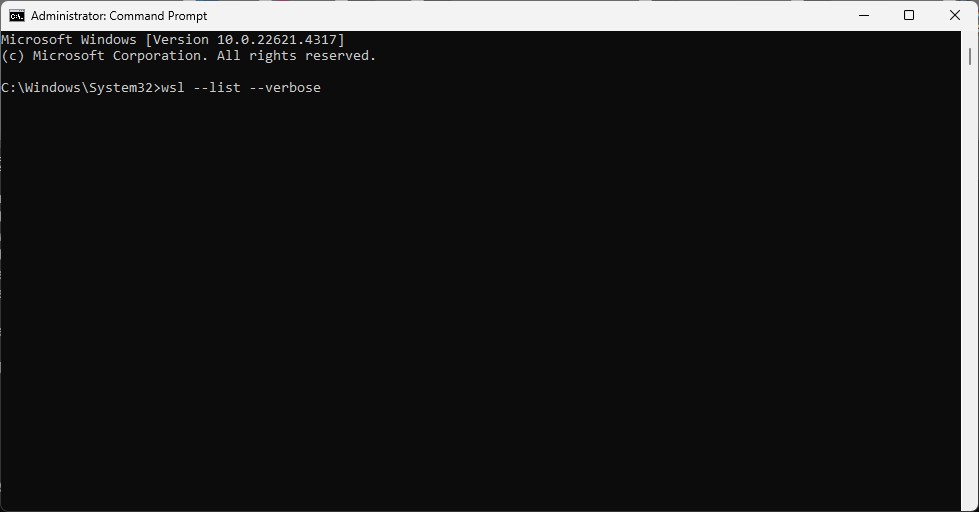
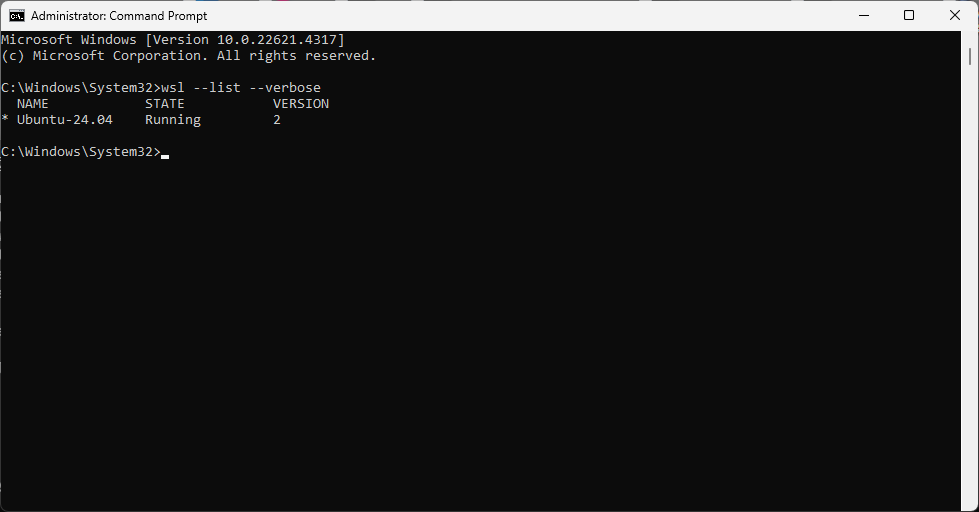
Enter the following command from a CMD window running as Administrator:
wsl --list --verbose
Enter the following command:
wsl --setdefault Ubuntu-24.04
Enter the following command:
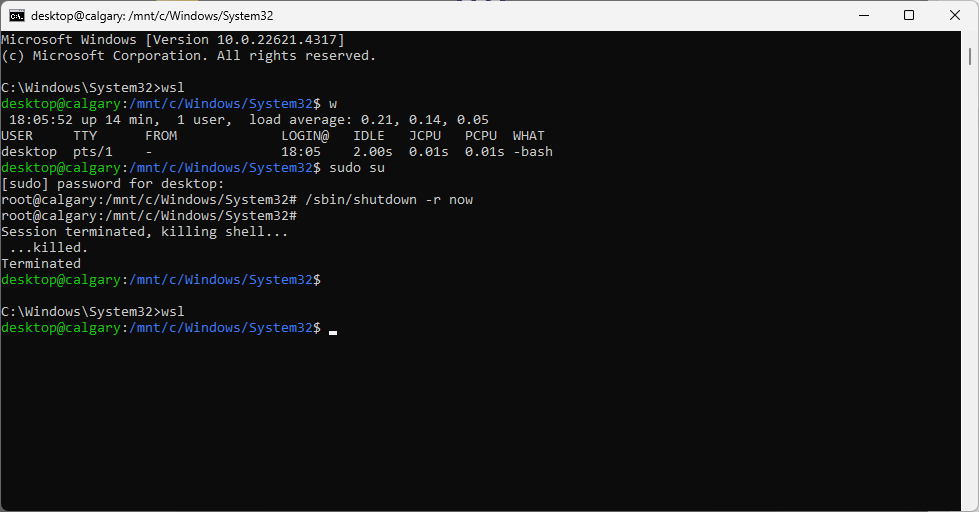
wsl
Enter the following command:
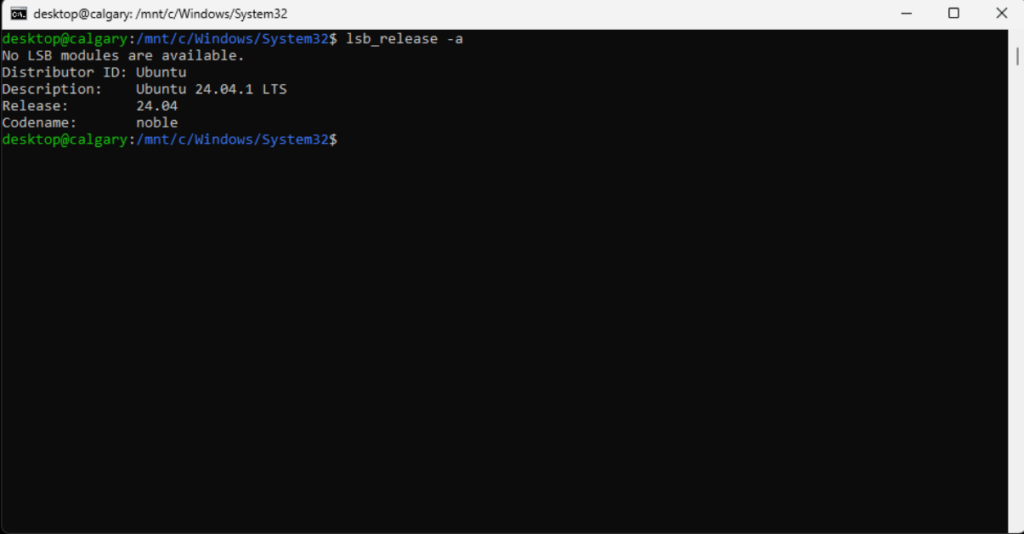
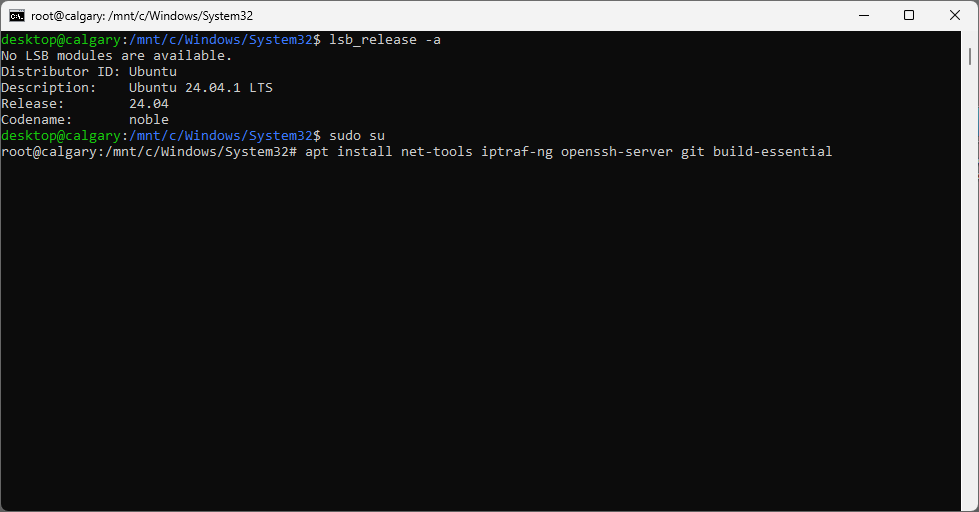
lsb_release -a
Enter the following command:
sudo su
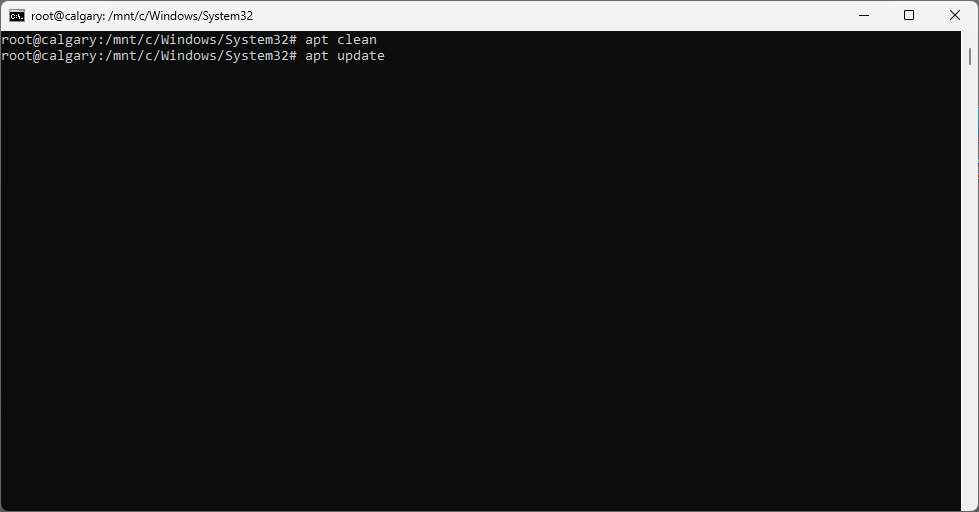
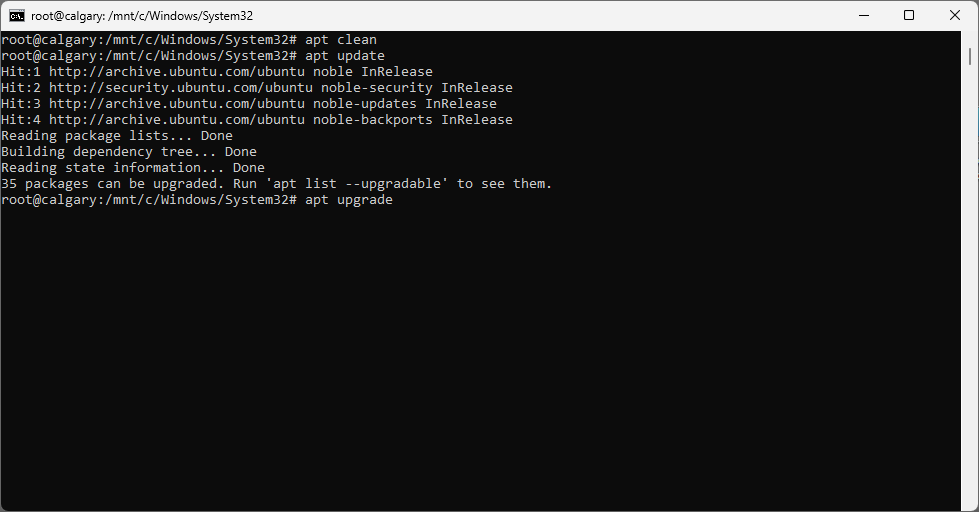
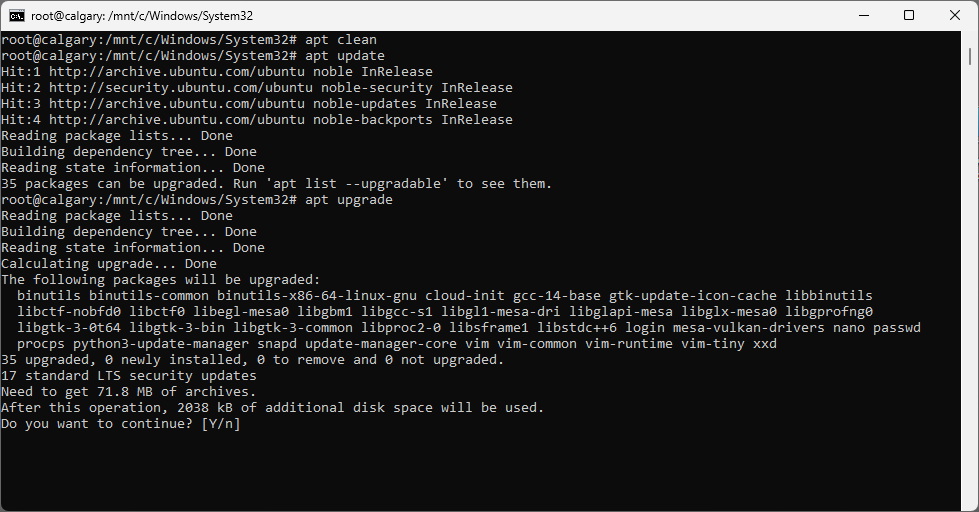
Updating apt packages on the Linux system
Enter the following commands:
apt clean
apt update
Enter the following command:
apt upgrade
Enter y for yes:
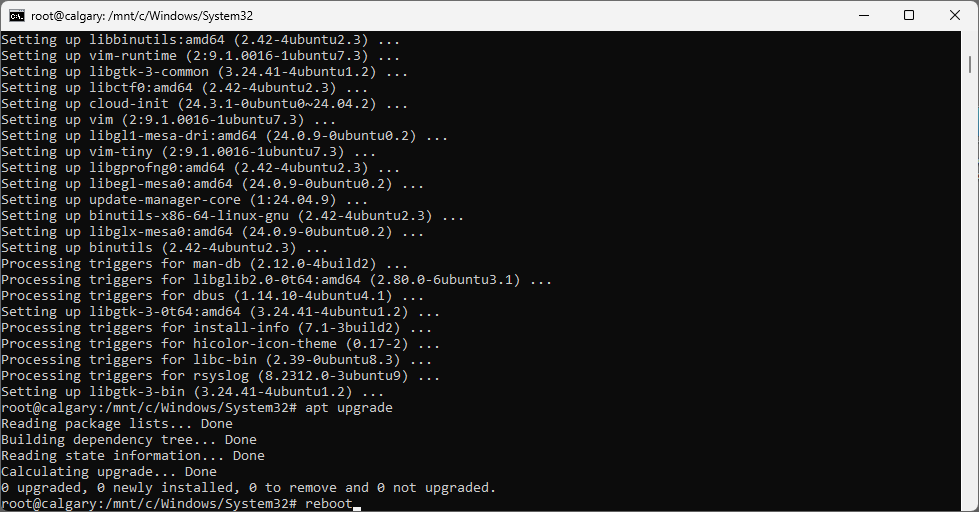
Enter the following command:
reboot
from a CMD window running as Administrator, enter the following command:
wsl
Installing some utilities
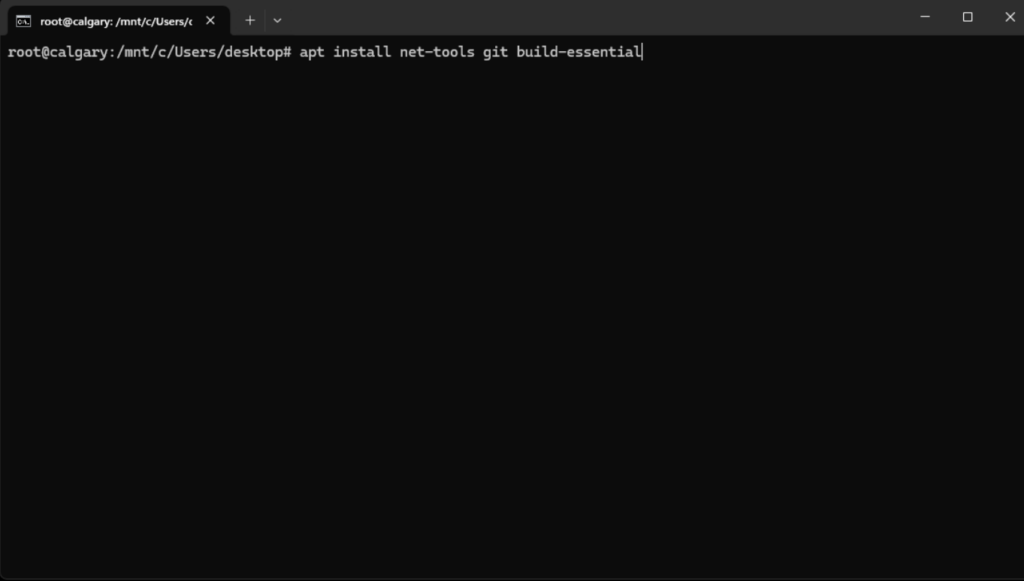
Enter the following commands:
sudo su
apt install net-tools git build-essential
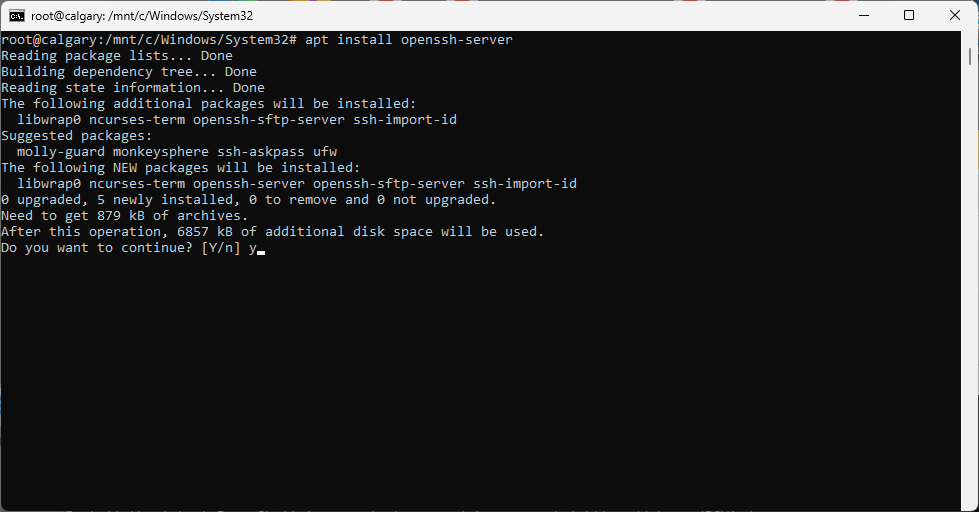
Installing openssh-server
Enter the following command:
apt install openssh-server
From a CMD window running as Administrator, enter the following command:
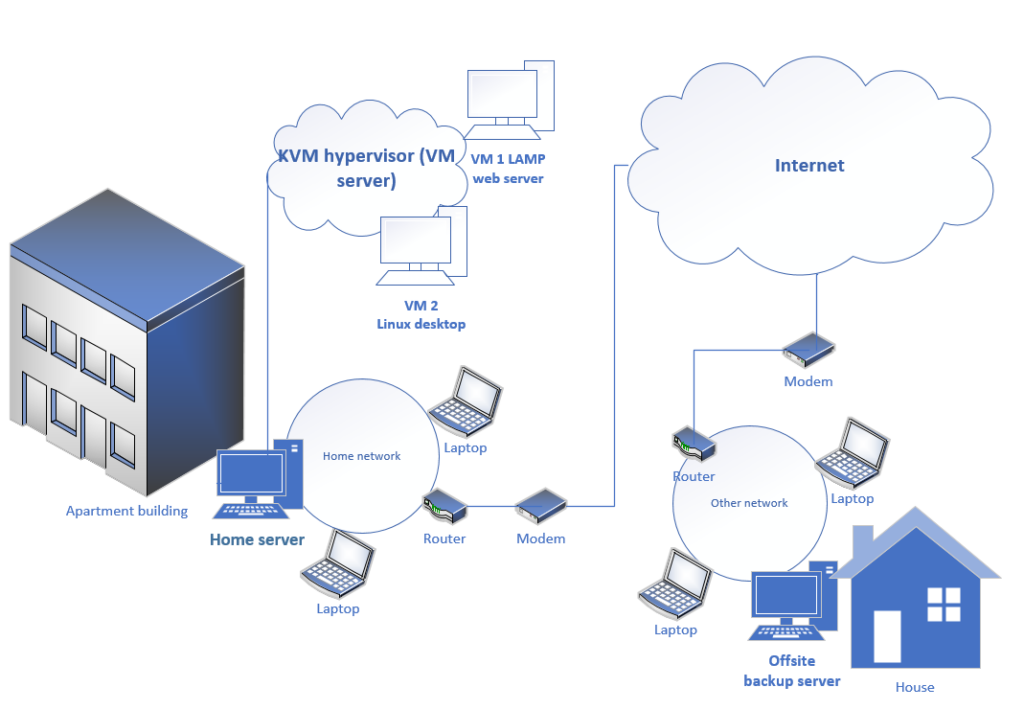
In this post, we build a home server using Ubuntu Desktop Linux that includes a Samba network file server, an OpenVPN virtual private network (VPN), and a KVM hypervisor hosting virtual machine (VM) guests including a Linux/Apache/MySQL/PHP web server. In addition, we build an offsite backup server using Fedora Server Linux, and link the offsite backup server to the home server via a WireGuard secure network tunnel.
Tasks for the home server
The home server will perform the following tasks:
Samba network file server
OpenVPN server
KVM hypervisor to host virtual machine (VM) guests
LAMP web server in a VM
Wireguard public-facing host to client connection to offsite backup server
Hardware for the home server
As the home server will host virtual machine guests, I need a certain level of performance, so I bought a refurbished circa 2017 computer for C$403 (US$294). CPU performance can affect OpenVPN performance, so the VPN server will benefit from a stronger CPU as well.
The home server is a small form factor (SFF) desktop circa 2017:
Dell OptiPlex 5050 SFF (circa 2017)
i7-7700 CPU
32GB DDR4 RAM
1TB SATA SSD
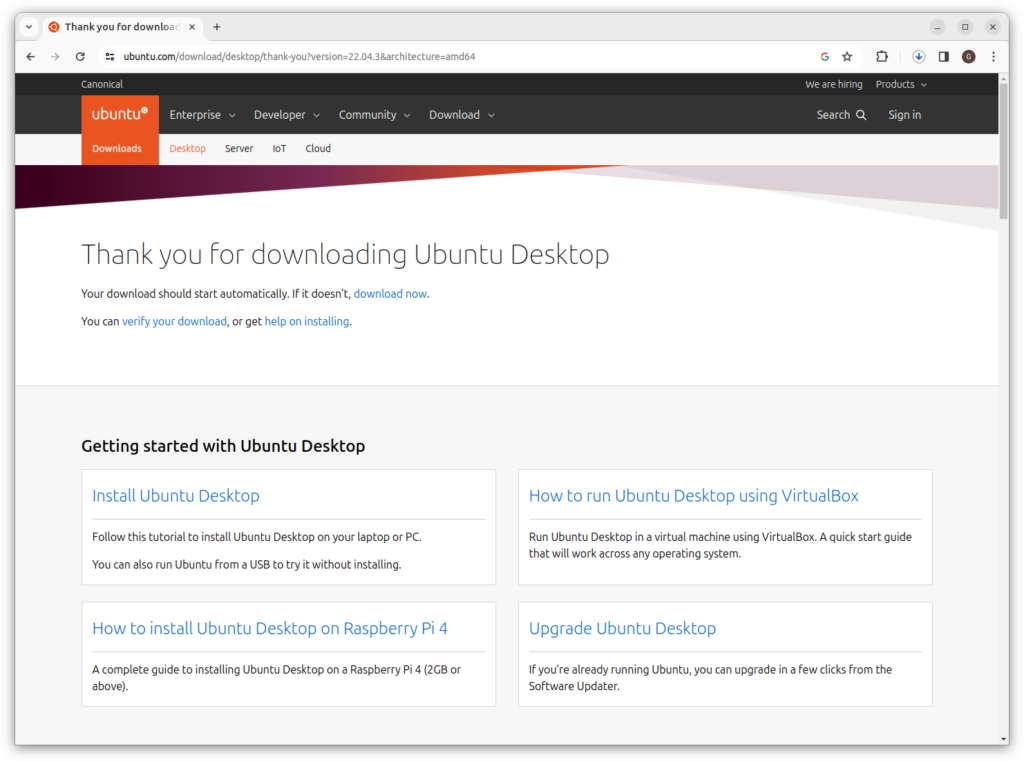
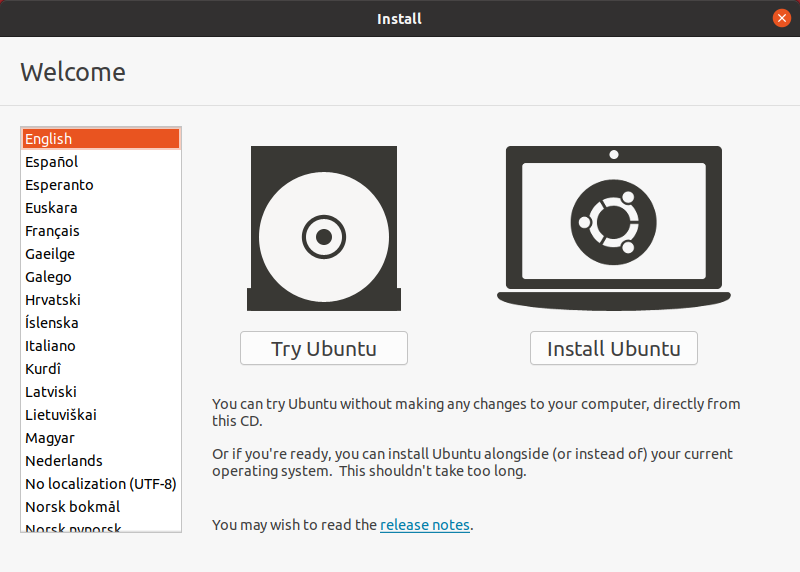
Formatting and configuring the home server with Ubuntu Desktop 22.04 LTS
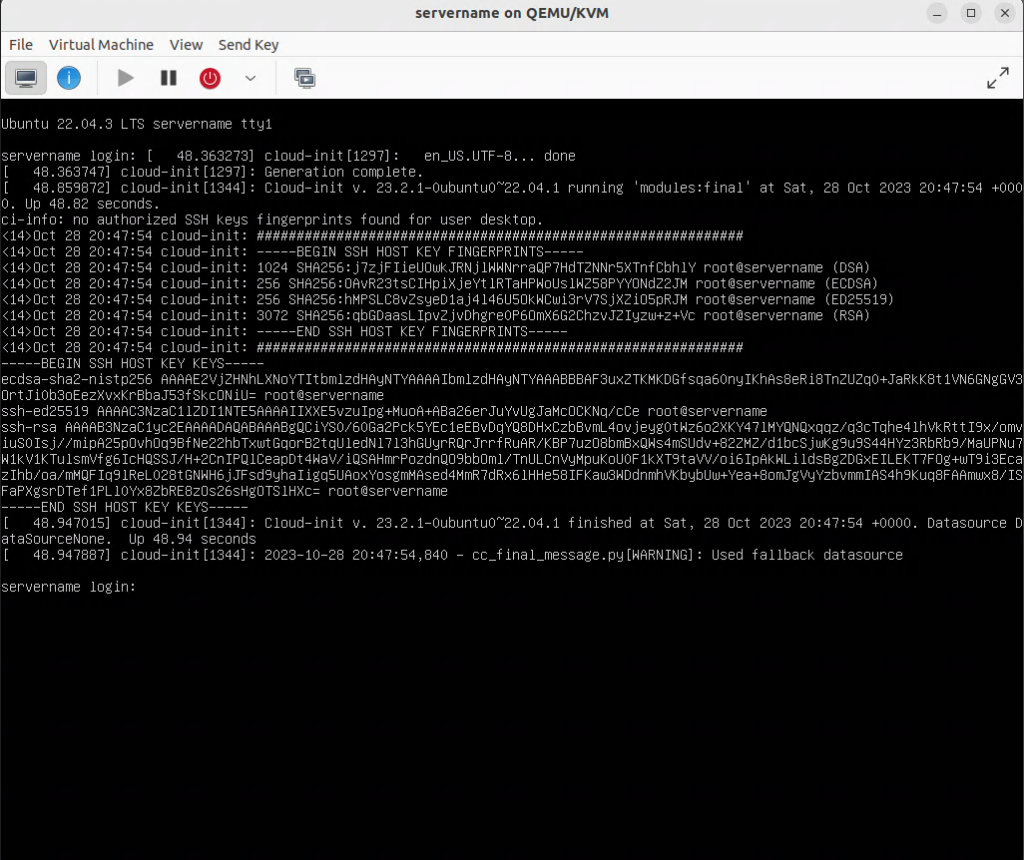
I formatted the home server with Ubuntu Desktop 22.04 LTS.
Why choose Ubuntu Desktop instead of Ubuntu Server?
For the home server, I wanted the option of a graphical user interface (GUI) desktop for use at console, and via remote desktop. A GUI desktop is also more convenient for the creation and management of KVM virtual machine guests using the virt-manager GUI, (and avoids the need for SSH tunnel forwarding and an X11 server to reach a headless server).
Formatting in UEFI mode
With modern hardware, I like to use UEFI mode for disk booting. Although we do not need a multiple-boot menu for this server, it is easier to construct a multiple-boot menu using grub when booting in UEFI mode. This is the default on a post-2016 motherboard, but it is worth looking at the BIOS when you first lay hands on a machine.
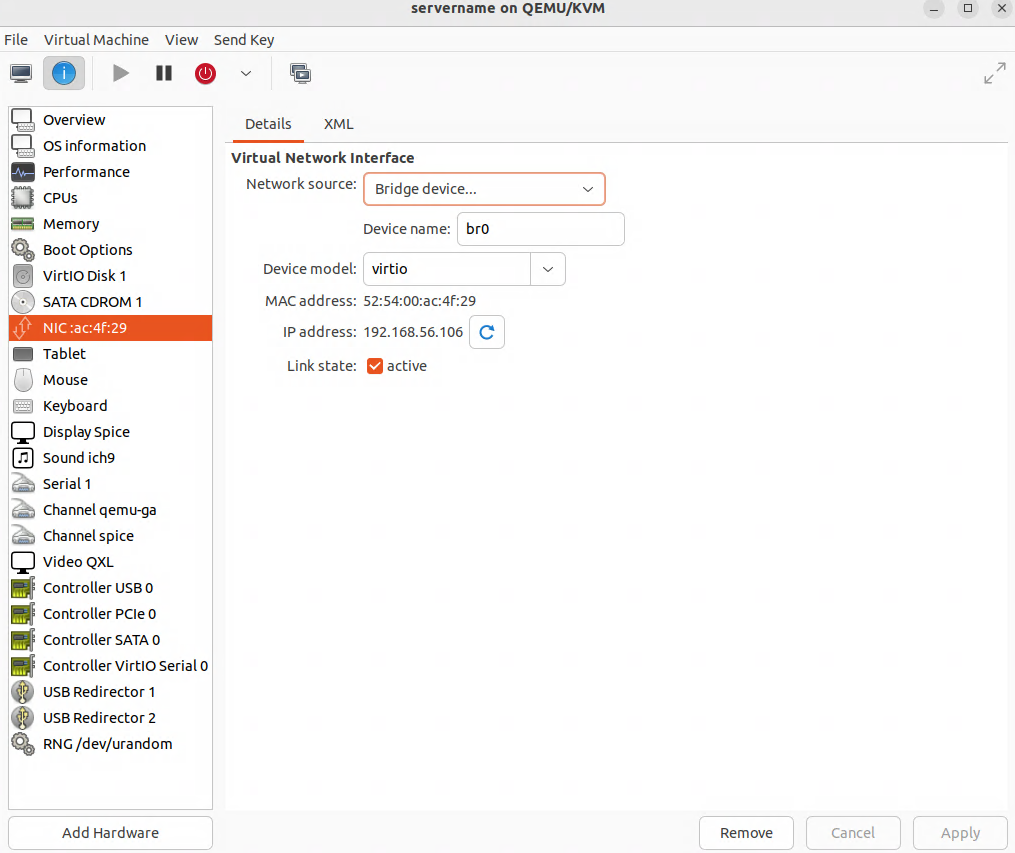
Connecting using wired Ethernet
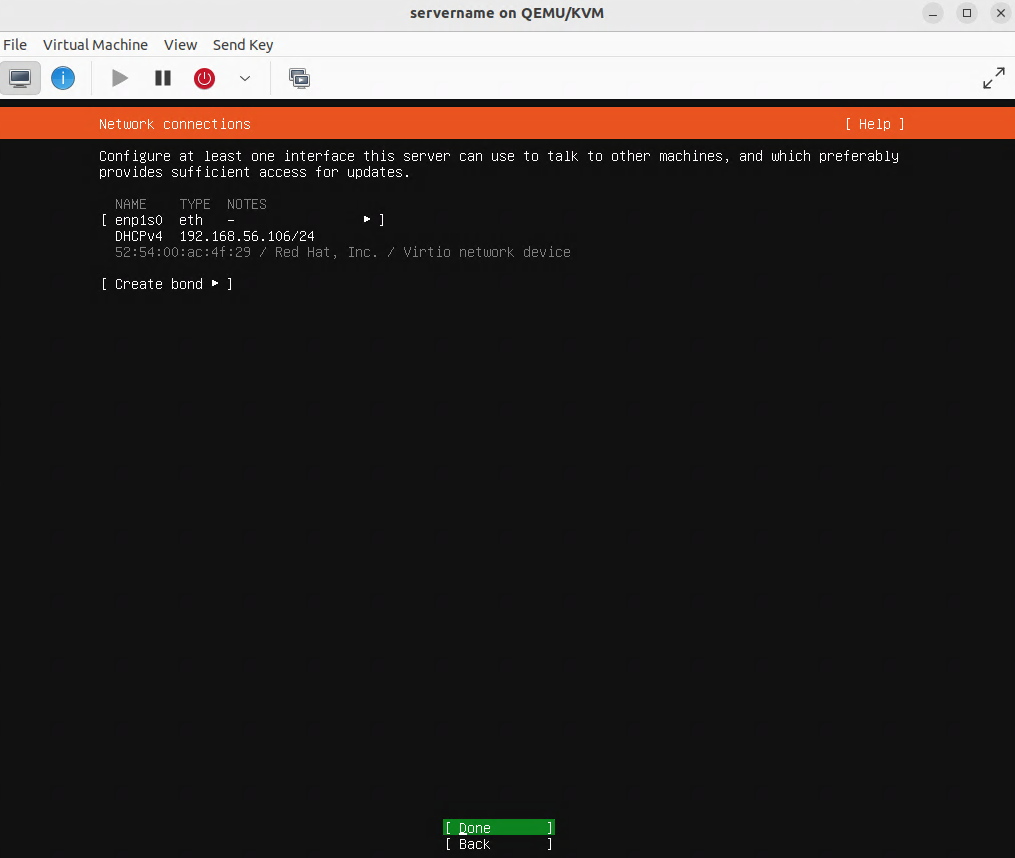
We need a wired Ethernet connection for the home server, as we want to create a bridge mode adapter (br0) so that virtual machine (VM) guests can have IP addresses in the host networking subnet.
Complete the fields as needed, then click on “Continue”:
Click on “Restart Now”:
Press the ENTER key on your keyboard:
Using the nmcli command to create a bridge mode adapter (br0)
Because we are working on an Ubuntu desktop, we will use the nmcli command to create a bridge mode adapter (br0).
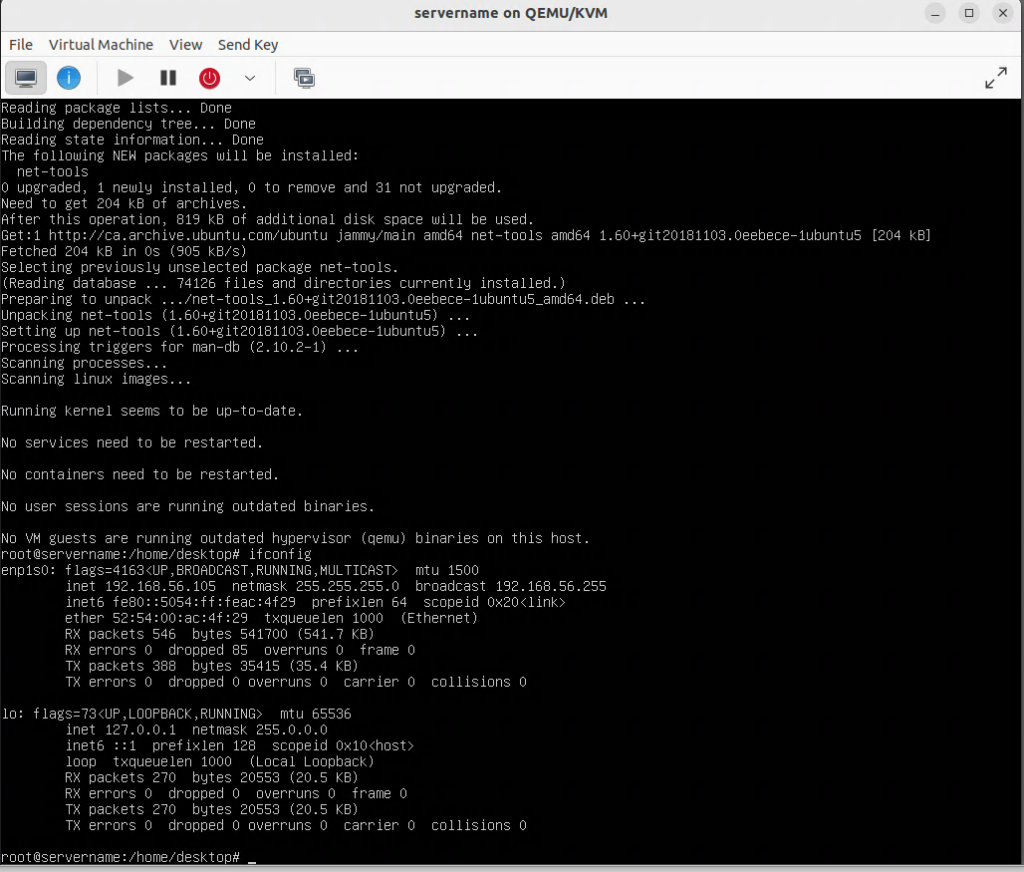
Open a terminal window. Enter the following commands:
sudo su
apt install net-tools bridge-utils
ifconfig
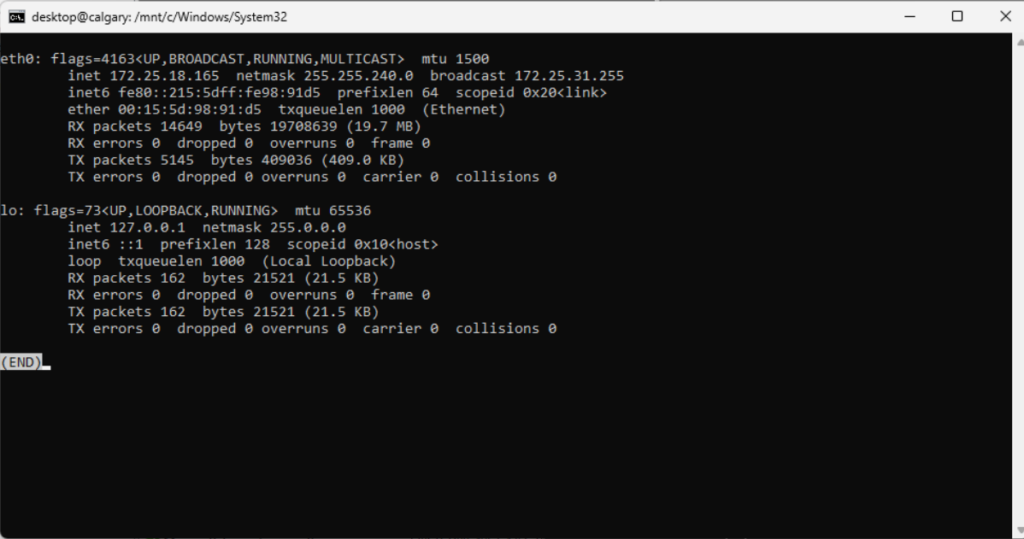
Look at the information displayed by the ifconfig command. Identify the name of the wired Ethernet connection. The name may be “eth0” or a string such as “enp0s31f6”
Use the value you identified above and use it in place of ethernet_name.
Enter the following commands:
nmcli con add ifname br0 type bridge con-name br0
nmcli con add type ethernet ifname ethernet_name master br0
nmcli con up br0
nmcli con show
brctl show
Using the nmcli command to set a static IP address on the bridge mode adapter (br0)
Although the br0 adapter appears in the Gnome Settings control panel, its IP address cannot be set using this graphical user interface (GUI). We can set the IP address and other IPV4 values of a br0 adapter using the nmcli command.
Enter the following commands:
nmcli con modify br0 ipv4.addresses 192.168.56.40/24 ipv4.gateway 192.168.56.1 ipv4.method manual
nmcli con modify br0 ipv4.dns "8.8.8.8 8.8.4.4"
nmcli con down br0 && sudo nmcli con up br0
con show br0
Understanding the bridge networking device (br0) and its relationship with the Ethernet adapter
The bridge networking device (br0) is a wrapper around the Ethernet adapter. The br0 adapter replaces the Ethernet adapter.
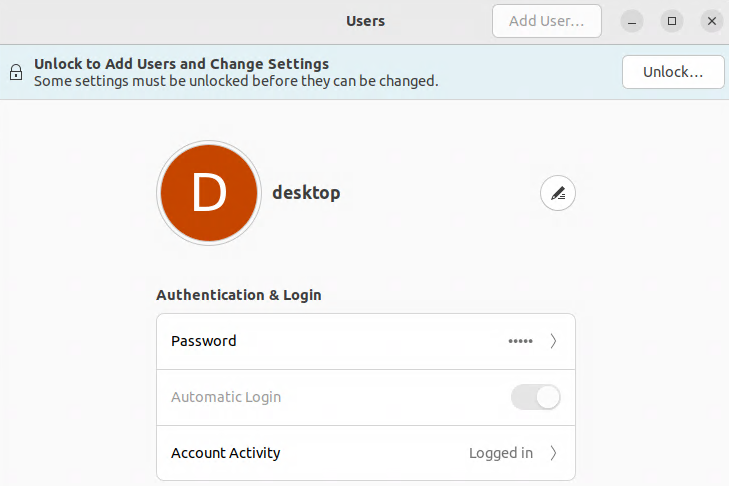
Configuring the desktop user to login automatically
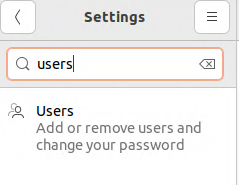
From the Ubuntu Desktop, Start the Settings application. Click on the search icon and search for “users”:
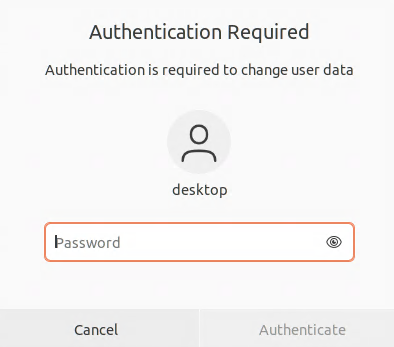
Click on “Unlock…”:
When prompted, enter the password for the user that owns the desktop session:
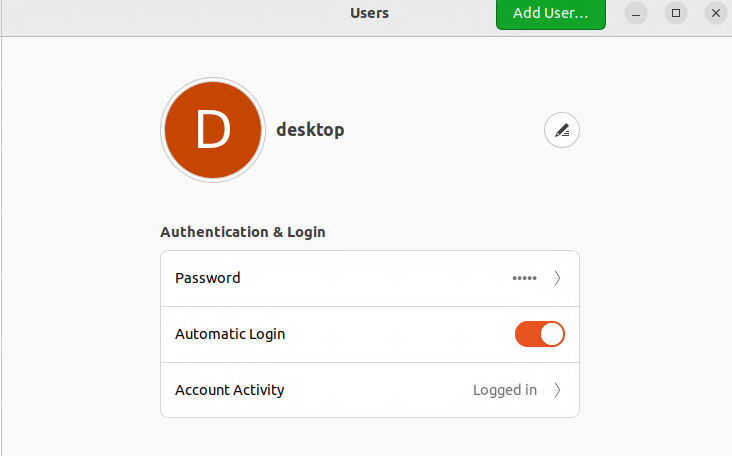
Enable “Automatic Login”:
Setting Blank Screen Delay to Never and Disabling Automatic Screen Lock
In the Settings application, go to Privacy, then Screen. Change “Blank Screen Delay” to “Never”. Disable “Automatic Screen Lock”:
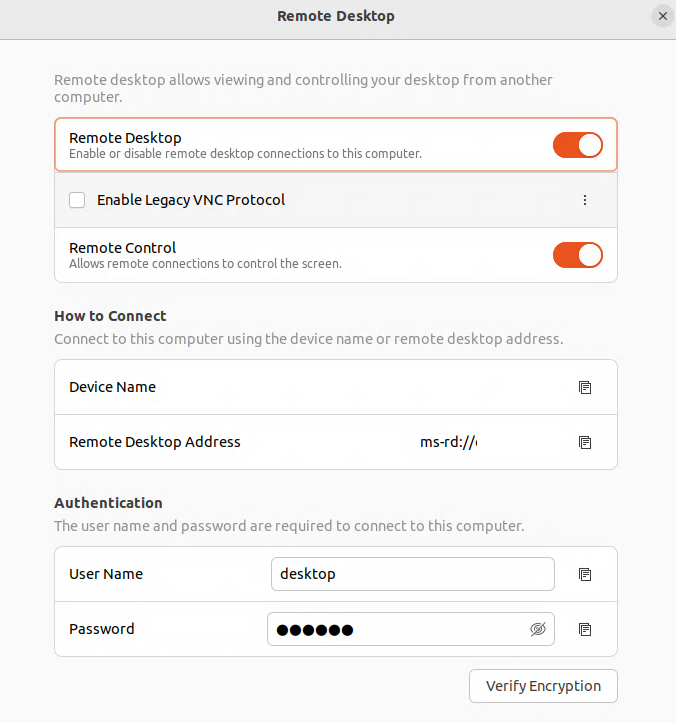
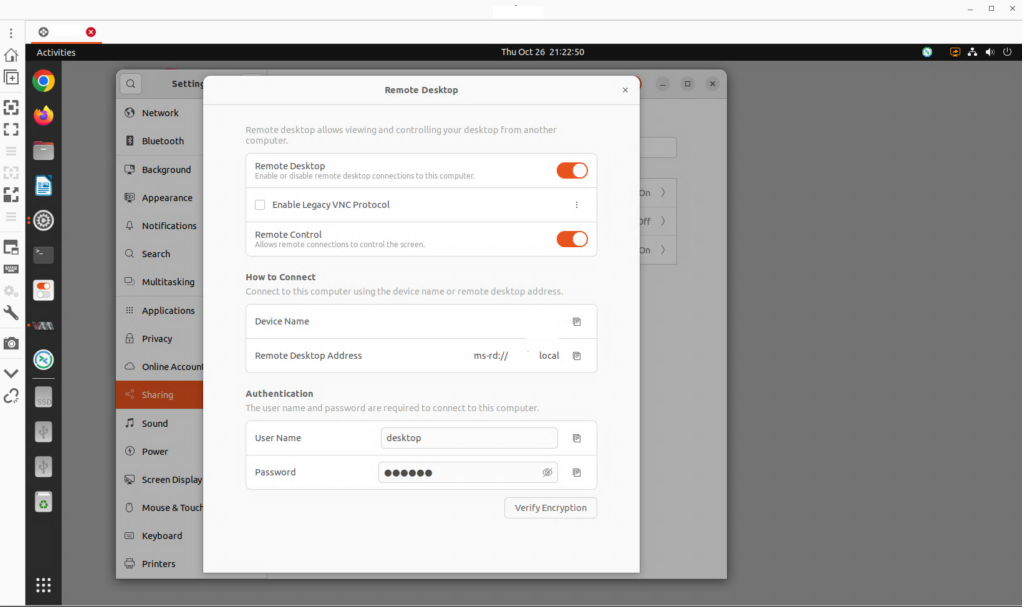
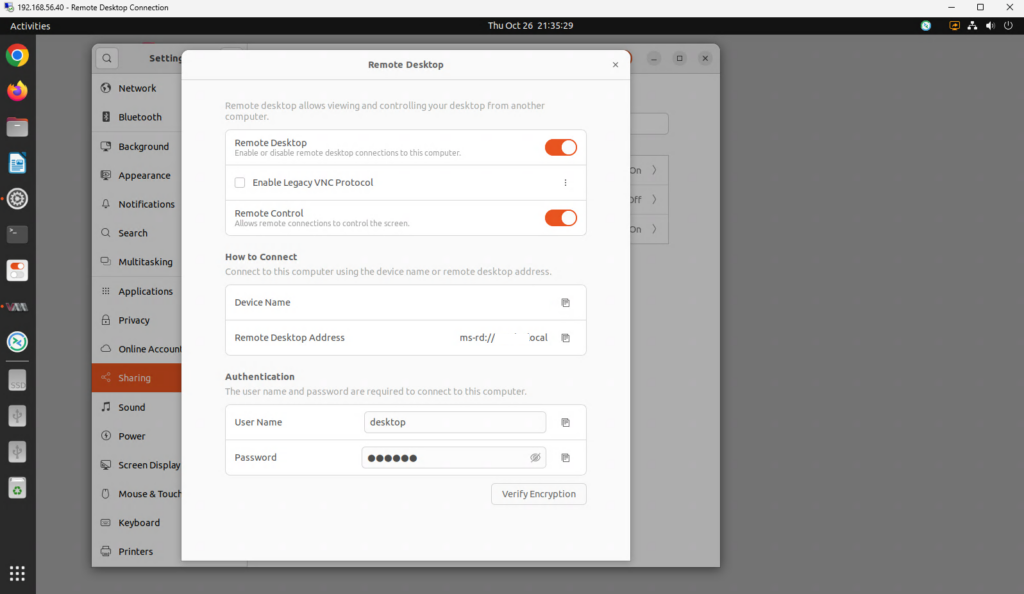
Enabling Remote Desktop Sharing
In the Settings application, go to Sharing, then go to “Remote Desktop”. Enable “Remote Desktop”. Enable “Remote Control”. Provide values for “User Name” and “Password”
Creating a firewall exception for the remote desktop port
Open a terminal window. Enter the following commands:
sudo su
ufw allow 3389/tcp
Testing Remote Desktop access to the home server from a Linux desktop
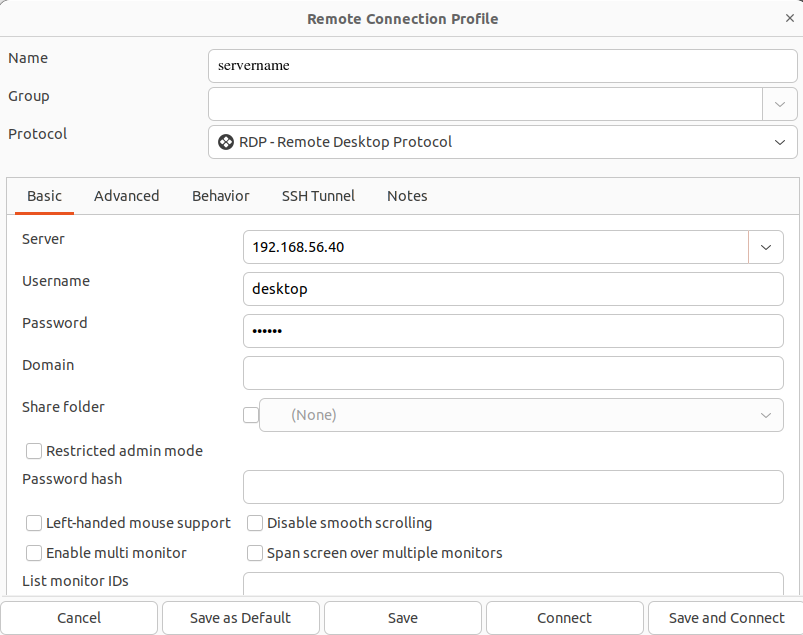
Use the Remmina program and select the RDP protocol. Complete the fields as necessary for your installation, then click on “Save and Connect”:
Testing Remote Desktop Sharing from a Windows 11 Pro desktop
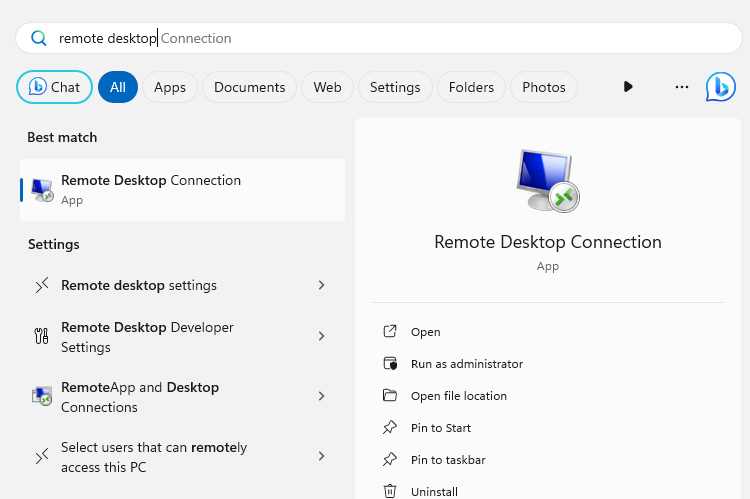
Click on the Start button. Enter the text “remote desktop”. Click on the icon for “Remote Desktop Connection”:
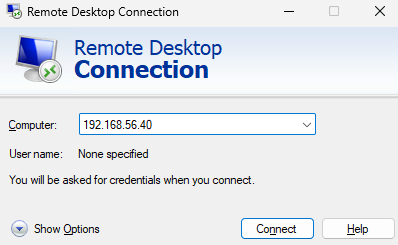
Enter the IP address of the home server. Click “Connect”:
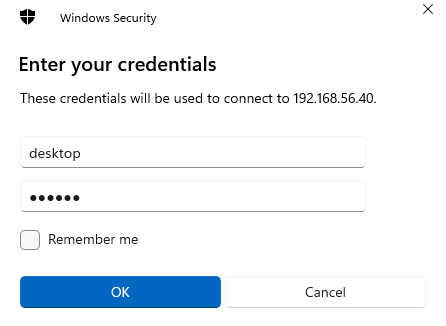
Enter the username and password you specified in the Settings application on the home server under Sharing | Remote Desktop:
Check the box “Don’t ask me again for connection to this computer”. Click on “Yes”:
Considering VNC as an alternative to Remote Desktop (RDP)
If you have difficulty connecting to the home server using a Windows remote desktop client, consider using VNC:
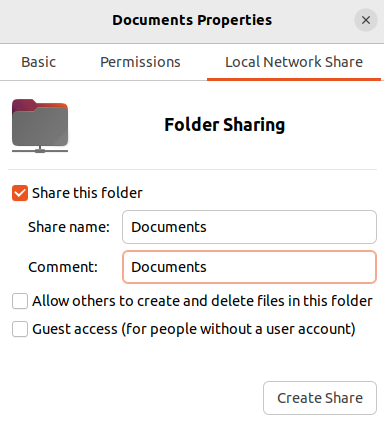
Using the smbpasswd command to create a Samba username to match the desktop username
Open a terminal window. Enter the following commands. Replace username with the user that owns the desktop on the home server. When prompted, provide a value for the password:
sudo su
smbpasswd -a username
Creating a firewall exception for the network file sharing (CIFS) port
Enter the following command:
ufw allow 137,138,139,445/tcp
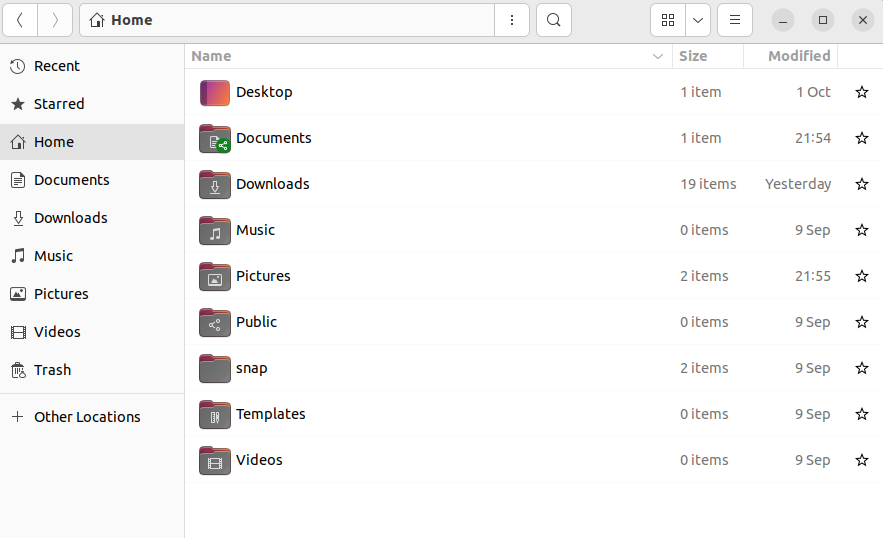
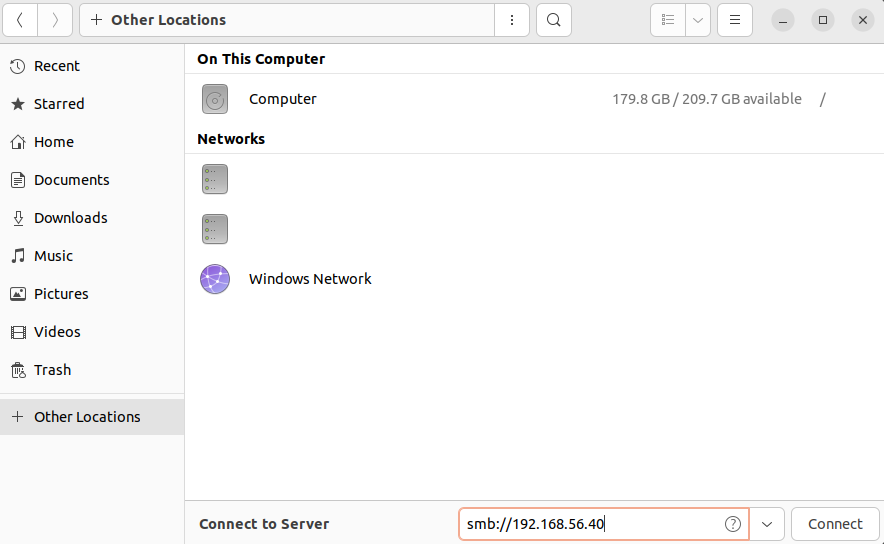
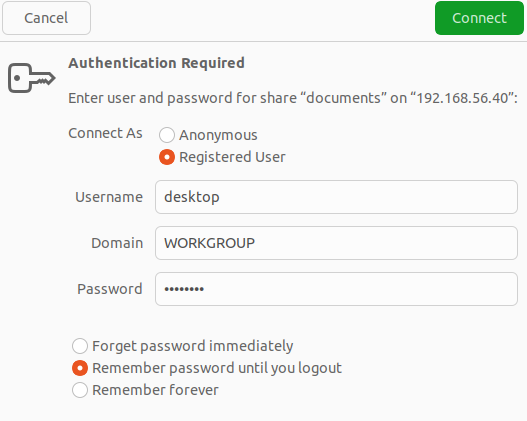
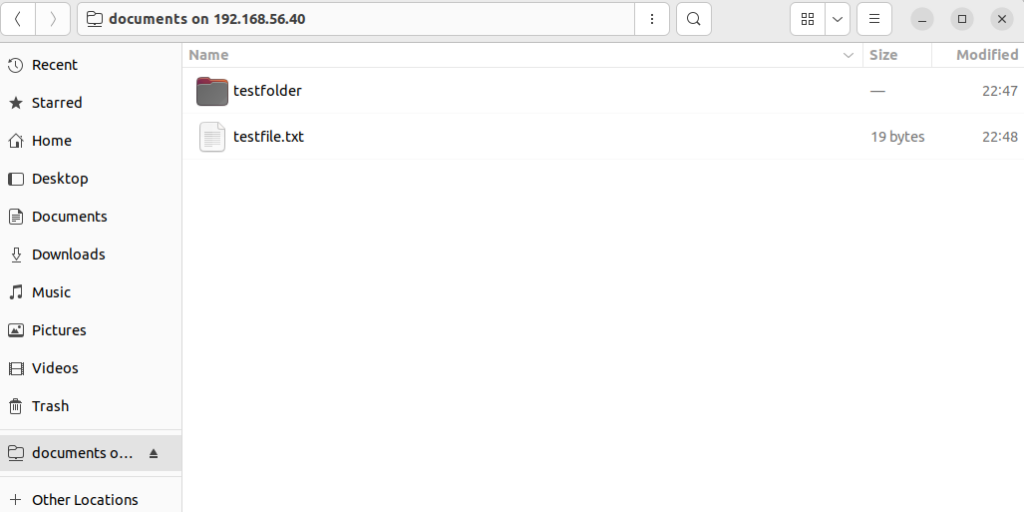
Testing the network file share using the Files (Nautilus) program
In the Files (Nautilus) application, click on “+ Other Locations”:
Select “Registered User”. Provide a value for “Username”. For Domain, put “WORKGROUP”. Provide a value for “Password”. Click on “Connect”:
Testing the network file share using File Explorer in Windows 11 Pro
From the File Explorer application in Windows 11 Pro, enter the address of the server in the address bar. Prefix the address with “\\” as in “\\192.168.56.40” for the following example. Enter the IP address of your home server:
Advanced applications of Samba including Active Directory authentication
Declaring a CNAME record in DNS to map a subdomain to the IP address of the persistent host name
If you have a registered domain name, and you have access to the DNS control panel for that domain, you can declare a CNAME record in DNS to map a subdomain to the ip address of the persistent hostname. For example, the GoDaddy DNS control panel allows the following kind of CNAME declaration:
This creates the subdomain servername.example.com, which will ping to the same IP address as persistenthostname.ddns.net
In this case we have set the time-to-live (TTL) value to 1 hour, so the IP address of the CNAME host would be updated once per hour. Many DNS providers block the option of declaring a CNAME to the apex (@) host of a domain. You can still host a subdomain, for example:
https://servername.example.com
If you need to declare the @ host as a CNAME consider pobox.com
If you need to declare the @ host of a domain as a CNAME associated with a persistent host name, consider using pobox.com as your DNS provider.
Using a script to automate the installation of OpenVPN
The openvpn-install.sh from Nyr automates the installation of the OpenVPN server application:
From the desktop of the home server, open a terminal window. Enter the following commands:
virt-manager
Verifying that the virtual machine (VM) is set for bridge mode with the br0 device
Click on the “i” icon on the VM. Select “NIC”:
Determining the current IP address of the VM
Enter the following commands:
sudo su
apt install net-tools
ifconfig
Note the name (ie enp1so) and IP address of the first adapter:
Connecting to the server with SSH
Open a terminal window on the desktop of the home server. Enter the following command, substituting values for username and ipaddress to match your installation:
ssh username@ipaddress
Creating a netplan for a static IP address for the VM
As the VM is running Ubuntu Server, we will use netplan to create a static IP address.
From the SSH terminal window, enter the following commands:
sudo su
cd /etc/netplan
cp 00-installer-config.yaml 00-installer-config.yaml.b4
nano 00-installer-config.yaml
Use the nano text editor to modify the 00-installer-config.yaml file. Change the value of adaptername as needed ie “enp1s0”:
Use the nano text editor to modify the apache2.conf file. Find the “<Directory /var/www/>” section. Change “AlllowOverride None” to “AllowOverride All”:
<Directory /var/www/html>
    Options Indexes FollowSymLinks
    AllowOverride All
    Require all granted
</Directory>
Enter the following commands:
a2enmod rewrite
systemctl restart apache2
Running the mysql_secure_installation command
Enter the following command.
mysql_secure_installation
Answer the prompts as follows:
Testing the web server on port 80
From the desktop of the home server, start a web browser. Visit the IP address of the VM that hosts the LAMP web server:
Forwarding the LAMP web server ports from the public-facing router to the bridge mode IP address of the VM hosting the LAMP web server
Testing the web server from a public address
Using your cell phone: switch to LTE data mode. Visit the URL of your persistent hostname. If you have a CNAME declared for a subdomain host in DNS, visit that URL as well.
Creating virtual hosts for Apache
Open an SSH terminal window to the VM hosting the LAMP web server:
ssh desktop@192.168.56.23
Enter the following commands:
sudo su
cd /etc/apache2/sites-available
nano persistenthostname.ddns.net.conf
Use the nano text editor to edit the persistenthostname.ddns.net.conf file:
Using Let’s Encrypt to create an SSL certificate for https
Open an SSH terminal window to the VM hosting the LAMP web server. Enter the following commands:
sudo su
apt install python3-certbot-apache
certbot --apache
systemctl restart apache2
Enabling Wireguard on the home server
Open an SSH terminal window to the home server. Provide values for username and ipaddress to match your installation:
ssh username@ipadress
Creating public and private WireGuard keys
Enter the following commands:
sudo su
cd /etc/wireguard
umask 077
wg genkey > privatekey
wg pubkey < privatekey > publickey
Creating a firewall exception for the WireGuard port on the home server
ufw allow 55555/udp
Enter the following commands:
nano wg0.conf
Creating the wg0.conf file
Use the nano text editor to modify the wg0.conf file. Provide a value for privatekey matching the privatekey of the home server, generated above. (Provide a value for publickey of the peer system (the offsite backup server) when the value becomes available, then restart the wg-quick@wg0 service):
[Interface]
# home server
Address = 10.5.0.1/24
PrivateKey = privatekeyofhomeserver
ListenPort = 55555

[Peer]
# offsite backup server
PublicKey = publickeyofoffsitebackupserver
AllowedIPs = 10.5.0.0/24, 192.168.1.0/24
Forwarding the WireGuard port from the public-facing router to the home server
Tasks for the offsite backup server
The offsite backup server will perform the following tasks
Samba network file server
Wireguard client connection to home server
Hardware for the backup server
My brother donated a computer to the project, a computer that was headed for a dumpster. This is an example of a hacker living his principles.
This machine could not address more than 1.5GB RAM of the RAM we found in our junkpiles. This machine has a 20GB mechanical hard drive — we could certainly upgrade that with a 120GB SSD, but we decided to see what was possible with the mechanical drive. We will be attaching an SSD drive to the computer. Because the taskings are Samba network file sharing and a Wiregurd tunnel to the home server, it may not be necessary to upgrade the mechanical drive.
The offsite backup server is a small form factor (SFF) desktop circa 2005:
HP HSTNC-008P-SF (circa 2005)
Pentium(R) D CPU
1.5GB DDR RAM
20GB mechanical drive (presumably 5400RPM)
Formatting and configuring the offsite backup server with Fedora Server 38
My brother formatted the offsite backup server with Fedora Server 38. This server will have a text-only console. This will allow us to conserve about 1.1GB RAM, ie 3/4 of the 1.5GB RAM we have available in the system.
Why choose Fedora Server instead of Fedora Desktop?
For the offsite backup server, as the hardware is limited, we will use Fedora Server to conserve CPU and RAM resources.
Formatting in Legacy Mode
With older, pre-2016 hardware, it is simpler to format in Legacy Mode. In this case, the system literally is legacy, this is the only mode available.
Connecting using wired Ethernet
We will connect the offsite backup server using wired Ethernet. This simplifies some kinds of networking, including WireGuard, which we will use later in this procedure to create a secure tunnel to the home server.
Installing a few utilities on the offsite backup server
Log in at the console of the offsite backup server. Enter the following commands:
sudo su
dnf install net-tools iptraf-ng finger wireguard
ifconfig
Examine the output of the ifconfig command. Find the name of the Ethernet adapter, it may be something like “enp0s25” or “eth0” — take note of this value.
Using the nmcli command to configure a static IP address for the offsite backup server
Enter the following commands. Provide values for adaptername and ipv4.gateway that match your installation:
nmcli con modify adaptername ipv4.addresses 192.168.1.95/24 ipv4.gateway 192.168.1.1 ipv4.method manual
nmcli con modify br0 ipv4.dns "8.8.8.8 8.8.4.4"
nmcli con down br0 && sudo nmcli con up br0
con show br0
reboot
Installing the Samba program on the offsite backup server
Open an SSH terminal window to the offsite backup server. Enter the following command:
dnf install samba
Creating a network file share using Samba on the offsite backup server
Use the nano text editor to modify the wg0.conf file. Provide a value for privatekey matching the privatekey of the home server, generated above. Provide a value for publickey matching the private key of the offsite backup server:
In this procedure we install the open source program OpenVPN on a server running on Linux to create a virtual private network (VPN) authenticated against Active Directory with two-factor authentication (2FA) enabled Google Authenticator.
Business case
A Linux server running OpenVPN server software can replace a Windows server or other commercial solution for the VPN server role in the enterprise, reducing software licensing costs and improving security and stability.
Authenticating connections to the VPN server using client certificates and Google Authenticator one-time passwords (OTPs)
Verifying client-side VPN certificates to authenticate a VPN connection
The VPN server will verify client digital certificates as one of the authentication methods.
Using Google Authenticator to obtain a one-time password (OTP) to authenticate a VPN connection
The VPN server will verify the one-time password (OTP) generated by Google Authenticator as one of the authentication methods.
Entering the OTP from Google Authenticator as the password for the VPN connection
To access the network, help desk clients will:
Enter their local network file share or Active Directory username as the username for the VPN connection.
Enter the OTP from Google Authenticator as the password for the VPN connection.
Not verifying a local password authentication module (PAM) or Active Directory password to authenticate a VPN connection
This procedure does not verify a PAM or Active Directory password to authenticate the VPN connection.
There are ways of prompting for a username, and a password, and an OTP from Google Authenticator. However, some of these are difficult to integrate with with client VPN connector software, which do not support a second password field. Some approaches ask the help desk client to enter a system password and the OTP as a combined password, but this can be confusing for help desk clients.
This procedure was tested on Ubuntu Linux 22.04 LTS
Deploying the VPN server as a physical or virtual machine
Deploy OpenVPN on a physical Linux server or on a virtual Linux server hosted as a virtual machine (VM), using KVM on Linux, Hyper-V, VMware, or VirtualBox on Windows, or Parallels using MacOS.
Adding a macvtap or bridge mode network adapter to a virtual machine
For KVM, add a macvtap network adapter to the automation server. For Hyper-V, VMware, VirtualBox or Parallels, add a bridge mode network adapter. This will allow the VPN server to access the same network as the server’s hypervisor host.
Assigning a static IP address to the server that will host the VPN
Assign a static IP to the VPN server.
Assigning a permanent host name to a dynamic host configuration protocol (DHCP) public-facing IP address
Most residential Internet connections have a dynamic host configuration protocol (DHCP) public-facing IP address, which can change over time. You can use a service like no-ip.com to associate a permanent host name such as permhostname.ddns.net to a host with a dynamic IP address:
cd /etc/openvpn/server
nano google-authenticator.sh
#!/usr/bin/bash
# this script written by OpenAI ChatGPT
# see References section for prompt
# check if the user has provided a username and password
if [ -z "$username" -o -z "$password" ]; then
  exit 1
fi

# get the user's secret key from the Google Authenticator app
secret_key=$(grep "^$username:" /etc/openvpn/server/google-authenticator.keys | cut -d: -f2)

# check if the user has a secret key
if [ -z "$secret_key" ]; then
  exit 1
fi

# generate a six-digit code using the secret key and the current time
code=$(oathtool --totp -b "$secret_key")

# compare the generated code with the password provided by the user
if [ "$code" = "$password" ]; then
  exit 0
else
  exit 1
fi
Press Ctrl-X to save and exit the file.
Enter the following command:
chmod 755 google-authenticator.sh
Restarting the OpenVPN server
From a root shell, enter the following command:
systemctl restart openvpn-server@server
Downloading the OpenVPN client profile
Use the FileZilla file transfer client to download the OpenVPN client profile:
Use a text editor to load the OpenVPN client profile. Add the following text to the bottom of the file:
auth-user-pass
Save and exit the file.
Downloading and Installing the Google Authenticator app on a help desk client’s smartphone
Visit the Apple App Store or the Google Play Store. Search for “google authenticator” and download the app:
Click on “Get started”:
Running the google-authenticator command on the server to enrol the help desk client’s Google Authenticator app
Open a terminal window as root, and make the terminal window full-screen. Enter the following command:
google-authenticator
Scanning the QR code into the Google Authenticator smartphone app
Click on “Scan a QR code” then click on “OK” to allow the app to access the camera:
Look at the one-time code shown on the Google Authenticator app:
Enter the code in the Terminal window in the field: “Enter code from the app (-1 to skip):”
Enter “n” to the question: “Do you want me to update your “/root/.google_authenticator file? (y/n):”
Creating the /etc/openvpn/server/google-authenticator.keys file and entering the secret key created during enrolment of the help desk client’s Google Authenticator app.
Enter the following commands:
cd /etc/openvpn/server
nano google-authenticator.keys
Add an entry to the file in with the format “username: yournewsecretkey”:
client06a:NRX7VMDMIC6XSDFJNU3WVB3K2I
Press Ctrl-X to save and exit the file.
A note re automation
Should this process be automated further? Yes. The google-authenticator program on the server could be scripted so that the client’s username and secret code could be added to the /etc/openvpn/server/google-authenticator.keys file.