
In this procedure we install the open source program OpenVPN on a server running on Linux to create a virtual private network (VPN) authenticated against Active Directory with two-factor authentication (2FA) enabled Google Authenticator.
Business case
A Linux server running OpenVPN server software can replace a Windows server or other commercial solution for the VPN server role in the enterprise, reducing software licensing costs and improving security and stability.
Authenticating connections to the VPN server using client certificates and Google Authenticator one-time passwords (OTPs)
Verifying client-side VPN certificates to authenticate a VPN connection
The VPN server will verify client digital certificates as one of the authentication methods.
Using Google Authenticator to obtain a one-time password (OTP) to authenticate a VPN connection
The VPN server will verify the one-time password (OTP) generated by Google Authenticator as one of the authentication methods.
Entering the OTP from Google Authenticator as the password for the VPN connection
To access the network, help desk clients will:
- Enter their local network file share or Active Directory username as the username for the VPN connection.
- Enter the OTP from Google Authenticator as the password for the VPN connection.
Not verifying a local password authentication module (PAM) or Active Directory password to authenticate a VPN connection
This procedure does not verify a PAM or Active Directory password to authenticate the VPN connection.
There are ways of prompting for a username, and a password, and an OTP from Google Authenticator. However, some of these are difficult to integrate with with client VPN connector software, which do not support a second password field. Some approaches ask the help desk client to enter a system password and the OTP as a combined password, but this can be confusing for help desk clients.
This procedure was tested on Ubuntu Linux 22.04 LTS
This procedure was tested on Ubuntu Linux 22.04 LTS.
Deploying the VPN server as a physical or virtual machine
Deploy OpenVPN on a physical Linux server or on a virtual Linux server hosted as a virtual machine (VM), using KVM on Linux, Hyper-V, VMware, or VirtualBox on Windows, or Parallels using MacOS.
Adding a macvtap or bridge mode network adapter to a virtual machine
For KVM, add a macvtap network adapter to the automation server. For Hyper-V, VMware, VirtualBox or Parallels, add a bridge mode network adapter. This will allow the VPN server to access the same network as the server’s hypervisor host.
Assigning a static IP address to the server that will host the VPN
Assign a static IP to the VPN server.
Assigning a permanent host name to a dynamic host configuration protocol (DHCP) public-facing IP address
Most residential Internet connections have a dynamic host configuration protocol (DHCP) public-facing IP address, which can change over time. You can use a service like no-ip.com to associate a permanent host name such as permhostname.ddns.net to a host with a dynamic IP address:
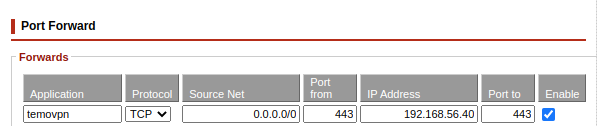
Forwarding ports from the public-facing IP address to the internal IP address of the VPN host
Use the control panel of your router to forward a port from the public-facing IP address to the internal IP address of the VPN host.
As an example, for the server described in this procedure, we are using the TCP port 443 to host the connection:
Entering commands as root
This procedure assumes that you are logged in as the root user of the Linux server.
Escalate to the root user by entering the following commands:
sudo su
Installing tools on the server
apt install libpam-google-authenticator curl oath libqrencode4
Modifying the /etc/sysctl.conf file to enable network forwarding
From a root shell, enter the following commands:
cd /etc
nano sysctl.conf
Add the following text to the bottom of the file:
net.ipv4.ip_forward=1
Press Ctrl-X to save and exit the file.
Enter the following command to reload the sysctl settings:
sysctl -a
Creating the /etc/rc.local file
Enter the following commands:
cd /etc
nano rc.local
Add the following text:
!/usr/bin/bash
iptables -t nat -A POSTROUTING -s 10.8.0.0/24 -o enp3s0 -j MASQUERADE
If you are using the no-ip.com dynamic update client (DUC), add the following text:
/usr/local/bin/noip2
Add the following text:
exit 0
Press Ctrl-X to save and exit the file.
Enter the following command
chmod 755 rc.local
Starting the rc-local service
Enter the following command:
systemctl restart rc-local
Using a script to automate the installation of OpenVPN
The openvpn-install.sh from Angristan automates the installation of the OpenVPN server application:
https://github.com/Angristan/OpenVPN-install
Downloading the OpenVPN installation script
To download the openvpn-install.sh script, enter the following commands:
cd /root
curl -O https://raw.githubusercontent.com/angristan/openvpn-install/master/openvpn-install.sh
chmod +x openvpn-install.sh
Running the OpenVPN installation script
./openvpn-install.sh
Modifying the OpenVPN server configuration file
From a root shell, enter the following commands:
cd /etc/openvpn/server
nano server.conf
Locate the following line:
push "redirect-gateway def1 bypass-dhcp"
Change the line to:
push "redirect-gateway def bypass-dhcp"
Add the following text to the end of the file:
auth-user-pass-verify "/etc/openvpn/server/google-authenticator.sh" via-env
script-security 3
username-as-common-name
Press Ctrl-X to save and exit the file.
Creating the google-authenticator.sh script
Enter the following commands:
cd /etc/openvpn/server
nano google-authenticator.sh
#!/usr/bin/bash
# this script written by OpenAI ChatGPT
# see References section for prompt
# check if the user has provided a username and password
if [ -z "$username" -o -z "$password" ]; then
  exit 1
fi

# get the user's secret key from the Google Authenticator app
secret_key=$(grep "^$username:" /etc/openvpn/server/google-authenticator.keys | cut -d: -f2)

# check if the user has a secret key
if [ -z "$secret_key" ]; then
  exit 1
fi

# generate a six-digit code using the secret key and the current time
code=$(oathtool --totp -b "$secret_key")

# compare the generated code with the password provided by the user
if [ "$code" = "$password" ]; then
  exit 0
else
  exit 1
fi
Press Ctrl-X to save and exit the file.
Enter the following command:
chmod 755 google-authenticator.sh
Restarting the OpenVPN server
From a root shell, enter the following command:
systemctl restart openvpn-server@server
Downloading the OpenVPN client profile
Use the FileZilla file transfer client to download the OpenVPN client profile:
Modifying the OpenVPN client profile
Use a text editor to load the OpenVPN client profile. Add the following text to the bottom of the file:
auth-user-pass
Save and exit the file.
Downloading and Installing the Google Authenticator app on a help desk client’s smartphone
Visit the Apple App Store or the Google Play Store. Search for “google authenticator” and download the app:

Click on “Get started”:

Running the google-authenticator command on the server to enrol the help desk client’s Google Authenticator app
Open a terminal window as root, and make the terminal window full-screen. Enter the following command:
google-authenticator

Scanning the QR code into the Google Authenticator smartphone app
Click on “Scan a QR code” then click on “OK” to allow the app to access the camera:


Look at the one-time code shown on the Google Authenticator app:

Enter the code in the Terminal window in the field: “Enter code from the app (-1 to skip):”
Enter “n” to the question: “Do you want me to update your “/root/.google_authenticator file? (y/n):”
Creating the /etc/openvpn/server/google-authenticator.keys file and entering the secret key created during enrolment of the help desk client’s Google Authenticator app.
Enter the following commands:
cd /etc/openvpn/server
nano google-authenticator.keys
Add an entry to the file in with the format “username: yournewsecretkey”:
client06a:NRX7VMDMIC6XSDFJNU3WVB3K2I
Press Ctrl-X to save and exit the file.
A note re automation
Should this process be automated further? Yes. The google-authenticator program on the server could be scripted so that the client’s username and secret code could be added to the /etc/openvpn/server/google-authenticator.keys file.
Downloading the OpenVPN client application
https://openvpn.net/community-downloads/
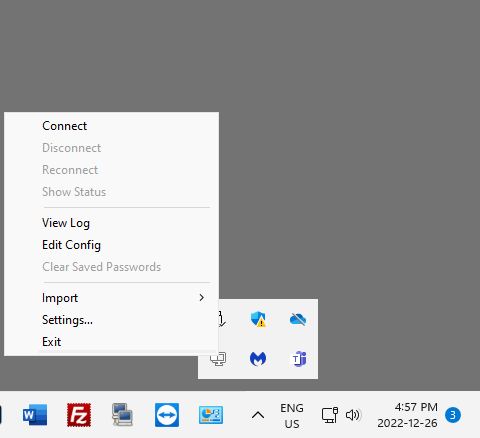
Importing the OpenVPN client profile
Import the OpenVPN client profile into the OpenVPN client application.
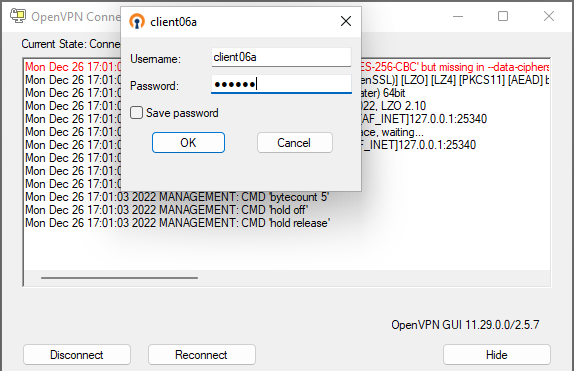
Connecting to the OpenVPN server
An example of a Windows client connecting to the OpenVPN server:
For “Username” enter the username of the VPN connection. For “Password” enter the one-time password (OTP) displayed by the Google Authenticator app:
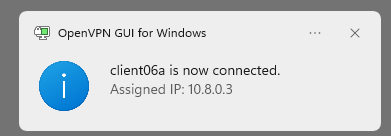
A successful connection:
References
https://egonbraun.medium.com/using-google-authenticator-mfa-with-openvpn-on-ubuntu-16-04-774e4acc2852
https://amilstead.com/blog/openvpn-with-google-authenticator-totp/
https://github.com/evgeny-gridasov/openvpn-otp
https://www.softether.org/
https://charlesreid1.com/wiki/Ubuntu/OpenVPN_Server#Adding_MFA_to_VPN_Access
https://www.howtoforge.com/how-to-set-up-openvpn-to-authenticate-with-linotp
https://www.howtoforge.com/securing-openvpn-with-a-one-time-password-otp-on-ubuntu
https://www.digitalocean.com/community/tutorials/how-to-configure-multi-factor-authentication-on-ubuntu-18-04
https://warlord0blog.wordpress.com/2022/09/01/openvpn-mfa-and-pam/
https://binsec.wiki/en/security/howto/protect-hardening/authorization-and-authentication/openvpn-configure-2fa-google-authenticator/
https://forums.openvpn.net/viewtopic.php?t=12886
https://www.freeipa.org/page/Windows_authentication_against_FreeIPA
http://pgina.org/
https://www.ezeelogin.com/kb/article/how-to-install-google-authenticator-on-centos-ubuntu-323.html
https://askubuntu.com/questions/182498/google-authenticator-for-desktop
https://unix.stackexchange.com/questions/341226/samba-not-starting-on-ubuntu-server-16-10
https://www.linuxquestions.org/questions/linux-server-73/samba-4-5-issues-4175597252/
https://serverfault.com/questions/1026344/how-can-i-setup-nat-on-my-openvpn-server-for-the-client
https://arashmilani.com/post?id=53
https://unix.stackexchange.com/questions/283801/iptables-forward-traffic-to-vpn-tunnel-if-open
https://aranel.net/tech/raspberrypi-openvpn
https://forums.openvpn.net/viewtopic.php?t=29880
https://superuser.com/questions/168128/openvpn-can-connect-but-cant-ping-or-access-the-server
https://chat.openai.com AI prompt: “create detailed instructions for the integration of google authenticator with openvpn”