When I travel, I like to carry the smallest and cheapest computer that can serve my needs, a netbook: the HP Stream 11” netbook (C$250) is a modest Intel single-core 64 bit cpu with 2 threads, 4GB of RAM, and 57GB of usable space on a 64GB eMMC drive. This computer is inexpensive, light, and disposable. This computer can be reformatted often, as it is not my main personal computer. Although this computer has light specs, the RAM and hard drive are double the size of typical netbooks. The amount of drive space makes a multiple boot environment possible, and the amount of RAM makes Windows bearable. I have also added a 64GB micro SD card for extra storage.
I use Linux for a lot of PHP programming. I also prefer Linux as a desktop for the performance, and for the privacy and freedom. I have to retain the ability to use Windows in case I need to connect to certain systems for work, and the computer is too limited in terms of CPU and RAM for virtualization. Don’t even get me started on Wine.
Partitioning a multiple-boot system with Windows and Linux
This has led me to divide the 57GB drive into a 35GB Windows 10 partition, and a 22GB Fedora 28 Linux partition. Windows must be installed first, with unallocated drive space available to the Linux installer to create a new drive partition. The Linux installer will also install a multiple boot manager which will list the Windows boot partition as an available option on startup.
Installing Windows
If you are modifying an existing Windows installation to become multiple-boot, resize the windows partition to create free, “unallocated” space, which can be used by the Linux installer.
If you are doing a fresh installation of a multiple boot system, use the Windows installer to destroy all existing partitions, then Windows system should be installed first, only partitioning the drive space needed for Windows, leaving the rest of the drive space unallocated for later use by the Linux installer.
I don’t plan to provide much further detail on how to install a Windows system, the world gives enough love to Windows already. The rest of this blog post contains my notes on installing Linux and setting up Docker containers for Linux/Apache/MySQL/PHP (LAMP) web development.
Installing Linux
Changing Fedora 28 from a sudo/wheel group implementation to a traditional box with root
Prior to Fedora 28, the operating system reflected a traditional RHEL-style box, with sudo available but requiring a true root password for some operations. It would seem that Red Hat has chosen to emulate the Ubuntu permissions model, which is that of a privileged user that owns the desktop, that belongs to the wheel group (BSD style permission to use sudo command), and that accepts the privieged user’s password to escalate to root using sudo as part of the command. To my mind, this means that the system effectively has no sandboxing or root password protection. I used the sudo su command to escalate to a root prompt, set a root password using the passwd command, edited the group file to remove the user owning the desktop from the wheel group, then rebooted.
Some general notes on setting up a Fedora 28 workstation
(My brother is the king of this kind of list.) I noticed that even when planning to do a minimal install for a temporary format for some experiments, I needed to perform the following steps to get the machine where I wanted it to be, so I decided to note them in a text file:
systemctl stop firewalld; systemctl disable firewalld
systemctl start sshd; systemctl enable sshd
dnf install nano (cause you always need a text editor)
Disable selinux:
cd /etc/selinux
nano config
set SELINUX=disabled
Set hostname:
cd /etc
nano hostname
Change gdm from Wayland back to x.org:
cd /etc/gdm
nano custom.conf
remove # in front of WaylandEnable=false
reboot
dnf clean all;dnf update
dnf install denyhosts
enable desktop sharing
adjust power settings: change timeouts for screen and hibernation on ac and battery power.
add the following repositories:
rpmfusion-free
rpmfusion-non-free
remi-release-28 (note: disabled by default you must edit the .repo file to enable prior to dnf)
(again) dnf clean all; dnf update
Accept GPG signatures, watch for missing RPM dependencies or conflicts between repositories.
Installing some favorite open-source desktop applications
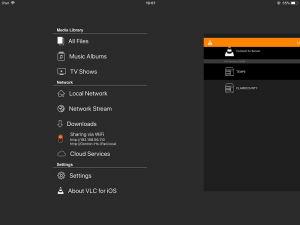
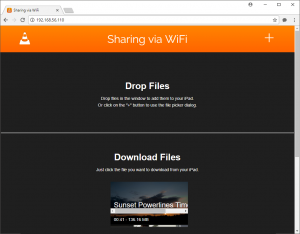
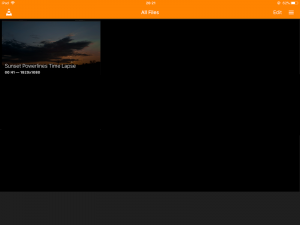
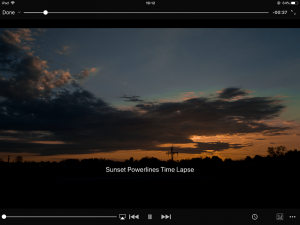
vlc: video and audio player
vncviewer: install tightvnc package
Filezilla: FTP and SSH file transfer client
rdesktop/rdp123: Windows remote desktop client
Installing binaries of proprietary software packages on Fedora 28 workstation
Some important utilities are only available as binary-only installations, you can find the installers by using Google:
Teamviewer
Skype
Installing Google Chrome on Fedora 28 workstation
On Fedora 27, installing Google Chrome was easy, the 64 bit RPM installed without a hiccup. However, on Fedora 28, I got broken RPM dependency errors, which I had to resolve one-by-one, by googling and finding the following commands:
dnf install redhat-lsb
dnf install libXScrnSaver
dnf install libappindicator
dnf install libappindicator-devel
dnf install libappindicator-gtk3
Installing Google Earth on Fedora 28 workstation
Once Google Chrome is installed with its dependencies, you can install Google Earth.
Using Docker containers to create isolated web development platforms without virtualization
On the Linux side, although the Fedora 28 workstation environment can easily support a Linux/Apache/MySQL/PHP (LAMP) server for offline web programming, it supports PHP 7.x, which is incompatible with some older software that is still in production on Centos 7.x boxen (Fedora 19, PHP 5.x). This code is being re-factored, but the new versions are not ready for production. Rant: PHP deprecates far too aggressively, and has created a demand for legacy version PHP parsers. I chose not play with batch files and symbolic links to binaries, as I was worried about creating version mismatches, especially with glue drivers that link php and mysql.
Again, because of the limitations of the hardware, creating and running a virtual machine guest is not a viable option. At a Linux meetup about a year ago, I learned about Docker and containers and thought they were stupid. Now, I realize that many things I learn at Linux Meetup will be useful later on.
Installing Docker
dnf install docker docker-compose docker-common docker-devel
systemctl start docker; systemctl enable docker
Using Docker images and docker compose files to install a Docker container environment
Rather than installing a traditional LAMP stack, I have decided to install containerized environments, one for the old PHP 5.x environment, and one for the current PHP 7.x environment. I found the following links to be helpful:
https://github.com/sp0ker/lamp-docker
Despite the Ubuntu-specific reference in one of the above links, I was able to follow the procedure on a Fedora 28 workstation.
There are endless permutations to Docker, some involving virtual machines, which I tried to avoid given the limited specs of the system on which I am installing. The 2 links above created self-contained environments that can be started using the command “docker-compose up –d” and can be stopped using the command “docker-compose down” from within the build context of the Docker container’s directory structure.
Docker has a lot of commands and options. Two commands to help get you started:
docker ps (lists running docker containers, note that what you consider a single container could actually be multiple linked containers, ie one for apache and php, another for mysql, and so on)
docker exec -it 6ca756ef1b50 bash -l (in this case, a shell login to the isolated instance of the Docker container running MariaDB/MySQL so I could run the mysql command line utility)
Due to the nature of LAMP development, most of the time access to files within your normal shell in the Docker file directories should be enough, along with phpMyAdmin on the local web server.
Tip: if you expect to be truly isolated and offline during your development, install an offline copy of the php.net website on your local system.