This procedure describes how to create a WordPress chatbot using FAISS for RAG and an external LLM API. We start by scanning the database of WordPress posts, to create a FAISS vector database. We then create an API wrapper that combines hinting information from the local FAISS database with a call to a remote LLM API. This API wrapper is then called by a chatbot, which is then integrated into WordPress as a plugin. The user interface for the chatbot is added to the sidebar of the WordPress blog by adding a shortcode widget that references the chatbot’s PHP, JavaScript, and cascading stylesheet (CSS) elements.
The chatbot accepts natural language queries, submits the queries to the RAG API wrapper, and displays results that contain the remote LLM API’s responses based on the text of blog posts scanned by the RAG system. Links to relevant blog posts are listed in the responses.
Using a recent Linux distribution to support Python 3.12 and some machine learning tools
In order to implement this procedure, we need a recent Linux distribution to support Python 3.12 and some machine learning tools. For this procedure we are using Ubuntu Server 24.04 LTS.
Using a server with relatively modest specifications
Most public-facing websites are hosted in virtual machines (VMs) on cloud servers, with relatively modest specifications. Because we are able to use an external LLM API service, we only need enough processing power to host the WordPress blog itself, as well as some Python and PHP code that implements the FAISS vector database, the RAG API wrapper, and the chatbot itself. For this procedure, we are deploying on a cloud server with 2GB RAM, 2 x vCPU, and 50GB SSD drive space.
Escalating to the root user
Enter the following command:
sudo su
Installing operating system dependencies
Enter the following command:
apt install php-curl libmariadb-dev python3-pip python3-venv
Creating a virtual environment for Python
Enter the following commands:
cd /var/www/html
mkdir ragblog_workdir
cd ragblog_workdir
python3 -m venv ragblog_env
source ragblog_env/bin/activate
Installing Python dependencies
Enter the following command:
pip install faiss-cpu sentence-transformers numpy fastapi uvicorn requests python-dotenv mariadb
Creating a .env file
Enter the following command:
nano .env
Use the nano editor to add the following text. Substitute values as appropriate for your environment:
EXTERNAL_LLM_API=https://api.lemonfox.ai/v1/chat/completions
EXTERNAL_LLM_API_KEY=xxxxxxxxxxxxxxxxxxxxxxxxxxxxxxxx
BLOG_URL_BASE=https://yourdomain/blog
DB_USER=db_user
DB_PASSWORD=db_password
DB_HOST=localhost
DB_NAME=db_name
Save and exit the file.
Creating the FAISS indexing script
Enter the following command:
nano rag_faiss.py
Use the nano editor to add the following text:
import faiss
import numpy as np
import json
import os
import mariadb
from sentence_transformers import SentenceTransformer
from dotenv import load_dotenv

# MIT license Gordon Buchan 2025
# see https://opensource.org/license/mit
# some of the code was generated with the assistance of AI tools.

# Load environment variables from .env file
load_dotenv(dotenv_path="./.env")

DB_USER = os.getenv('DB_USER')
DB_PASSWORD = os.getenv('DB_PASSWORD')
DB_HOST = os.getenv('DB_HOST')
DB_NAME = os.getenv('DB_NAME')


# Load embedding model
model = SentenceTransformer("all-MiniLM-L6-v2")

# FAISS setup
embedding_dim = 384
index_file = "faiss_index.bin"
metadata_file = "faiss_metadata.json"

# Load FAISS index and metadata
if os.path.exists(index_file):
    index = faiss.read_index(index_file)
    with open(metadata_file, "r") as f:
        metadata = json.load(f)
        metadata = {int(k): v for k, v in metadata.items()}  # Ensure integer keys
    print(f"📂 Loaded existing FAISS index with {index.ntotal} embeddings.")
else:
    index = faiss.IndexHNSWFlat(embedding_dim, 32)
    metadata = {}
    print("🆕 Created a new FAISS index.")

def chunk_text(text, chunk_size=500):
    """Split text into smaller chunks"""
    words = text.split()
    return [" ".join(words[i:i + chunk_size]) for i in range(0, len(words), chunk_size)]

def get_blog_posts():
    """Fetch published blog posts from WordPress database."""
    try:
        conn = mariadb.connect(
            user=DB_USER,
            password=DB_PASSWORD,
            host=DB_HOST,
            database=DB_NAME
        )
        cursor = conn.cursor()

        cursor.execute("""
            SELECT ID, post_title, post_content
            FROM wp_posts
            WHERE post_status='publish' AND post_type='post'
        """)

        posts = cursor.fetchall()
        conn.close()
        return posts

    except mariadb.Error as e:
        print(f"❌ Database error: {e}")
        return []

def index_blog_posts():
    """Index only new blog posts in FAISS"""
    blog_posts = get_blog_posts()
    if not blog_posts:
        print("❌ No blog posts found. Check database connection.")
        return

    vectors = []
    new_metadata = {}
    current_index = len(metadata)

    print(f"📝 Found {len(blog_posts)} blog posts to check for indexing.")

    for post_id, title, content in blog_posts:
        if any(str(idx) for idx in metadata if metadata[idx]["post_id"] == post_id):
            print(f"🔄 Skipping already indexed post: {title} (ID: {post_id})")
            continue

        chunks = chunk_text(content)
        for chunk in chunks:
            embedding = model.encode(chunk, normalize_embeddings=True)  # Normalize embeddings
            vectors.append(embedding)
            new_metadata[current_index] = {
                "post_id": post_id,
                "title": title,
                "chunk_text": chunk
            }
            current_index += 1

    if vectors:
        faiss_vectors = np.array(vectors, dtype=np.float32)
        index.add(faiss_vectors)

        metadata.update(new_metadata)

        faiss.write_index(index, index_file)
        with open(metadata_file, "w") as f:
            json.dump(metadata, f, indent=4)

        print(f"✅ Indexed {len(new_metadata)} new chunks.")
    else:
        print("✅ No new posts to index.")

if __name__ == "__main__":
    index_blog_posts()
    print("✅ Indexing completed.")
Save and exit the file.
Creating the FAISS retrieval API
Enter the following command:
nano faiss_search.py
Use the nano editor to add text to the file:
import os
import faiss
import numpy as np
import json
from sentence_transformers import SentenceTransformer  # ✅ Ensure this is imported

# MIT license Gordon Buchan 2025
# see https://opensource.org/license/mit
# some of the code was generated with the assistance of AI tools.

# ✅ Load the same embedding model used in `rag_api_wrapper.py`
model = SentenceTransformer("all-MiniLM-L6-v2")

# ✅ Load FAISS index and metadata
index_file = "faiss_index.bin"
metadata_file = "faiss_metadata.json"

embedding_dim = 384

if os.path.exists(index_file):
    index = faiss.read_index(index_file)
    with open(metadata_file, "r") as f:
        metadata = json.load(f)
else:
    index = faiss.IndexFlatL2(embedding_dim)
    metadata = {}

def search_faiss(query_text, top_k=10):
    """Search FAISS index and retrieve relevant metadata"""
    query_embedding = model.encode(query_text).reshape(1, -1)  # ✅ Ensure `model` is used correctly
    _, indices = index.search(query_embedding, top_k)

    results = []
    for idx in indices[0]:
        if str(idx) in metadata:  # ✅ Convert index to string to match JSON keys
            results.append(metadata[str(idx)])

    return results
Save and exit the file.
Creating the RAG API wrapper
Enter the following command:
nano rag_api_wrapper.py
Use the nano editor to add the following text:
from fastapi import FastAPI, HTTPException
import requests
import os
import json
import faiss
import numpy as np
from dotenv import load_dotenv
from sentence_transformers import SentenceTransformer

# MIT license Gordon Buchan 2025
# see https://opensource.org/license/mit
# some of the code was generated with the assistance of AI tools.

# Load environment variables
load_dotenv(dotenv_path="./.env")

EXTERNAL_LLM_API = os.getenv('EXTERNAL_LLM_API')
EXTERNAL_LLM_API_KEY = os.getenv('EXTERNAL_LLM_API_KEY')
BLOG_URL_BASE = os.getenv('BLOG_URL_BASE')

# Load FAISS index and metadata
embedding_dim = 384
index_file = "faiss_index.bin"
metadata_file = "faiss_metadata.json"

if os.path.exists(index_file):
    index = faiss.read_index(index_file)
    with open(metadata_file, "r") as f:
        metadata = json.load(f)
        metadata = {int(k): v for k, v in metadata.items()}  # Ensure integer keys
    print(f"📂 Loaded FAISS index with {index.ntotal} embeddings.")
else:
    index = faiss.IndexHNSWFlat(embedding_dim, 32)
    metadata = {}
    print("❌ No FAISS index found.")

# Load embedding model
model = SentenceTransformer("all-MiniLM-L6-v2")

app = FastAPI()

def search_faiss(query_text, top_k=3):
    """Retrieve top K relevant chunks from FAISS index"""
    if index.ntotal == 0:
        return []

    query_embedding = model.encode(query_text, normalize_embeddings=True).reshape(1, -1)
    distances, indices = index.search(query_embedding, top_k)

    results = []
    for idx in indices[0]:
        if idx in metadata:
            post_id = metadata[idx]["post_id"]
            title = metadata[idx]["title"]
            chunk_text = metadata[idx]["chunk_text"]
            post_url = f"{BLOG_URL_BASE}/?p={post_id}"

            # Limit chunk text to 300 characters for cleaner display
            short_chunk = chunk_text[:300] + "..." if len(chunk_text) > 300 else chunk_text
            results.append(f"📌 {title}: {short_chunk} (Read more: {post_url})")

    return results[:3]  # Limit to max 3 sources

@app.post("/v1/chat/completions")
def chat_completions(request: dict):
    if "messages" not in request:
        raise HTTPException(status_code=400, detail="No messages provided.")

    user_query = request["messages"][-1]["content"]

    # Retrieve relevant blog context
    context_snippets = search_faiss(user_query)

    context_text = "\n".join(context_snippets) if context_snippets else "No relevant sources found."

    # Send query with context to LLM API
    payload = {
        "model": "llama-8b-chat",
        "messages": [
            {"role": "system", "content": "Use the following blog snippets to provide a detailed response."},
            {"role": "user", "content": f"{user_query}\n\nContext:\n{context_text}"}
        ]
    }
    headers = {"Authorization": f"Bearer {EXTERNAL_LLM_API_KEY}"}
    response = requests.post(EXTERNAL_LLM_API, json=payload, headers=headers)

    if response.status_code != 200:
        raise HTTPException(status_code=500, detail="External LLM API request failed.")

    llm_response = response.json()
    response_text = llm_response["choices"][0]["message"]["content"]

    return {
        "id": llm_response.get("id", "generated_id"),
        "object": "chat.completion",
        "created": llm_response.get("created", 1700000000),
        "model": llm_response.get("model", "llama-8b-chat"),
        "choices": [
            {
                "message": {
                    "role": "assistant",
                    "content": f"{response_text}\n\n📚 Sources:\n{context_text}"
                }
            }
        ],
        "usage": llm_response.get("usage", {"prompt_tokens": 0, "completion_tokens": 0, "total_tokens": 0})
    }
Save and exit the file.
Running the rag_faiss.py file manually to create the FAISS vector database
Enter the following command:
python3 rag_faiss.py
Starting the RAG API wrapper manually to test the system
Enter the following command:
uvicorn rag_api_wrapper:app --host 127.0.0.1 --port 8000
Testing the RAG API wrapper with a curl command
Enter the following command:
curl -X POST http://localhost:8000/v1/chat/completions -H "Content-Type: application/json" -d '{"messages": [{"role": "user", "content": "How do I use an external LLM API?"}]}'
Creating the ragblog-faiss service
Enter the following command:
nano ragblog-faiss.service
Use the nano editor to add the following text:
[Unit]
Description=ragblog-faiss
After=network.target

[Service]
User=root
WorkingDirectory=/var/www/html/ragblog_workdir
ExecStart=/usr/bin/bash -c "source /var/www/html/ragblog_workdir/ragblog_env/bin/activate && python3 /var/www/html/ragblog_workdir/rag_faiss.py"
Restart=always
Environment=PYTHONUNBUFFERED=1
StandardOutput=journal
StandardError=journal

[Install]
WantedBy=multi-user.target
Save and exit the file.
Creating the ragblog-faiss timer
Enter the following command:
nano ragblog-faiss.timer
Use the nano editor to add the following text:
[Unit]
Description=Run monitoring tasks every 5 minutes

[Timer]
OnBootSec=5min
OnUnitActiveSec=5min

[Install]
WantedBy=timers.target
Save and exit the file.
Enabling and starting the ragblog-faiss service and the ragblog-faiss timer
Enter the following commands:
systemctl daemon-reload
systemctl enable ragblog-faiss.service
systemctl start ragblog-faiss.service
systemctl enable ragblog-faiss.timer
systemctl start ragblog-faiss.timer
Creating the ragblog-api-wrapper service
Enter the following command:
nano /etc/systemd/system/ragblog-api-wrapper.service
Use the nano editor to add the following text:
[Unit]
Description=ragblog-api-wrapper service
After=network.target

[Service]
User=root
WorkingDirectory=/var/www/html/ragblog_workdir
ExecStart=/usr/bin/bash -c "source /var/www/html/ragblog_workdir/ragblog_env/bin/activate && uvicorn rag_api_wrapper:app --host 127.0.0.1 --port 8000"
Restart=always
Environment=PYTHONUNBUFFERED=1
StandardOutput=journal
StandardError=journal

[Install]
WantedBy=multi-user.target
Save and exit the file.
Enabling and starting the ragblog-api wrapper service
Enter the following commands:
systemctl daemon-reload
systemctl enable ragblog-api-wrapper.service
systemctl start ragblog-api.service
Creating the chatbot.php file
Enter the following command (adjust values to match your environment):
nano /var/www/html/yourdomain.com/blog/chatbot.php
Use the nano editor to add the following text:
<?php
header("Content-Type: text/html");

// MIT license Gordon Buchan 2025
// see https://opensource.org/license/mit
// some of the code was generated with the assistance of AI tools.

// If this is a POST request, process the chatbot response
if ($_SERVER["REQUEST_METHOD"] === "POST") {
    header("Content-Type: application/json");

    // Read raw POST input
    $raw_input = file_get_contents("php://input");

    // Debugging: Log received input
    error_log("Received input: " . $raw_input);

    // If raw input is empty, fallback to $_POST
    if (!$raw_input) {
        $raw_input = json_encode($_POST);
    }

    // Decode JSON input
    $data = json_decode($raw_input, true);

    // Check if JSON decoding was successful
    if (json_last_error() !== JSON_ERROR_NONE) {
        echo json_encode(["error" => "Invalid JSON format"]);
        exit;
    }

    // Validate the message field
    if (!isset($data["message"]) || empty(trim($data["message"]))) {
        echo json_encode(["error" => "Invalid input: Message is empty"]);
        exit;
    }

    $user_message = trim($data["message"]); // Sanitize input

    // API request to FastAPI server
    $api_url = "http://127.0.0.1:8000/v1/chat/completions";
    $payload = json_encode([
        "messages" => [
            ["role" => "user", "content" => $user_message]
        ]
    ]);

    $ch = curl_init();
    curl_setopt($ch, CURLOPT_URL, $api_url);
    curl_setopt($ch, CURLOPT_RETURNTRANSFER, true);
    curl_setopt($ch, CURLOPT_POST, true);
    curl_setopt($ch, CURLOPT_HTTPHEADER, ["Content-Type: application/json"]);
    curl_setopt($ch, CURLOPT_POSTFIELDS, $payload);
    curl_setopt($ch, CURLOPT_TIMEOUT, 10);

    $response = curl_exec($ch);
    $http_status = curl_getinfo($ch, CURLINFO_HTTP_CODE);
    curl_close($ch);

    // Handle errors
    if ($http_status !== 200) {
        echo json_encode(["error" => "API error: HTTP $http_status"]);
        exit;
    }

    // Return API response
    echo $response;
    exit;
}

// If not a POST request, show the chatbot UI
?>
<!DOCTYPE html>
<html lang="en">
<head>
    <meta charset="UTF-8">
    <meta name="viewport" content="width=device-width, initial-scale=1.0">
    <title>Standalone PHP Chatbot</title>
    <style>
        #chat-container {
            width: 100%;
            max-width: 350px;
            padding: 10px;
            border: 1px solid #ccc;
            background-color: #fff;
        }

        #chat-input {
            width: calc(100% - 60px);
            padding: 5px;
            margin-right: 5px;
        }

        button {
            padding: 6px 10px;
            cursor: pointer;
        }

        #chat-output {
            margin-top: 10px;
            padding: 5px;
            background-color: #f9f9f9;
            max-height: 200px;
            overflow-y: auto; /* Enables scrolling */
            border: 1px solid #ddd;
        }
    </style>
</head>
<body>

<div id="chat-container">
    <input type="text" id="chat-input" placeholder="Ask me something...">
    <button onclick="sendMessage()">Send</button>
    <div id="chat-output"></div>
</div>

<script>
    async function sendMessage() {
        let userMessage = document.getElementById("chat-input").value.trim();
        let chatOutput = document.getElementById("chat-output");

        if (!userMessage || userMessage.length > 500) {
            chatOutput.innerHTML = "<i>Invalid input. Please enter 1-500 characters.</i>";
            return;
        }

        chatOutput.innerHTML = "<i>Loading...</i>"; // Show loading text

        try {
            let response = await fetch("chatbot.php", {
                method: "POST",
                headers: { "Content-Type": "application/json" },
                body: JSON.stringify({ message: userMessage })
            });

            let data = await response.json();
            if (data.error) {
                throw new Error(data.error);
            }

            let formattedResponse = data.choices[0].message.content.replace(
                /(https?:\/\/[^\s]+)/g,
                '<a href="$1" target="_blank">$1</a>'
            );

            chatOutput.innerHTML = `<p>${formattedResponse}</p>`;
        } catch (error) {
            console.error("Error:", error);
            chatOutput.innerHTML = `<i>Error: ${error.message}</i>`;
        } finally {
            document.getElementById("chat-input").value = "";
        }
    }
</script>

</body>
</html>
Save and exit the file.
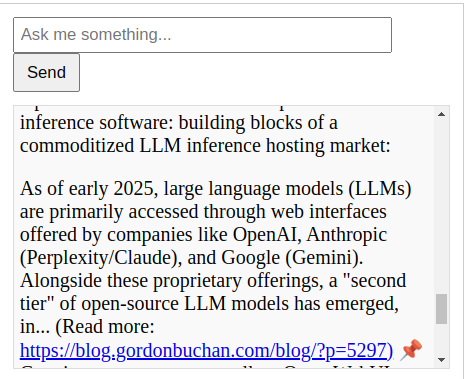
Testing the chatbot.php file
Use a web browser to visit the address of the chatbot (modify values to match your environment):
https://yourdomain.com/blog/chatbot.php
Suggested query: “Tell me about LLMs.”
Creating the WordPress plugin directory
Enter the following commands:
cd /var/www/html/yourdomain.com/blog/wp-content/plugins
mkdir rag-chatbot
cd rag-chatbot
Creating the rag-chatbot.php file
Enter the following command:
nano rag-chatbot.php
Use the nano editor to add the following text:
<?php
/**
 * Plugin Name: RAG Chatbot
 * Description: A WordPress chatbot powered by chatbot.php.
 * Version: 1.3
 * Author: Gordon Buchan
 */

// MIT license Gordon Buchan 2025
// see https://opensource.org/license/mit
// some of the code was generated with the assistance of AI tools.

function rag_chatbot_enqueue_scripts() {
    // ✅ Load scripts from the plugin directory
    wp_enqueue_script('rag-chatbot-js', plugin_dir_url(__FILE__) . 'rag-chatbot.js', array(), '1.3', true);
    wp_enqueue_style('rag-chatbot-css', plugin_dir_url(__FILE__) . 'rag-chatbot.css', array(), '1.3');
}
add_action('wp_enqueue_scripts', 'rag_chatbot_enqueue_scripts');

function rag_chatbot_shortcode() {
    ob_start(); ?>
    <div id="chat-container">
        <input type="text" id="chat-input" placeholder="Ask me something...">
        <button onclick="sendMessage()">Send</button>
        <div id="chat-output"></div>
    </div>
    <?php
    return ob_get_clean();
}
add_shortcode('rag_chatbot', 'rag_chatbot_shortcode');
?>
Save and exit the file.
Creating the rag-chatbot.js file
Enter the following command:
nano rag-chatbot.js
Use the nano editor to add the following text:
async function sendMessage() {
    let userMessage = document.getElementById("chat-input").value.trim();
    let chatOutput = document.getElementById("chat-output");

    console.log("User input:", userMessage); // Debugging log

    if (!userMessage || userMessage.length > 500) {
        chatOutput.innerHTML = "<i>Invalid input. Please enter 1-500 characters.</i>";
        return;
    }

    chatOutput.innerHTML = "<i>Loading...</i>";

    try {
        let response = await fetch("/blog/chatbot.php", { // ✅ Calls chatbot.php in /blog/
            method: "POST",
            headers: { "Content-Type": "application/json" },
            body: JSON.stringify({ message: userMessage })
        });

        console.log("Response received:", response);

        let data = await response.json();
        if (data.error) {
            throw new Error(data.error);
        }

        chatOutput.innerHTML = `<p>${data.choices[0].message.content.replace(
            /(https?:\/\/[^\s]+)/g,
            '<a href="$1" target="_blank">$1</a>'
        )}</p>`;
    } catch (error) {
        console.error("Error:", error);
        chatOutput.innerHTML = `<i>Error: ${error.message}</i>`;
    } finally {
        document.getElementById("chat-input").value = "";
    }
}
Save and exit the file.
Creating the rag-chatbot.css file
Enter the following command:
nano rag-chatbot.css
Use the nano editor to add the following text:
/* Chatbot container */
#chat-container {
    width: 100%;
    max-width: 350px; /* ✅ Works in sidebars and posts */
    padding: 10px;
    border: 1px solid #ccc;
    background-color: #fff;
    border-radius: 5px;
    box-shadow: 2px 2px 10px rgba(0, 0, 0, 0.1);
    font-family: Arial, sans-serif;
    display: flex;
    flex-direction: column;
    gap: 10px;
}

/* Input field */
#chat-input {
    width: calc(100% - 70px);
    padding: 8px;
    border: 1px solid #aaa;
    border-radius: 3px;
    font-size: 14px;
}

/* Send button */
button {
    padding: 8px 12px;
    cursor: pointer;
    background-color: #0073aa; /* ✅ Matches WordPress admin blue */
    color: #fff;
    border: none;
    border-radius: 3px;
    font-size: 14px;
    font-weight: bold;
}

button:hover {
    background-color: #005d8c;
}

/* Chat output area */
#chat-output {
    margin-top: 10px;
    padding: 8px;
    background-color: #f9f9f9;
    max-height: 250px; /* ✅ Scrollable output */
    overflow-y: auto;
    border: 1px solid #ddd;
    border-radius: 3px;
    font-size: 14px;
}

/* Ensures long responses don’t overflow */
#chat-output p {
    margin: 0;
    padding: 5px;
    word-wrap: break-word;
}

/* Links inside chatbot responses */
#chat-output a {
    color: #0073aa;
    text-decoration: underline;
}

#chat-output a:hover {
    color: #005d8c;
}

/* Mobile responsiveness */
@media (max-width: 500px) {
    #chat-container {
        max-width: 100%;
    }

    #chat-input {
        width: 100%;
    }
}
Save and exit the file.
Activating the WordPress plugin
Enter the WordPress admin console.
Go to the section “Plugins”
Click on “Activate” for “RAG Chatbot”
Adding the shortcode widget to add the chatbot to the WordPress sidebar
Go to the section “Appearance” | “Widgets.”
Select the sidebar area. Click on the “+” symbol. Search for “shortcode,” click on the short code icon.

In the text box marked “Write shortcode here…”
Enter the shortcode:
[rag_chatbot]

Click on Update.
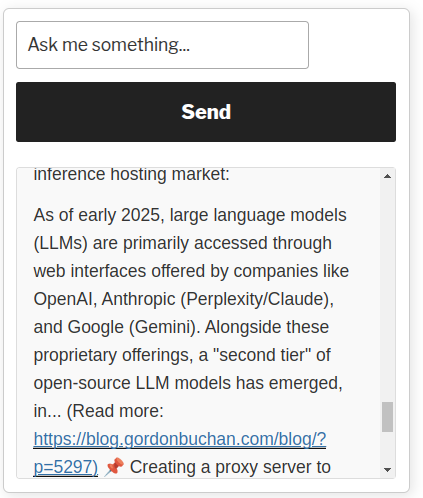
Checking that the chatbot has been added to the sidebar of the blog
Go to the main page of the blog. Look to ensure that the short code element has been added to the blog’s sidebar. Test the chatbot (suggested query: “Tell me about LLMs.”):